There is no specific sweeping that can be called the best or perfect. The perfect sweeping is about adapting the make-up to the shape of the eyes and what exactly you feel good and comfortable in.
The perfect sweeping for me may not suit another person at all, if you do exactly the same.
But here come mine 10 best tips to get the perfect sweep for you! :)

Step 1 - Darkness
Do you enjoy very dark and intense make-up, or do you feel slightly over-made up?
If you thrive in the dark, I recommend using a lot of black eyeliner in addition to the black eye shadow. With the eyeliner along the waterline, down on the lower lash line and quite wide on the upper lash line, you easily get that carbon black really intense feeling! You can also apply black make-up in the corner of the eye to really frame the whole eye.

Step by step on this makeup is available here!
If, on the other hand, you feel easy for dark around the eyes, so try to lighten the inside of the eye. You can lighten up as much as the inside of the eyelid or maybe even the entire lower lash line, but just a little light shimmer in the corner of the eye actually does a lot even if you want to remove that intense feeling you get by sooting around the entire eye.

Step by step on this makeup is available here!
Step 2 - Use eyeshadow primer
Some say that a soot becomes softer and easier to soot if you skip primer, and that is true because the eye shadows do not adhere as well and do not become quite as strong, then the look becomes a little more "soft". But if you, like me, have very oily eyelids (most people do, even if you are not oily on the rest of the face), the eye shadow will fold on the eyelid after a few hours, which is especially noticeable when you have dark eye shadows.
My favorite primer is Lumene Eye Shadow Primer, ca 115kr.
Step 3 - Effect
It can be very difficult to look at yourself in the mirror and then look at some kind of template and say "I have eyes like this, then I should have such a shape on my sweeping". What I usually think about instead is what do I want to achieve for results? What effect do I want the make-up to give? Do I want to look up more, make my eyes look bigger, or just frame my eyes?
I show two examples, of Karin and Linda:
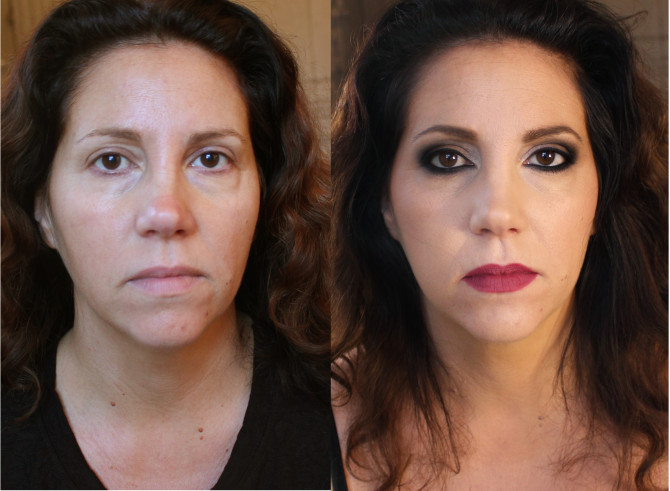
On Karin I wanted to do a sweep that lifts her eyes (which with age has started to hang a little, a little in the outer corner of the eye) at the same time I want to open my eyes and make her eyes look bigger.
Therefore, I chose to mark the lower lash line quite strongly, so that you get the intense feeling. Then I worked up the black shadow along the globe line so that the eye "follows up" in the semicircle. This prevents the eye from going down as much as it does.
Then I chose relatively light eye shadows on the rest of the eyelid and in the corner of the eye, to open up the gaze so that the eyes look big and alert.
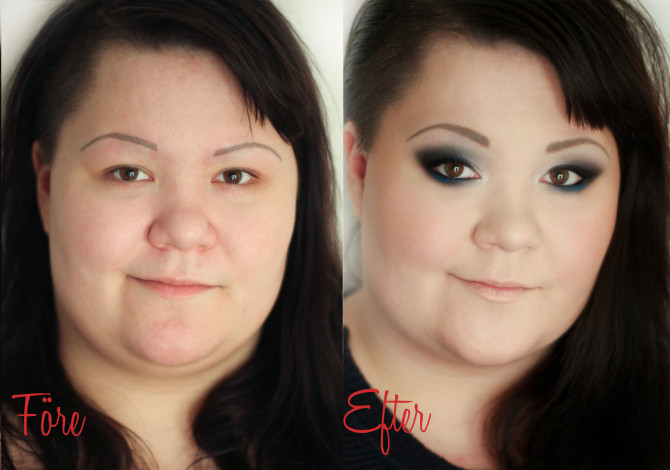
For Linda, who has slightly smaller eyes, I instead chose a more elongated cat eye shape that lifts up and "pulls out" the gaze a little more. I have also chosen to lighten up the inner edges to make the eye look more open. The eyelids themselves are very small, but since she has a large area under the brow, you should not be afraid to soot up a lot over the real globe line!
The biggest difference in their eye shapes is that Karin is more round while Linda is very almond shaped. The easiest way is therefore to make a more elongated shape on the almond eye and a more rounded shape on the rounded eye. If, on the other hand, you want your round eyes to look more almond-shaped, or that an almond-shaped eyes should look more round - then you do the opposite!
Step 4 - Adjust to eye shape
As you have hopefully understood, there is not only one form that is right for one eye, it depends on what you are looking for results and what you enjoy.
But there is a guideline that you can get help from regardless, to get the sweeping adapted to your own eye! What I'm talking about is the slope of the lower lash line, if you follow it when you blur outside the eye, you automatically get a shape that suits your eye. This applies both if you make a cat eye shape or a more rounded sweep.

Hope you see what I mean!
Step 5 - Release the panda eyes
The reason why many people get typical panda sootings that only look like two large holes, is because you do not adapt the sooty shape to the eye. I'm talking partly about the tip you got in "step 4", but there is another trick you can use to get a more "shaped shape".
* Either you can soot wider in the outer edges and a little narrower in the middle, to get a more almond-shaped eye.
* Or you can soot higher in the middle of the eyelid, and lower in the middle of the lower lash line, to open up the eye more.
 Hope you understand my dot pictures! In any case, this is how you get a clearer shape that suits the eye better and gives a more harmonious impression.
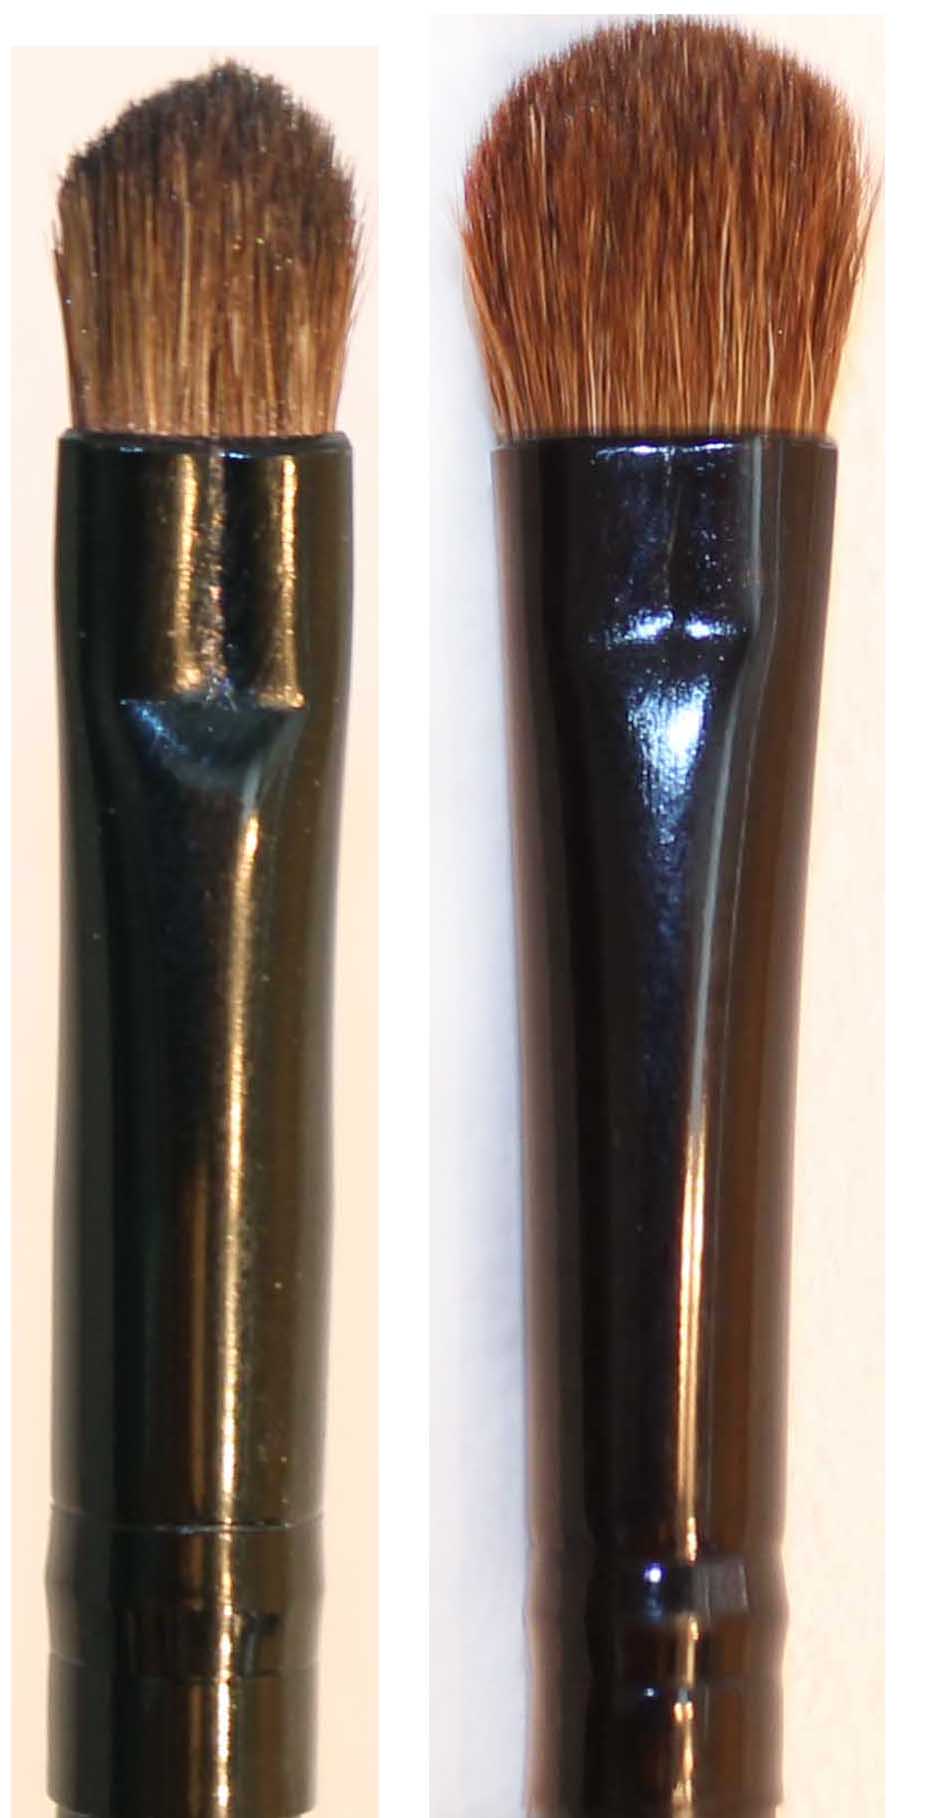
Step 6 - Makeup Brushes
Everyone uses different types of brushes, it is very much a matter of taste. For just sweeping, I usually only have soft fluffy brushes, what sets them apart is the size.
Application - Medium-sized soft makeup brush.
Erasing - Large, soft and fluffy makeup brush.
Step 7 - Technique
How to use the brushes when making a sweep is not so easy to know. This is what I usually do:
1. Dab black eyeshadow on the entire eyelid with the smaller brush. It is important that you dab and not pull, and that you apply properly with eye shadow so that you saturate the primer and get an even black result.
2. Then blur the edges by pulling back and forth in the middle of the line between the skin and the black eye shadow. Use the larger brush for this. You should only blur the edge, not the entire eyelid.
Feel free to take a little eye shadow at a time if you are unsure, it is easier to add extra than to remove.
Step 8 - Highlight
There are thousands of ways to vary a sweep, how to highlight and match with the rest of the makeup.
Black sweeping and red lips are classic, but many say that you should either opt for "a lot of eyes" or "a lot of lips" and that therefore nude lips are better for a sweeping. Otherwise, there will be a lot of make-up at the same time as you steal focus from the eyes. I myself only partially agree, because while bright lips of course emphasize the intense eyes more, you get more balance in the face if not everything ends up in the same place on the face.
Do as you please, I say, but my basic rule is:
Dark eyes and colorful lips - Very little blush.
Dark eyes and light lips - More blush / shading & highlighter.
No matter what you do then, you still get balance in the face, without being made up! And if you are unsure, you can always choose an intermediate color on the lips and you have solved the problem :)
You can also add a little color to a sweep, for example to match the clothes or to emphasize the eye color. Gold if you have blue eyes, blue and you have brown and purple and you have green. Or, for example, silver glitter if you wear silver jewelery.

Nicolin's make-up (far left) I have matched the sweeping with red lips. However, I have only smoked quite discreetly on the lower lash line, so as not to get a very sharp look.
On Frida's sweeping (along the right) I have added purple eye shadow to highlight her green eyes!
Step 9 - Hard to get a nice fade?
The idea with a sweep is that it should be so faded that you do not see where the eye shadow ends and the skin color begins. This can be a little difficult in the beginning when you are not used to it, then you can apply a little brown eye shadow right in the transition when you smoke. It is easier to get a brown eyeshadow to blend in with the skin, than a black one.
You can also take your blush brush or foundation brush that still has a little make-up on and pull with it a little lightly just in the transition.
Step 10 - Video tutorial
You can read as much as you like about make-up, but the very best thing is to really see it in front of you. And I actually did a video tutorial where I just do smoky eyes! It does not work for me to publish videos here on Modernmom, but here is a full picture of the result and you can find the video on Youtube here!

Hope this post was helpful! :)
You get more tips and make-up daily on Imakeyousmile.se!