My business week

I have been thinking about how to get more entrepreneurship into the blog, partly because there are some who have requested it and also because I usually get good feedback every time I write about my company and because I think it's great fun!

Many people have a hard time identifying themselves as entrepreneurs, but if I had to choose between that and a makeup artist, I actually feel more like an entrepreneur actually :) in the long run.

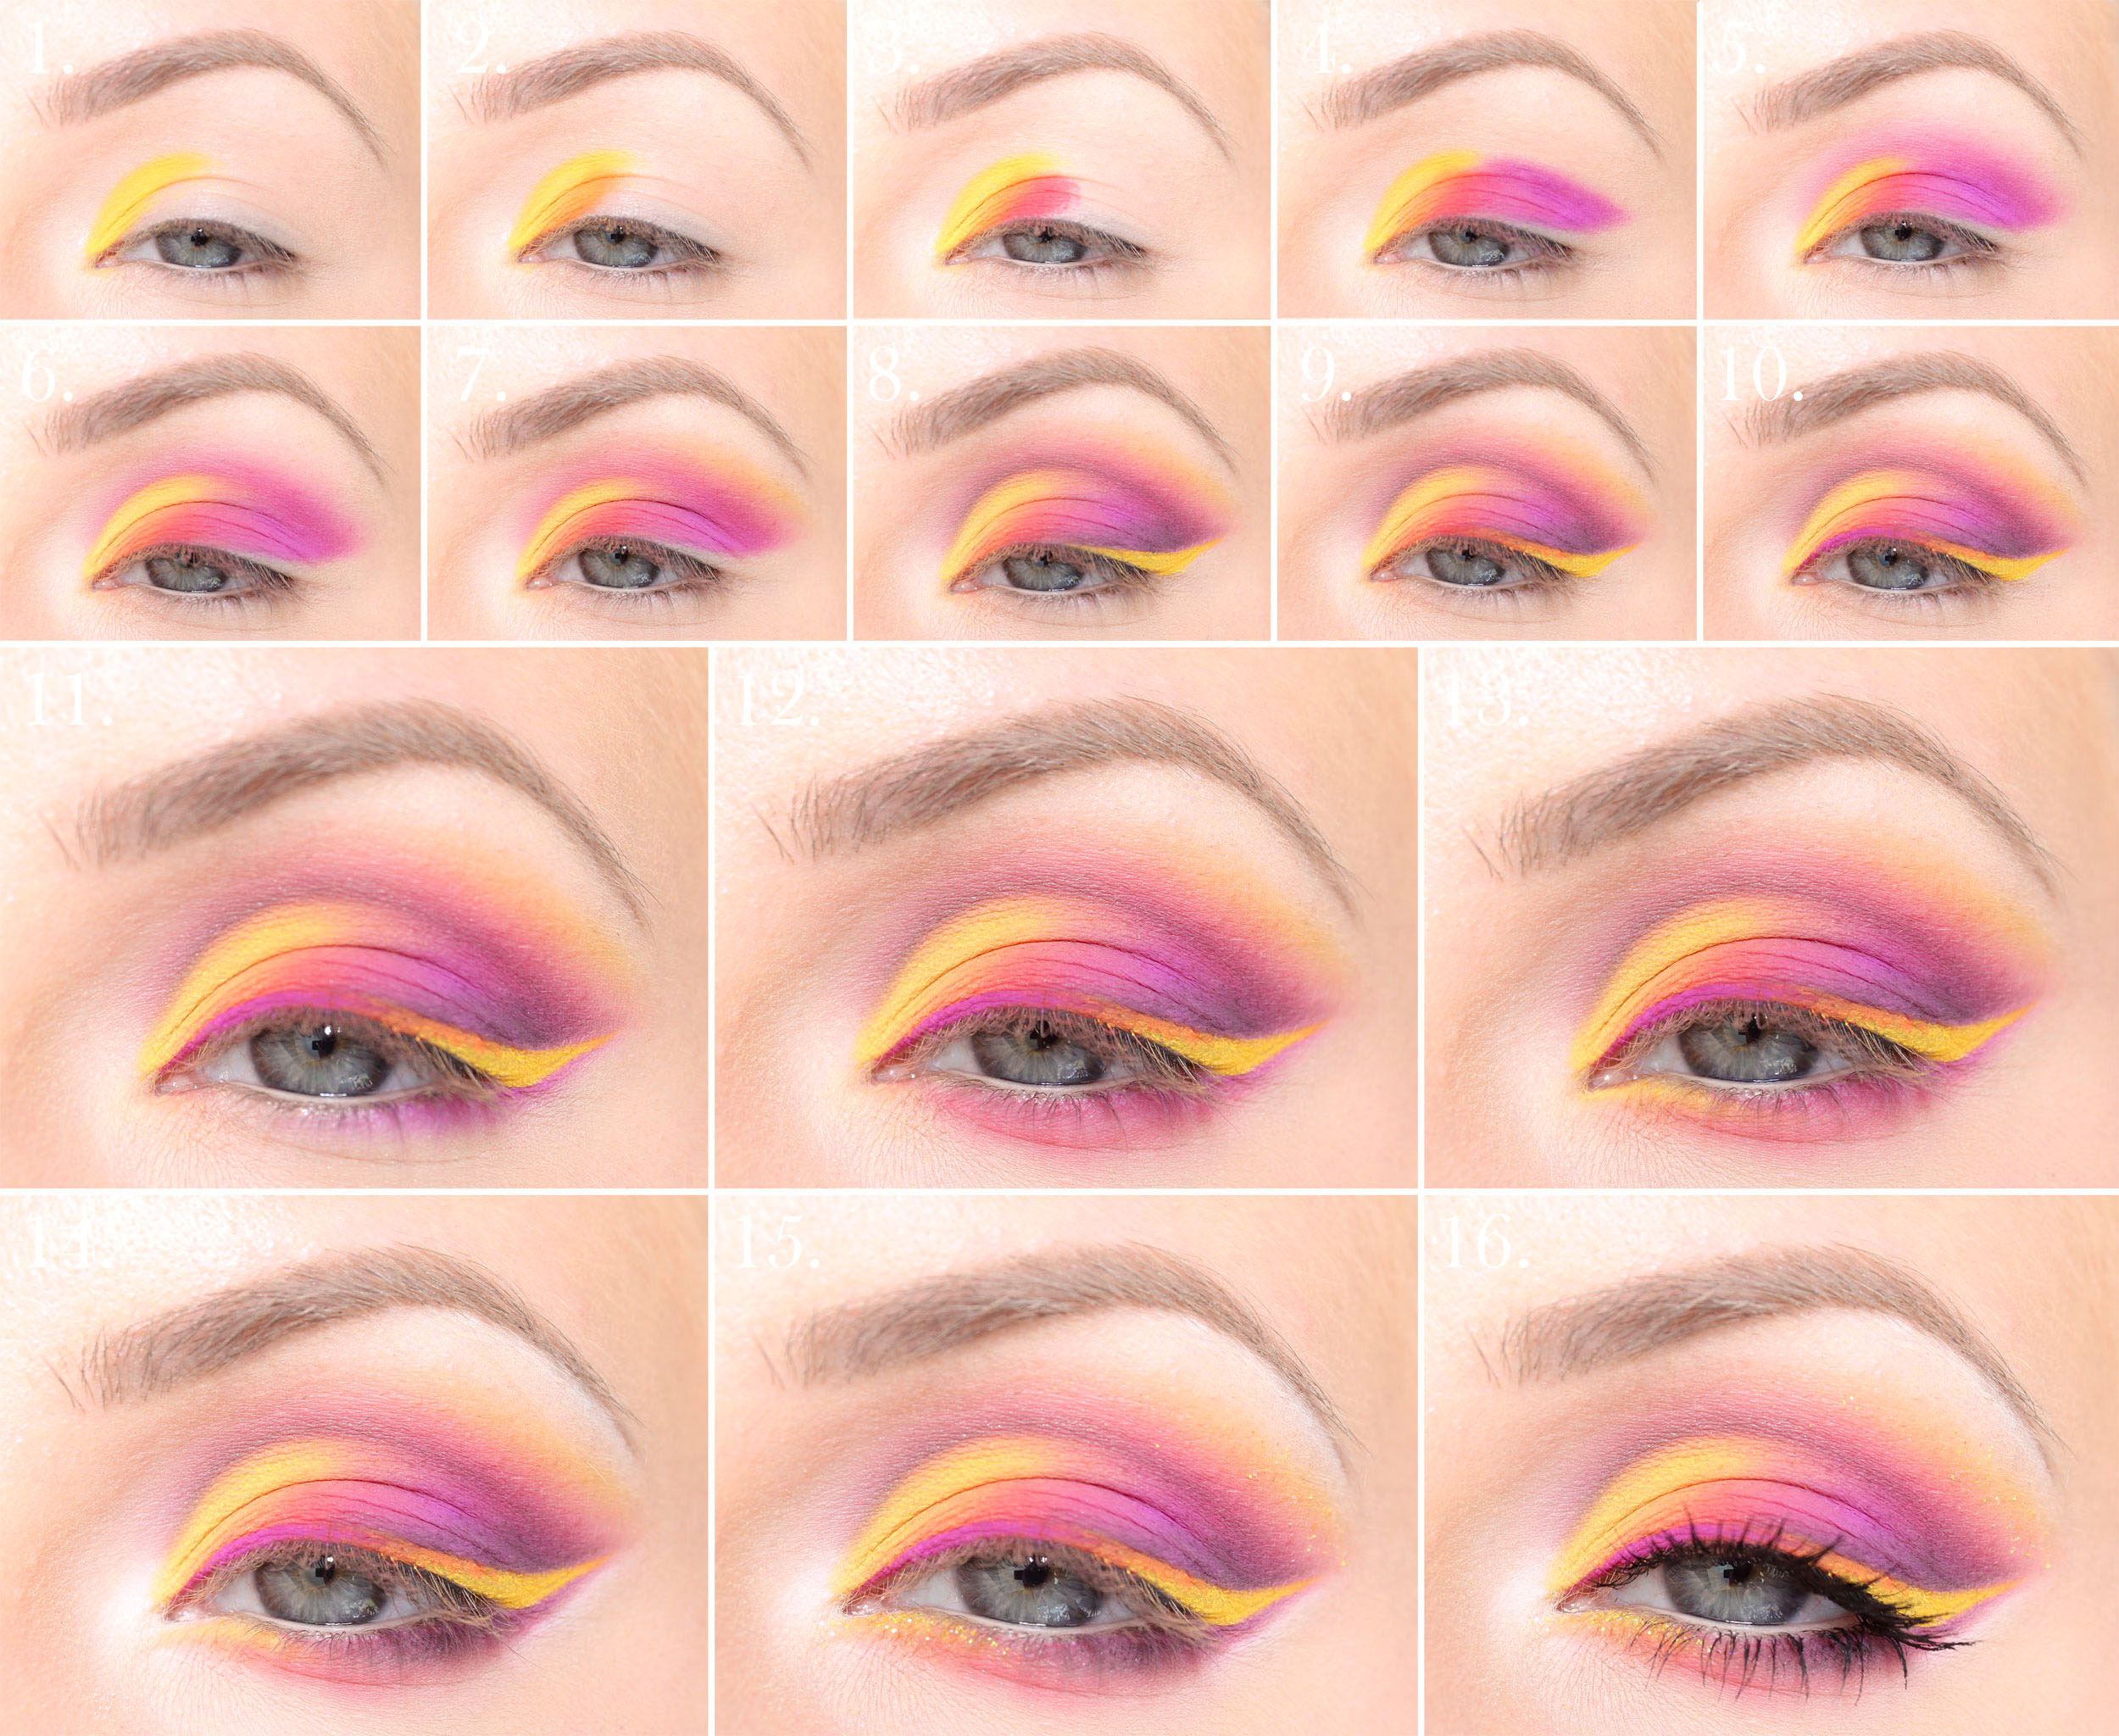
And my focus, no matter what I write about, is not just to inspire but also to give you tips on how you too should succeed! This applies regardless of whether it is about making a nice eyelinervinge or starting your own webshop :) In addition, company talk is often inspiring even if you do not have a company yourself, it is always possible to apply tips to your job and private life as well.

So my idea now is to make a post about my business week every Sunday! Today comes the first post and it certainly happens to be Wednesday today but the first business week gets a waiver;) Hope you think it will be fun!

1. Meeting with the employment service
I was really hot inside after a meeting I had with the employment service regarding an intern who will start with us tomorrow.

I'm used to getting praise for my job, but 99.9% of all compliments is about my make - up, our good products, etc. But something I'm not spoiled by is getting praise for being a good entrepreneur and employer! When I talked about how we should set up the internship, how we work at the salon and all that, the supervisor jokingly asked if she could send other employers on a course with me haha! I got a lot of praise, which I was not prepared for at all, so it was really a boost for self-confidence! :)

2. Creative Makeup Kickoff 2017!
Basically all the time last week was spent preparing for Friday's kickoff with the whole team! We were on Odalgården outside Uppsala (highly recommended, we were there last year too) and it was a really successful day, everyone felt so excited and we got really good feedback.

The most important thing we presented was our new target image that we will reach no later than June 30, 2018 and I held the entire presentation around it!

This is how we work:

  1. Goal image - First, we presented our goal picture, 4 clear points with how we want the company to look within a year. But it is not enough to decide a goal picture and then go back to work and just hope that the dream comes true, but you have to start and work in the right direction to get there.
  2. Current status image - And to know what we are going to do, we have to look at what the business looks like today, what opportunities do we have and what needs to be improved? This is broken down into different categories.
  3. Strategic focus - But all the points listed above we can not do at once (even if you want!) But you have to look at which points are most prio and start with them. These most acute points can be summarized as a sub-goal, which must be achieved earlier than the goal picture.
  4. Key figures - Now we know where we will and how we must start working to get there, but we must also be able to follow up that it is going in the right direction - and above all have time to do something about it not going in the right direction. We do this with key figures that are specific things you measure to see if it progresses. The key figures are not necessarily figures on sales and such, but you can measure just about anything, how well you follow routines, etc.

We did all this exactly one year ago and we reached those goals this June! :) And now I presented our new goal picture, focus and key figures that we will put our teeth into in the coming year!

In addition to talking about concrete facts such as goals and structures, we also told a little about our background and how it came about that we, me, Annika and Miska, merged our companies 2 years ago.

For the past year, we have become many more at the salon and they have more or less been thrown into the business and have gotten to know each other over and over again. But since we are two companies that merged, it is important that everyone knows about the background, we have some customers who have been on Annika's journey in her first salon (or kind of scrub as it was then haha) while some have come from my kept and followed my blog and webshop since I went to high school.

After group work and coffee out in the sun, Annika gave a presentation on personal development, which we will start working on more in the coming year. Because we are sooo happy with our team at the salon and really want them to feel that they are growing with U.S.

Annika started Creative Makeup almost 11 years ago and do you know that only 2% of all Sweden's companies survive for over 10 years? So it's really good!

During that time, she has not only gathered the world's largest knowledge bank in permanent makeup, but also in personal development and what is important in life.

Annika also showed this ironic image in her presentation, what is important in life? You will not lie on the deathbed and think that you should have spent a little more time at work as well :) Just because you do something fun does not mean that you do not need time to rest too, regardless of whether you own a company or are employed . We have such good people with us so we do not have to worry about them not doing their best, and are very careful that they have balance in life and feel good.

It was a long way to the kickoff but it's basically that and brow picking that has reflected my entire business week this week haha! And it all ended with a wonderful dinner with lots of laughter and bullshit, so cozy!

Hope you thought this setup was a little fun. On Sunday there will be an update about this week and it will be very mixed with big and small and rice and rose :)

Hugs are!

Reverse ombré eyeliner - Light makeup

When I put on make-up, a "make-up I feel good in" and a "make-up that is the most fun to do" are usually two different things. But today's make-up is an exception as it was very creative and fun to do and at the same time a make-up you easily feel comfortable in as it is not particularly prominent.

Hope you like it too!

Bassmink:
Colored day cream - Pixi Illuminating Tint & Conceal (2 Nude)
Concealer - Pixi Pat Away Concealer (2 Nude and 1 Cream) (news coming soon)
Foundation - Pixi H2O Skinint (2 Nude)
Contouring & highlighter - Pixi Contour Creator
Rouge - Paese Powder Blush (35)
Fixing mist - Pixi makeup fixing mist
Net matting powder - Paese Bamboo Silk Powder

Brynpenna - gloMinerals Micro Brow Liner (Ash and Dark brown)

Lips - Benecos natural lip liner (Brown) all over the lips and gloMinerals Lipstick (Blush) in the middle of the lips.

What do you think? :)

  1. Eyeshadow primer, Pixi eye bright primer
    White eye shadow on the inside of the eyelid, Paese cashmere (601)
  2. Light brown eye shadow in the middle of the eyelid and dark brown at the end of the eyelid (and save a small part where the eyeliner wing should be), Paese Matte Eyeshadow Trio (101)
  3. Brown eye shadow also along the globe line
  4. Apply with white eyeshadow so that the contrast with the globe line is sharper and the gradient with the brown shadow on the eyelid is softer
    The eyeliner is made with the same eye shadows as above and mixed with Kryolan Cake Liner Sealer:
  5. Dark brown eyeliner at the bottom of the lash line
    Lice brown eyeliner in the middle of the lash line
  6. White eyeliner and wing
  7. Brown eyeshadow along the lower lash line
  8. Black mascara on all lashes, Magnetic lash mascara

Clear!

Hugs are!

Real Rebel & Magnetic lash in stock again!

The Santhilea brand has been out of stock in the webshop for a while due to delays at our distributor. But now I managed to order directly from London instead, I have my contacts because it is my eyes they have on all their displays;)

So now there is our best-selling lipstick Real Rebel in stock again and we have also received refills of Magnetic Lash Mascara!

From green to red! Real Rebel is a green lipstick that reacts with the skin's own chemistry and becomes the perfect red-pink tone for your lips.

How Real Rebel works:

  1. The lipstick reacts to pH value, which gives the lips a reddish-pink tone
  2. Blue and yellow pigments then neutralize the red and orange tones in your own lip color
  3. The waxes in the lipstick react to heat and become more colorful the longer it lasts, which boosts durability as the color compensates and becomes stronger when part of the lipstick begins to disappear
  4. The lipstick is opaque but is also adapted to the darkness of your own lip color.

Long shelf life and caring with shea butter, vitamin E, beeswax and jojoba oil.

On me the color becomes very pink and I think it's because I have my lip tattoo underneath. On most it will be a milder tone, usually a mild pink but some go more to red / raspberry. Very exciting! :)

The lipstick costs SEK 199 and you can read even more about it in this post!

As I said, we have also filled the warehouse with Magnetic lash mascara! When you buy mascara, you also get a sleeve with fibers, so you can vary and use only mascara some days, put on some fiber other days and put on lots of fiber e.g. to the party! :)

  1. Apply mascara on one eye, I usually do one at a time so that the cream does not have time to dry on one eye while I do the other. The fibers attach more when the mascara is still creamy.
  2. Apply the fibers from the middle of the lashes up to the tops, or as you prefer (you can only put in the outer edges or only the tops if you want)
  3. Finish with another layer of mascara and build up the desired length
  4. You can apply more layers if you want more effect. I find that it is better to add a little at a time than lots of fiber directly. Just as you see in the pictures above, in the middle I only have a little fiber and in the picture to the right I have added another round of fibers and mascara.

Read more about mascara and more ways to get longer eyelashes this post!

Both products have received 5-star reviews in our webshop :)

Shout out if you have any questions!

Cover a scarlet pimple - with Redness Relief Powder

How big are the odds that you get a big scarlet pimple preciiis in the middle of the cleavage? :) But my symmetry eye liked it very much haha!

In any case, I thought to put this pimple on a little useful, so that it is not completely useless, and took the opportunity to show how to use gloMinerals Redness Relief Powder to quickly cover a pimple that looks like a red light.

Or "Glo Skin Beauty" I should write as the brand has just changed its name! But I keep calling it gloMinerals until we get all the products in the new packaging :)

When I was done, I asked my sister (who had seen what the finn looked like before, how could she like haha) "of course you can not believe that I have a scarlet pimple here under the makeup?” ”No, not really!She said impressively :) So it not only looks good on cards but in reality too!

gloMinerals Redness Relief Powder removes red tones, it is mineral based but not opaque but only neutralizes the redness. And it's so effective!

As you can see in the picture above, this powder has come in a completely changed packaging. Now it is a brush from which powder automatically comes out when you swipe it over the face. The bottom of the package is a lid so you can also unscrew from the bottom and dip the brush directly into the powder. So it's good for me who overuse and almost bathe in this powder daily;)

So, for a thin layer of sweep with the brush over the skin, you get the right amount of powder automatically. For more powder, unscrew the lid on the underside and dip your makeup brush directly into the powder.

I personally was actually not happy when I saw this change of packaging, it does not have to be so heavenly innovative even when an ordinary honest jar works so smoothly, is my opinion. But the powder itself is so good that I would use it even if it came in an ugly plastic bag;) If they had removed the powder from the range, then you would have seen a crazy Helena!

Here's what I did:

Swipe on gloMinerals Redness Relief Powder with a soft brush. Do you see what a difference already? No coverage at all but just removed with the redness :)

You can actually stop already at this step if you just want the fin not to be so prominent but that it does not matter if it is slightly visible. Because it is hardly the case that others will think of it when it is already so little visible. But I will show more steps to conjure it away completely!

The fin is not completely new but has become a bit dry and damn well, which is usually the hardest part to remove make-up because it often just gets itchy and uneven. Therefore, I have also supplemented with a creamy concealer to get a moisturized result:

2. Dab on gloMinerals Under Eye Concealer (Beige), I have applied with Eco Minerals Concealer & Angled Brush. A thin layer is enough.

3. Spread the concealer by pulling with the brush only at the edges, so you do not have to pull with the brush over the entire fin because then you can easily "pull off" the powder and concealer so that the fin begins to appear again.

4. The concealer needs to be fixed with powder for it to last well all day. You can use any transparent powder if you are happy with the coverage already, but I usually swipe on a little more Redness relief powder for extra effect.

5. When you put on a lot of make-up in just a small area and are completely unmade-up all around, it can easily look a bit unnatural, because even though the coverage is natural, it is still quite a lot of make-up to be able to cover a large pimple, and the make-up has a slightly different surface than the unmade-up skin.

Clear! :) ♥

Colorful cut crease makeup tutorial

Today's make - up I had when Antonio Axu celebrated 20 years as a hairdresser with a hair show at Café Opera, so much fun!

I had an all-black, simple outfit and updo hair in a slightly sloppy knot, and enlivened it all with lots of färg på islandgOnen! :)

Hope you like the look and get use of my step by step description!

Bassmink:
Colored day cream - Pixi Illuminating Tint & Conceal (2 Nude)
Concealer - Pixi Pat Away Concealer (2 Nude and 1 Cream)
Foundation - Pixi H2O Skinint (2 Nude)
Contouring & highlighter - Pixi Contour Creator
Rouge - Paese Powder Blush (35)
Fixing mist - Pixi makeup fixing mist
Net matting powder - Paese Bamboo Silk Powder

Brynpenna - gloMinerals Micro Brow Liner (Ash and Dark brown)

Lips - gloMinerals Suede Matte Crayon, the shade (Sorbet) on the entire lips and (Bombshell) on the edges.

What do you think? :)

All colorful eye shadows are Paese NEO Eyeshadow, the shades are just called numbers.

  1. Eyeshadow primer, Pixi eye bright primer
    Yellow eye shadowgive the innermost part of the eyelid (662)
  2. Orange eye shadow next to the yellow (663)
  3. Red eye shadow next to the orange (664)
  4. Purple pink eye shadow on the rest of the eyelid (650)
  5. … And along the globe line
  6. Fill with yellow eye shadow to make the globe line even sharper
  7. Yellow eye shadow in the fade as well
    The colorful eyeliner are the above shades mixed with Kryolan Cake Liner Sealer to get them floating.
  8. Yellow eyelinervinge
    Black eye shadow at the end of the eyelid and in the globe line for more depth in the make-up, Paese cashmere eyeshadow (602)
  9. Orange and red eyeliner in the middle of the lash line
  10. Purple eyeliner at the bottom of the lash line
  11. Purple pink eye shadow at the bottom of the lower lash line and under the eyeliner
  12. Red eye shadow in the middle of the lower lash line
  13. Yellow eye shadow at the bottom of the lower lash line
  14. White eye shadow in the corner of the eye, under the brow and under the purple-pink under the eyeliner, Paese cashmere eyeshadow (601)
    Black eye shadow at the bottom of the lower lash line, Paese cashmere eyeshadow (602)
  15. Yellow glitter deep on the lower lash line and on the yellow in the fade, glitter is an old one I had at home and it is attached with Kryolan Cake Liner Sealer
  16. Black mascara on all lashes, Magnetic lash mascara

Clear!

The make-up is many steps and a lot of pill, but if you only take a little at a time and are careful, it is easier than it looks if you just look at the finished picture. It is only when you get all the details and the mascara in place that it looks nice :)


Hugs are ♥


en_USEnglish