Everyday make-up before & after

Here is a make-up customer from Norrköping who took the opportunity to book an appointment with us when she was in Uppsala, fun! :)

First we did brow pick and brow color and then a make-up consultation incl. products. She wanted an everyday make-up with tips that can be done quickly in everyday life.

That's why we chose a colored face primer as a base - if you do not need more coverage, it is absolutely the fastest way to get a nice base with everything you need: spf 30, smoother skin, smoother skin tone and a matte and durable result without powder.

Then we did an invigorating eye makeup that lifts the gaze, it turned out really nice :) And finished with a colored lip balm instead of lipstick.

Here is the result:

BASE:
Colored face primer - glo Tinted Primer Spf 30 (Medium)
Contouring & matt highlighter - Contouring Palette (No. 1)
Luminous highlighter - Pixi Glow-Y-Powder (Santorini sunset)
Rouge - glo Skin Beauty Blush (Papaya)
Fixing mist - Pixi makeup fixing mist

EYEBROW:
Brynpenna - gloMicro brow liner (Light brown)
- The color is a little darker than what the eyebrow pencil really is because the eyebrows are completely newly colored

EYES:
Eyeshadow Primer - Pixi eye bright primer
Eyeshadows - glo Eyeshadow Quartet (Bon Voyage)
Light eyeliner along the waterline - gloMinerals Eye Pencil (Peach)
Eyeliner (lashliner / fringe marking) - Kryolan HD Cream Liner (Ebony)
Mascara - Magnetic lash mascara

We put the eye shadow only on the top of the eyes, partly for a more natural and discreet look but also to get a more lifting effect. If you just put it up, you lift your gaze and if you put it both up and down, you open up your gaze.

Another detail that is important for lifting the gaze is to apply a slightly darker eye shadow just above the globe line so that it comes over that fold of skin when looking straight ahead. So relax in the forehead and look straight ahead - then you mark how high up you need to go with the eye shadow :) It does not have to be far over, a little does a lot!

LIPS:
Colored lip balm - Pixi Shea Butter Lip Balm (Ripe raspberry)

Take care of your lips and get a nice color at the same time, quickly and easily :)

Hope you were inspired!

Hug ♥

11 steps - Make acrylic nails on yourself (Step by step)

Can you make acrylic nails yourself? Answer yes!

I have received many requests for a more detailed blog post about how to make my acrylic nails on myself. Here it finally comes step by step :)

It takes a pretty good while to do all 10 nails, so tip number one is to make it a cozy moment.

When I took photos for this post, I was lying in bed with a cup of tea and Pretty Little Liars. Absolutely wonderful! Otherwise, I usually lie in the bath at the same time or listen to the podcast.

Make acrylic nails on yourself at home

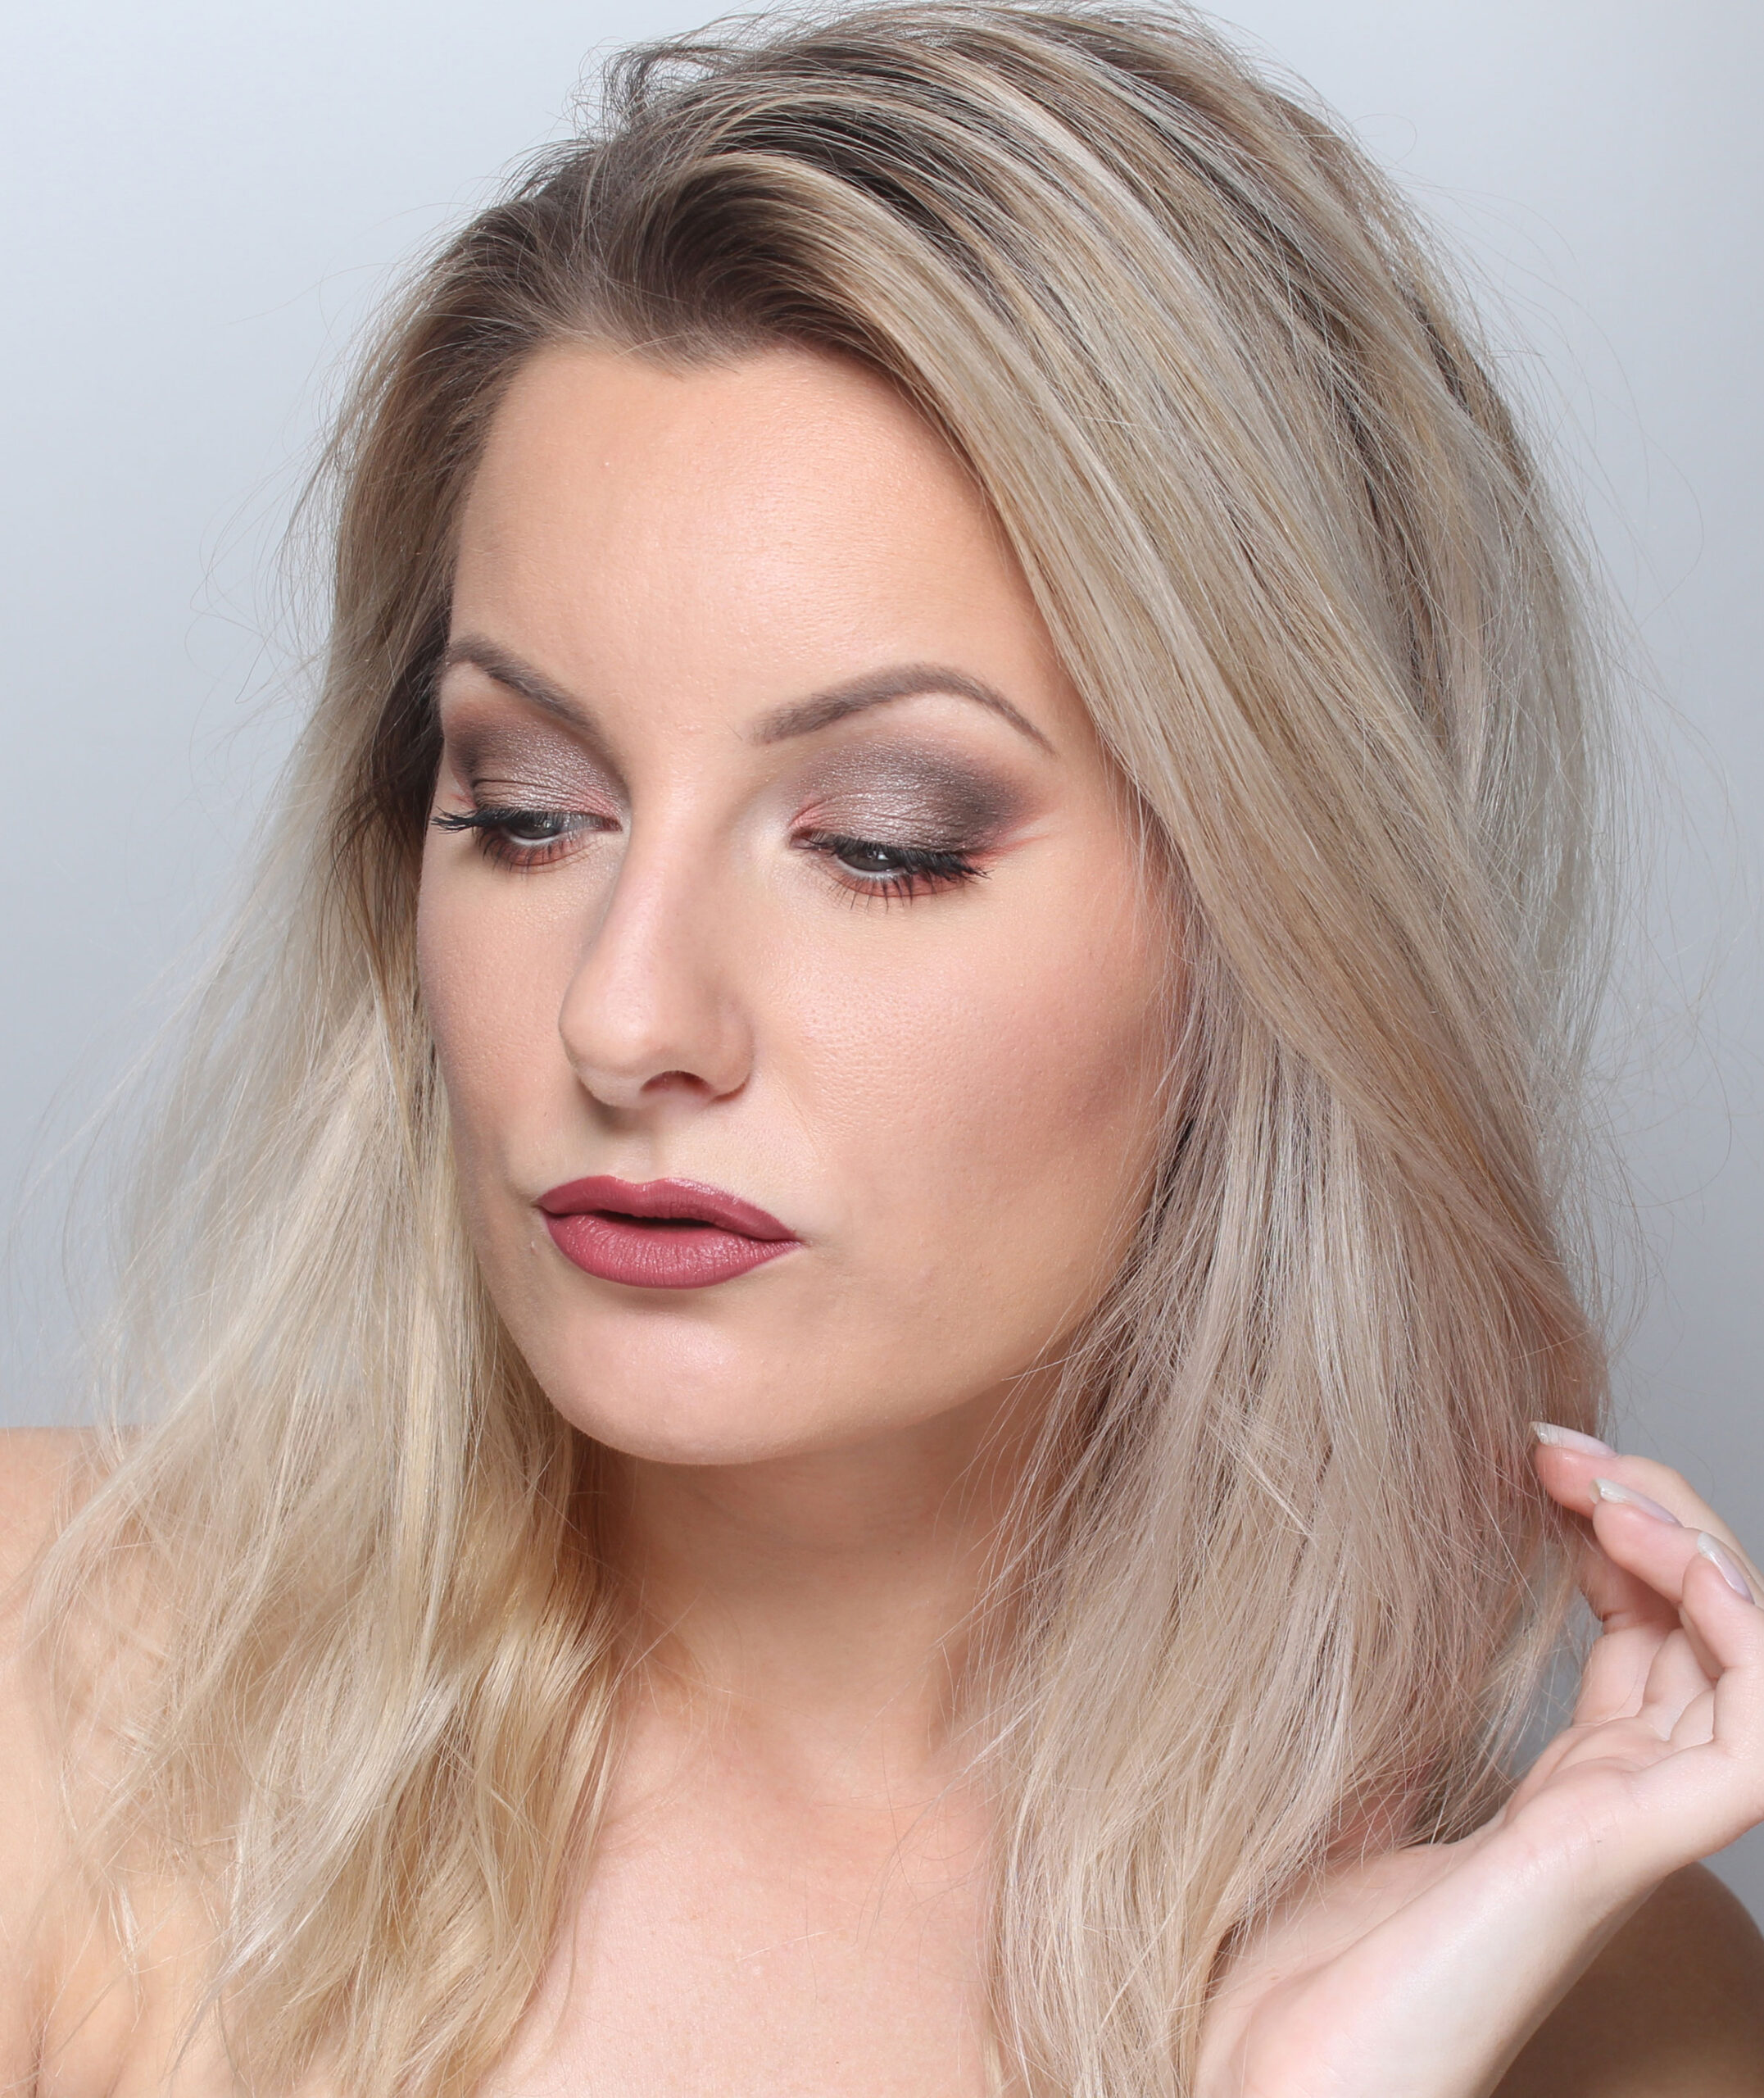
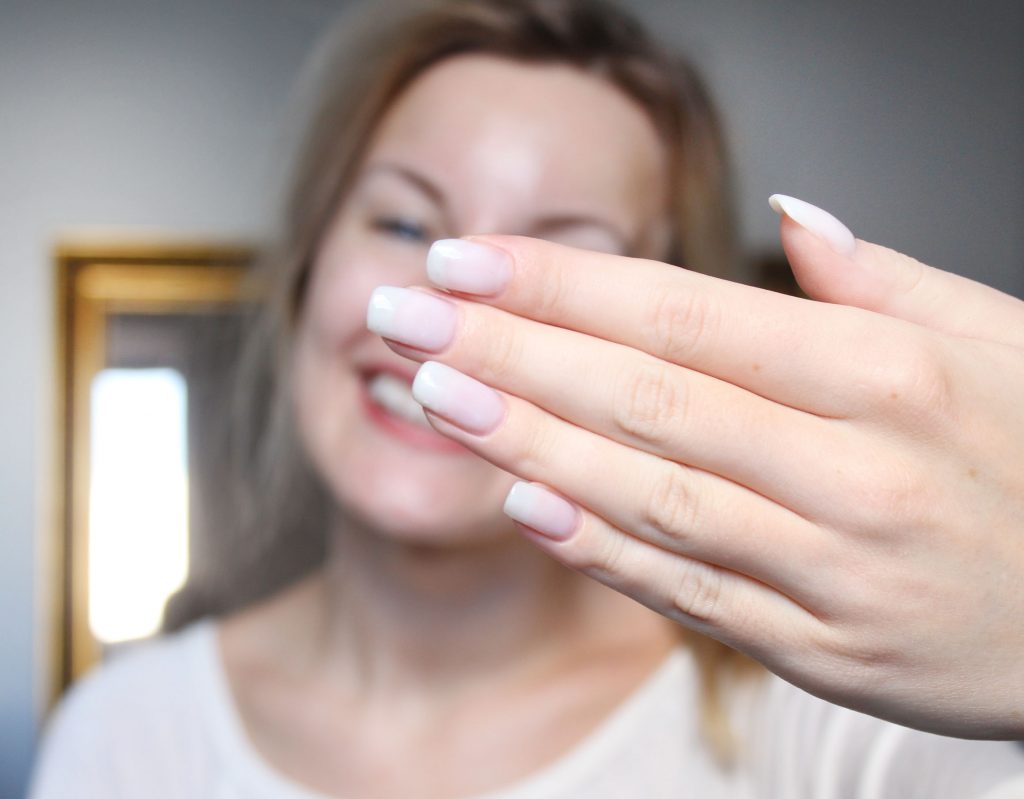
Here you see the end result. I have not made any extension but only reinforcement, so my nails below are exactly this length. However, it is possible to glue on tips first and then do exactly all the steps that I will show you now.

Risks of making your own nails at home - is it dangerous?

Before I start, I really want to emphasize that there is nothing to play with this! If you get acrylates on the skin, you can get strong reactions. So it is important to be responsible, as well as aware that you are actually taking a risk.

Nail-savvy people probably kick back if they read this and if you test it yourself, you do it at your own risk quite simply;)

With that said, here is a detailed step by step + links to the products I use!

Make acrylic nails at home all you need

You need this to build your own acrylic nails:

Note I do not even know if these are exactly acrylic nails, but they are mixed with acrylic powder in any case.

  • Nail polish removal
  • Nail powder, I use EzFlow Extra White but it is available in more colors as well.
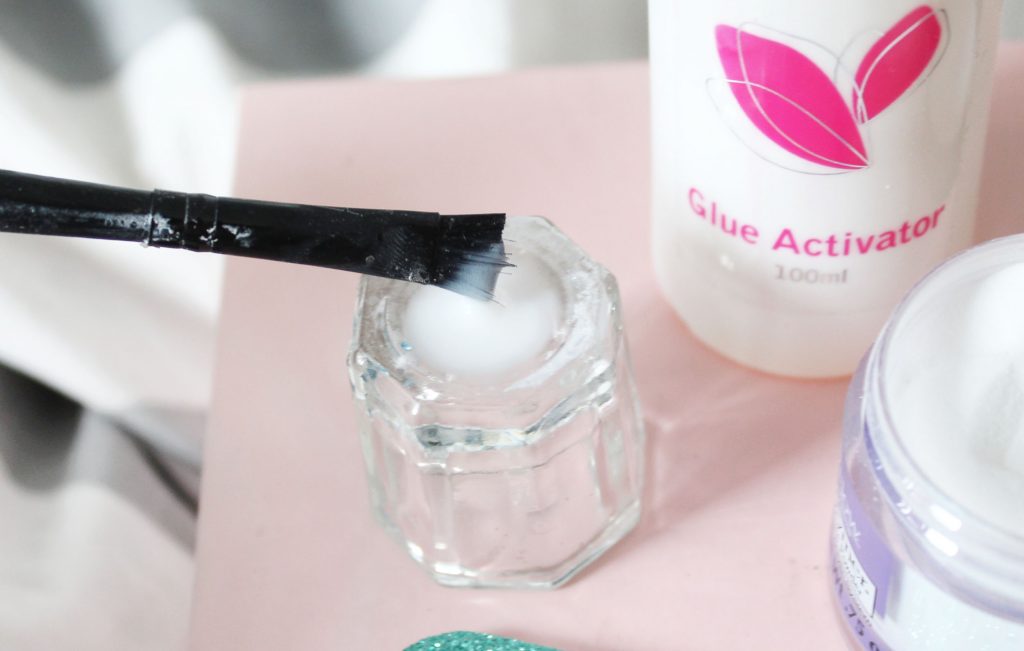
  • Nagellim, e.g. Essence fix it (adlink) A small bottle runs out pretty quickly so good to buy several at once if you are going to continue building your nails. However, you can use glue from other brands as well, there is not a huge difference between glue and glue.
  • Spray that hardens the glue, e.g. Depend Gel Activator Spray (adlink)
  • At least 2 brushes, absolutely none that you are afraid of.
  • Two nail files - a polishing file, e.g. this from Depend (adlink) with 4 steps. As well as a powerful that grinds properly, e.g. this from Lyko (adlink) which is for forming gel and acrylic nails.
  • Something small to mix in, I have a small glass bowl. Maybe a shot glass upside down can work well?
  • I use a spoon for the nail powder, but it works with a spatula or whatever!

I have all the stuff in a drawer, and when I fix my nails I turn the drawer upside down and have it as a table in the bed :)

Build nails yourself step by step - preparation

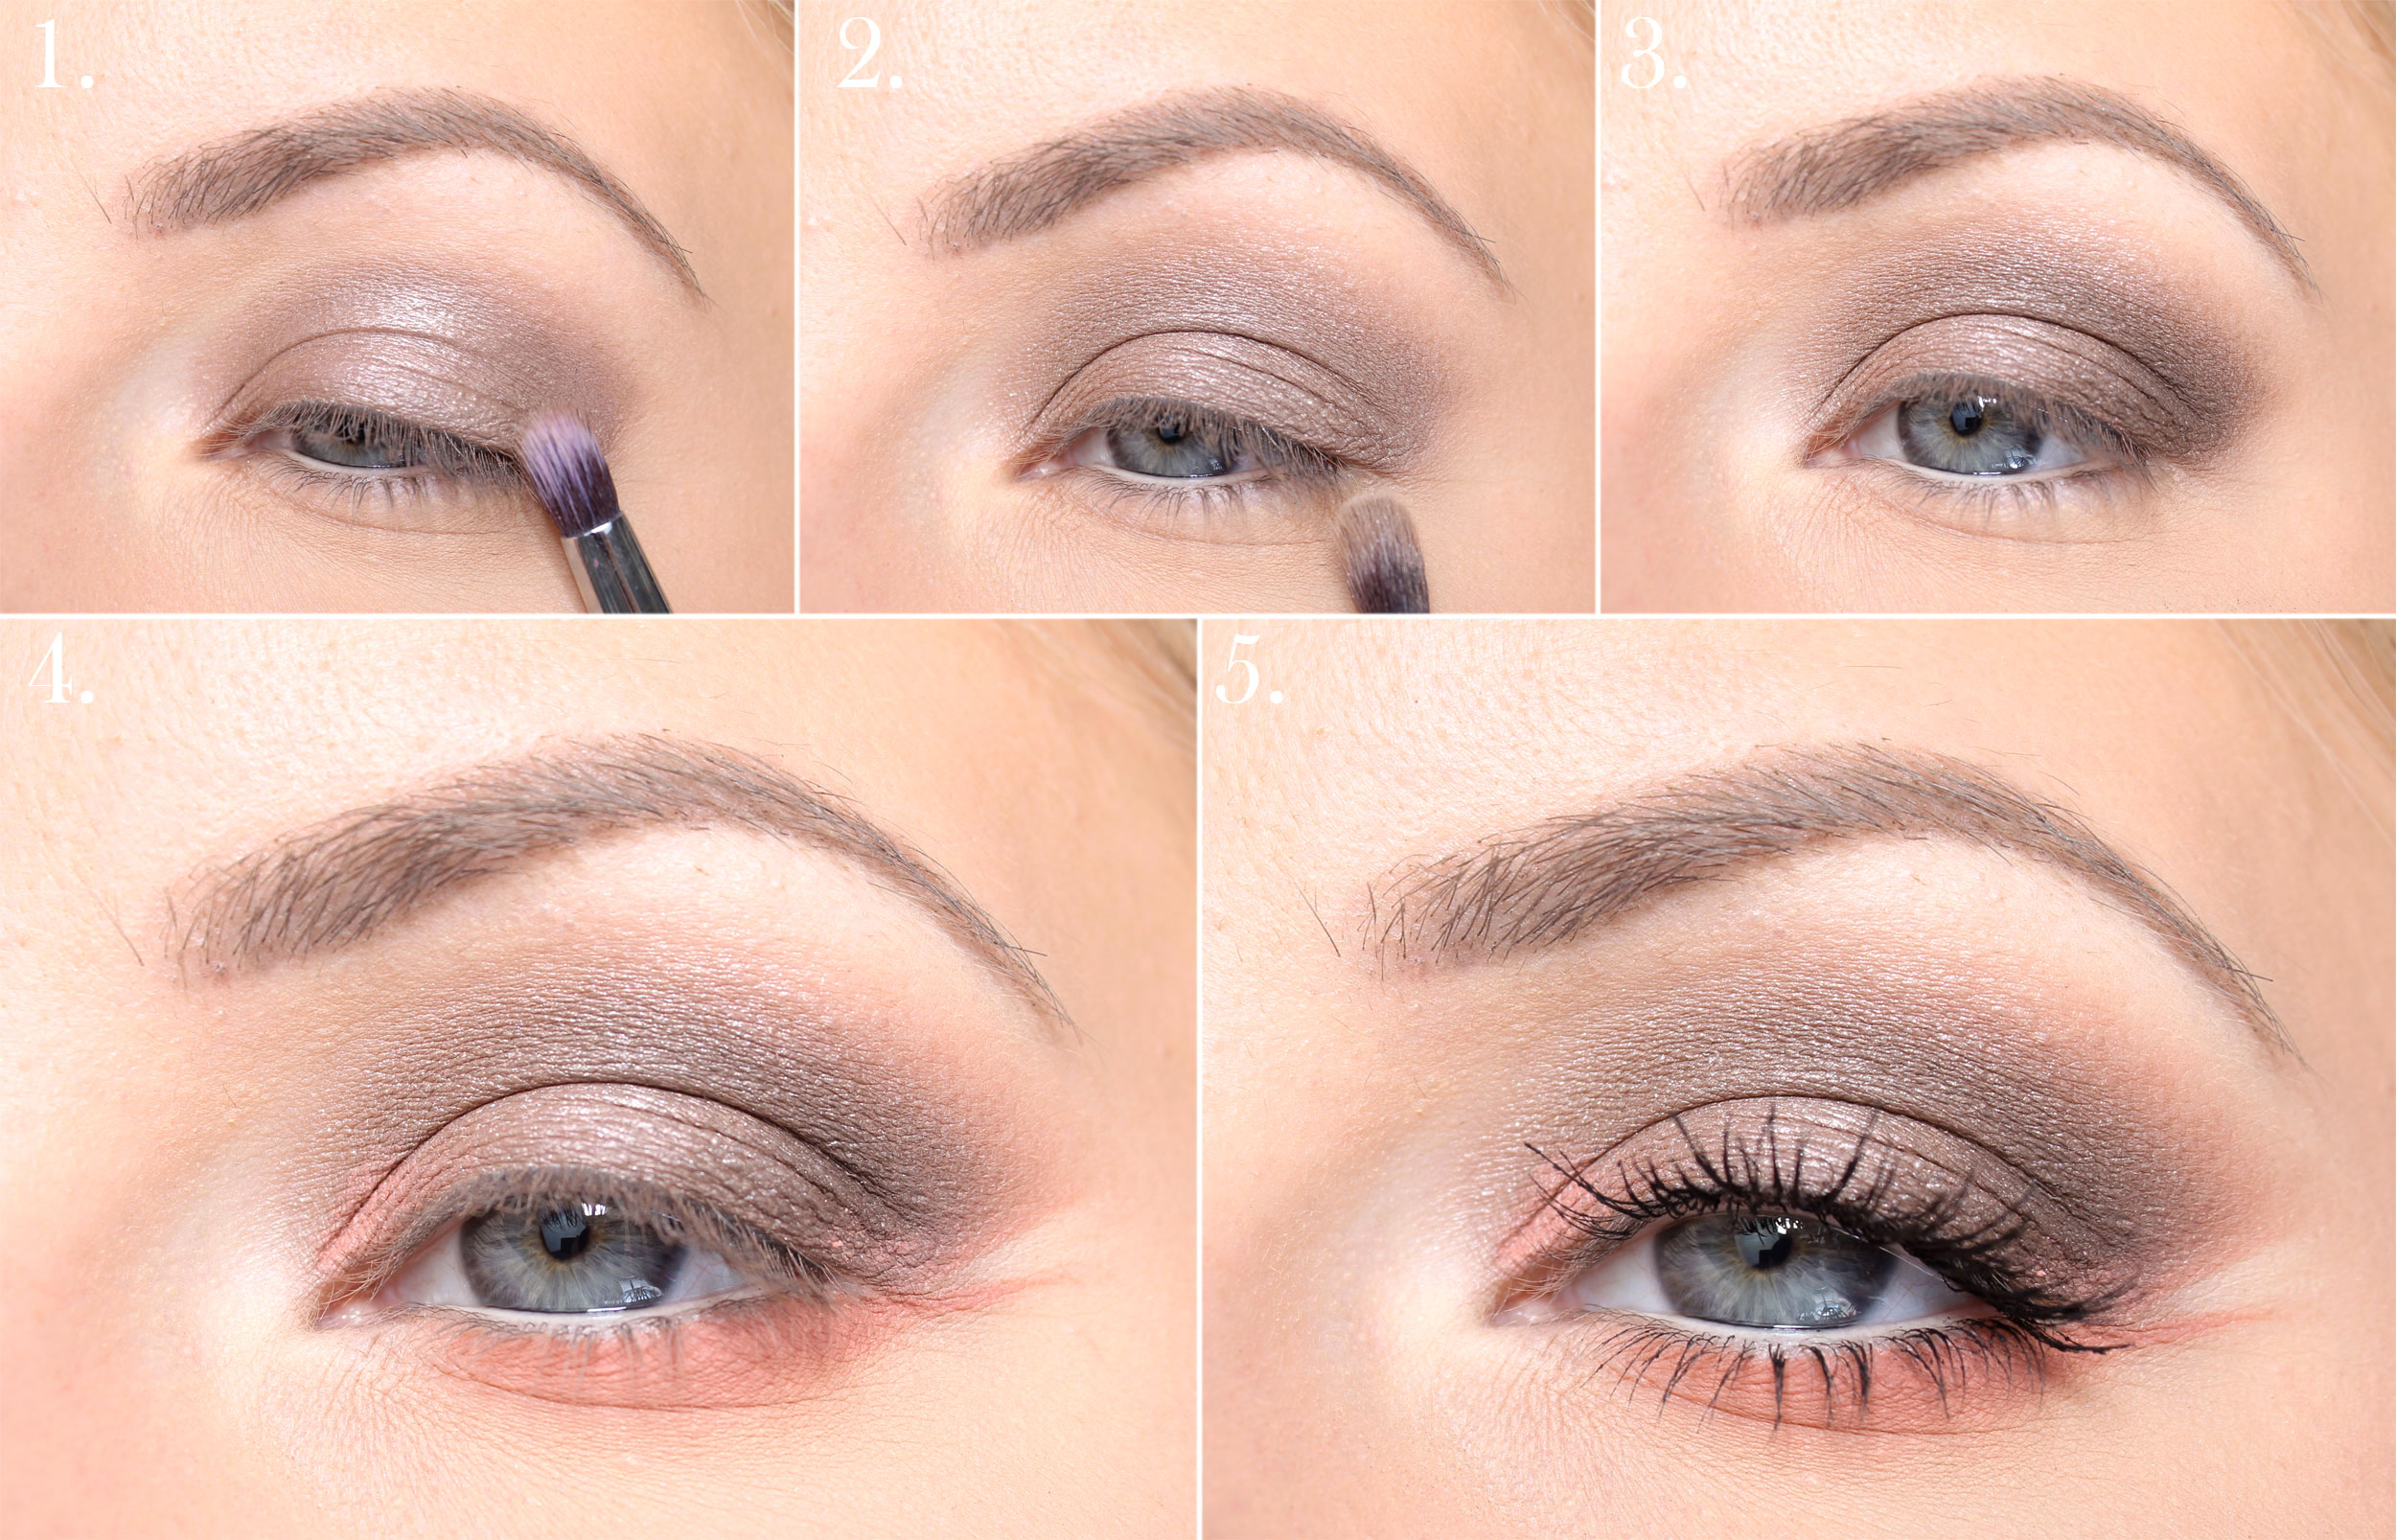
1. Polish the nails with the polishing file. Not too much because you do not want to make the nail thin, but so that you even out the biggest irregularities.

The smoother the nail, the more durable the result.

2. Clean the nail with nail polish remover so that it is completely clean.

3. Pour nail glue into the bowl. It is a transparent liquid so it is not visible in the picture that I have poured in :)

Mix in nail powder, I use the handle from a teaspoon to pour in.

Update! An even easier way I came up with is to dip the brush in the glue, then straight down into the powder jar. You do not necessarily need to mix like this on the page. It is much smarter for the batter in the glass jar to dry otherwise. But if it is just poured glue in the bowl, it is liquid for a very long time and you can work without stress.

Make acrylic nails on yourself (Step by step)

5. The consistency should be "reasonably" thin, it must not be too runny because then you do not get on a thick layer on the nail. But it must also not be too thick because then it will be sticky and difficult to get even.

Build nails yourself step by step - application

glue nails

Spread over the entire nail. Lay a little thicker in the middle of the nail and be careful not to get it on the cuticles or out on the edges. It is easiest to try to get it as even as possible immediately, but if it gets a little uneven somewhere, it does nothing because you can file it off.

When I was a beginner, I did one nail at a time. But the easiest is to:

  1. Apply thin layer on each nail on all 5 fingers
  2. When you put on the fifth finger, the first finger has already dried a bit. Then apply all 5 nails again.
  3. And so you build up a little at a time all the time.

The first time I did this, the durability was like that, but the second time I put a thicker layer and then it held much, much better! So it's also a tip, do not put too thin :)

Make acrylic nails on yourself (Step by step)

7. Spray the glue activator spray and everything will harden immediately. It then smells quite strong.

You only need to do this in the last step. Not between applications while building your nail.

8. Since I have white powder, I like to put an extra layer on top of the nail, so it will be extra white there. A bit like a French manicure with a fade :) Then you spray again!

Build nails yourself step by step - shape and finish

nail file for built nails acrylic gel

The result will not be completely even, not for me in any case. But it does not matter because you file it later! Then I do all these steps on the rest of the nails as well.

file nails

9. When I have finished all the nails, I quickly clean the bowl with glue before the glue has time to solidify.

Then we come to what I think is the coziest - sit back and start filing! So I take the coarse file and file on the top of the nail so that it becomes a smooth surface. As well as molds for the edges.

file nails at home

10. Then I take the polishing file and polish the nails so they become smooth and shiny.

nail glue

11. I finish with transparent varnish to get that nice high-gloss effect. Nail polish fits much better on built nails so I usually never actually improve it but it stays on until I redo the nails next time.

I also use it to protect the nails from discoloration, I usually do not smudge so much but it can happen that you happen to get e.g. lash color on the nails when working with a customer :)

Durability acrylic nails

The durability depends partly on how much stress there is on the nails, but it is also individual. Annika makes her nails with exactly the same material but on her it lasts much longer! Over a month. Mine lasts for about 3 weeks, even when Annika has done on me so it has nothing to do with the skill.

They also last longer if I build with tips than if I only have on my natural nails.

I usually "look good" on them after 2 weeks if I have been active. For example. when I lived in a house and did a lot of stuff with firewood and stuff. If I only work from home, of course they last longer.

It can drop a little at the edges, but then it is very easy to file a little and apply more glue so it sinks under the material and they look freshly made again.

Then I usually redo them completely after 3-4 weeks.

Make acrylic nails on yourself (Step by step)

It takes some time so there is nothing that anyone has the time or patience for. But for those of us who have patience, it is very calming, I must say!

Shout out if you have any questions!

Also read:  Fix long and healthy nails at home

Hug ♥

Eyeshadow with moistened brush (Make-up step by step)

One way to apply eye shadow that I have not done so much before, but which I now think is a very nice technique actually - is to moisten the eye shadow brush a little!

I still have primer underneath as usual + moisten with fixing mist (so not just water) so the durability is just as good.

What is the difference?

1. The difference is partly that shimmery shadows get a little more powder in them, they become a little more glowy or metallic.

2. It is also easier to get a shadow to attach better on top of another shadow, because dry on dry does not adhere as well. This is what I did in this make-up - first light brown over the entire lid, then darkened on the outer edge and a warm color on the inner edge, and then they attached very quickly and easily even though it is shadow on shadow :)

3. You can also make a little sharper edges and get more precision! For example. as I did at the outer edge of today's makeup.

Hope you like the look :)

Face primer - Paese Makeup Base (Matte)
Concealer - Pixi Pat Away Concealing Base (1 Cream)
Foundation - glo Pressed Base Foundation (Golden light)
Powder that neutralizes redness - glo Redness relief powder
Contouring - Contouring Palette (2)
Rouge - Blush (35)
Fixing Mist - Pixi Makeup Fixing Mist
Powder - Paese Bamboo Silk Powder

Eyebrows - glo Micro Brow Liner (Dark brown)

Lips - A mixture of the lip pencil glo Lip Liner (Java) and the lipstick glo Lipstick (Knockout)

By the way, this is exactly the kind of make-up that I feel very comfortable and nice in! It is dark and clear enough to "bring out" the finest in my features. But it is also so down to earth and neutral that it suits everything and every occasion :)

All eye shadows are applied with a dampened brush that I sprayed a little Pixi Makeup Fixing Mist on.

All four eye shadows come from the 4 palette glo Shadow Quartet (Bon Voyage)

  1. Eyeshadow primer, Pixi eye bright primer
    Light brown shimmer shadow on the entire eyelid
  2. Fade the edges
  3. Dark brown eye shadow at the end of the eyelid and along the globe line
  4. Terracotta eye shadow at the inside of the eyelid and along the entire lower lash line + in a sharper "v-shape" at the outer edge
    Light eye shadow in the corner of the eye and in the middle of the "v-shape"
  5. Black mascara on all lashes, Magnetic lash mascara

Clear!

Hugs are!

What, how, why?

Whether we are talking about work, business or private life, the words "what, how, why" are very important to ask yourself regularly.

For example:
1. What: I want to get really sharp on makeup
2. How: I will do a new look every time I put on make-up and challenge myself with more difficult techniques and color combinations. Three make-ups a week in one year is a total of 156 pieces, after that I will be cruel at this!
3. Why: Makeup is fun but it is much more fun if you are good at it! And I want to start each day with a fun moment in front of the makeup mirror as meditation and free time.

And that's just the last word - why - which I want to push extra hard for today!

Namely, I myself have fallen into the "trap" that I do things for the wrong reason without even reflecting on it myself! There is so much that I want to do, want and want to change when I think about it superficially, until I get to the why phase and realize that "when I think about it, I actually do not even want this!".

For example:
1. What: We will turn Creative Makeup into a beauty chain! Cool !!
2. How: We rent premises in Stockholm and Gothenburg, employ makeup artists and train them in our way of performing treatments, permanent makeup and our product range.
3. Why: Ehh, that would be cool? It would be a great financial gain. But it will be a lot of work too .. On closer inspection, I do not want to make more copies of the workplace I have today, I want to make that workplace completely stable and spend my time on new projects instead!

Can an unclear "why" lead to mental illness?
Now maybe you think I end up on very long side tracks :) but what if we had made Creative Makeup a salon chain, worked really hard and burned ourselves out on the coup - and then we realize that we have done it for the completely wrong reason. If you really wants one thing and know why you fight, it's easier to get through adversity (some shit will happen, that's all you know - as Mikael Arnt said so well in an episode of Businesspodden haha). For all problems and setbacks, it becomes so much tougher if you do not have a clear "why" in everything you do.

You "should" do so much all the time. You should be able to afford so much, work so much and at the same time have a lot of time left to socialize, train, clean, go to the hairdresser and all that.

It's so easy to feel pressure and stress when you look at other people's lives (especially on social media) and you want everything that everyone else has. But had you just stopped and thought, "Why do I want this?" so you had very often realized that you do not even really want it. I really think we give birth to as many unnecessary brain ghosts as we could have avoided if we had just asked ourselves the question "why" a little more often.

In other words: It is not about everyone having to get better, develop and be successful. But if you ask yourself the question "why" then you may realize that you are actually happy with what you have and can even let go of all the pressure and stress thanks to this! Actually, maybe you do not want more stuff or larger housing but are happy with your salary as it is = you can say no to that full-time job and instead spend that time hanging out with your family or even just lying on the couch and watching series provided that is exactly what you feel good about :)

What can we managers do about mental illness?
It scares me how much mental illness there is in society today. And it's not just driven entrepreneurs who get burned out, it's just all industries! I get terrified when I think about the idea that my staff or someone I care about a lot should burn out.

What can we managers do then? You can be a mainstay and you can facilitate with what you can, but to be completely honest, I do not think there is much more that you can do. Do you know why? Because I think that in 90% the cases do not only depend on the workplace itself, but the "puzzle of life" in general.

If you have a bad workplace, you can of course burn yourself out just because of it, but I really think that there are so many more components that come into play such as relationships, family, housing, rest, finances - in short, the balance in life, mixed with that pressure you put on yourself.

Dare to think outside the norm
There are so many who do things just "for the sake of it", because society looks like that and you do not even reflect on it - and when you then stand there burnt out with a brain that no longer works, you do not even understand how to ended up there. Was it worth it?

I firmly believe that if you just dare to go liiiite outside the norm, you will become a happier person. Or dare think outside the norm is perhaps a more correct definition, because it is not at all wrong to live as the norms are, but the risk if you do not even think outside is precisely that you do things "because you should" and not "because you want".

How do you find your why?
Having to have a "why" for everything you do can also feel a bit stressful haha. I mean, every single thing can not be so heavenly important in life because then you can not do anything at all in the end.

I think it's a lot about taking the time to listen to your gut feeling. You have to do things that make you feel good and not stare blindly at the opinions of others. Do you want to lie in the bathtub and eat ice cream? Do it! Do you finally want to take the plunge and start your own business? Do it! :)

What is my why?
I myself often think "why" in my everyday life, that may be why I have a pretty good balance between driven entrepreneurs and life enjoyers haha :)

I work hard because I know why I work and what to do next. I do not think "now I sit and have a meeting with my staff" but I think "now I sit and build the best workplace in the world!".

I save money because I know what I want to use them for and why it will give me more quality of life. If I buy a car, I want bluetooth so you can listen to music and podcasts via the phone and a button on the key so you can start the engine heater while you are still inside the house - rather than a luxurious and expensive brand that impresses people! You understand the point :)

I also take long baths, watch series like a haystack on the couch, love slippers and face masks and try to be quite "mañana". Why? Because I enjoy being at home in my house and feel great about my own time!

I value soft values and I love the lifestyle of having my own business! It's really not about any kind of prestige or being able to sit on a pile of money. I see absolutely no fascination in it but want to have fun both at work and in private, have financial security and the freedom to live my life just as I want to live it.


Hope you thought it was a little fun to read something else this Sunday than just what my work week has looked like :) We live the flea in Spain for a week to us!

Hugs are ♥

Yellow, green & purple

I love the purple details on today's makeup, they really became the finishing touch :)

Hope you like the look too!

Colored face primer - glo Tinted Primer spf 30 (Medium)
Concealer - Pixi Pat Away Concealing Base (1 Cream)
Powder that neutralizes redness - glo Redness relief powder
Contouring - Contouring Palette (2)
Rouge - Blush (35)
Fixing Mist - Pixi Makeup Fixing Mist
Powder - Paese Bamboo Silk Powder

Eyebrows - glo Micro Brow Liner (Ash)

Lipstick - glo Suede Matte Crayon (Rumor)

Surely the lipstick is sooo nice ?? :)

Tell me if you start to get tired of glitter haha!

  1. Eyeshadow primer, Pixi eye bright primer
    Yellow eye shadow on the inside of the eyelid, Paese neo eyeshadow (662)
  2. Light green eye shadow on the inside of the eyelid, Paese Opal Eyeshadow (Atacama)
  3. Dark green eye shadow at the end of the eyelid and along the globe line, Paese Opal Eyeshadow (Atacama)
  4. Purple eyeliner, Paese cashmere eyeshadow (650) mixed with Pixi Makeup Fixing Mist
  5. Black eyeliner wing, Kryolan Cake Liner (Black)
  6. The same eye shadows also under the eye
  7. Glitter in the middle of the eyelid, at the bottom of the lower lash line and under the eyeliner, Mood Wood Natural Glitter (Mint)
  8. Black mascara on all lashes, Magnetic lash mascara

Clear!

Hugs are !!

en_USEnglish