Great products from Pixi!

I rarely show press releases "just like that" without testing and giving a review at the same time - but this kit from Pixi may be an exception because it is so heavenly nice!

These products are not something that I myself will start selling (in the current situation at least) even though I myself am a reseller for Pixi, because these special kits are not always in the range for that long.

But they are really nice, so even if you are not going to buy make-up for yourself, these are great gift tips! :)

Look how nice !! The box is divided into three different looks that are made in collaboration with different influencers: Cloe Morello, Dulce Candy and Weylie Hoang.

It is difficult to see proportions in the picture so I also took pictures with myself in the picture so you can see how cool it is:

So inspiring! I myself sell Pixi really appreciate all the nice packaging they always have for their products, you will be happy with them! :)

The Dulce Candy collection consists of two palettes:

Coffee with dulce Multi-Use Palette (adlink) is a palette with shimmer shadows that can be used as eye shadows, blush and highlighter.

Dulce's Lip Candy (adlink) is a lip palette with 9 different colors, so nice!

Tip! In my web shop we have sales on other palettes from Pixi and there you will also find one lip palette with even more colors for only SEK 299 :)

The collection with Chloe Morello contains a multi-palette and a shimmering lip gloss!

Palette Chloette (adlink) contains 3 blushes, 6 eye shadows and 3 brow shadows. So smart!

Lip Icing (adlink) is lip gloss shimmer that can be used both alone or to top other lip colors.

The best gift tip is the Weylie Hoang kit Dimensional Eye Creator Kit (adlink) with a small and flexible eyeshadow palette and a duo eyeliner! The eyeliner thus has a liquid eyeliner (like a felt-tip pen) at one end and a eyeliner at the other end.

Hugs are ♥


Bridal makeup red hair (+ product list)

Here is a bridal make-up that was so much fun to do! She did test makeup with me on Creative Makeup and these photos were taken then, it is now on Saturday I will make her up on the big day!

I was almost eager to force her to buy these eyeshadows at home haha, they suited her so well :)

Glitter usually does not want to be seen at all in the picture, but in the transition between the two eye shadows on the eyelid, I have also dabbled in a little discreet glitter that really became the finishing touch!

Look so nice:

BASE:
Face primer - Pixi Flawless & poreless primer
Foundation - Pixi H2O Skintint (3 warm)
Concealer - glo Under eye concealer (golden)
Powder that neutralizes redness - glo Redness Relief Powder
Contouring & matt highlighter - Contouring Palette (no 1)
Luminous highlighter - Pixi Glow-Y-Powder (Santorini Sunset)
Rouge - glo Skin Beauty Blush (Papaya)
Fixing mist - Pixi makeup fixing mist

EYEBROW:
Brynpenna - glo Skin Beauty Miro brow liner (Light brown & Dark brown)

EYES:
Eyeshadow Primer - Pixi eye bright primer
Eyeshadows - glo Eyeshadow Quad (Rebel angel)
Silver white eye shadow in the corner of the eye - Paese Opal trio Eyeshadow (Ice queen)
Light purple glitter - Mood Wood Natural Glitter (purple) it is attached with Kryolan Cake Liner Sealer.
Eyeliner - Kryolan HD Cream Liner (Ebony)
Mascara - Magnetic lash mascara 

LIPS:
Lip pencil in the contours - Benecos Lip Liner (Brown)
Lip Gloss - glo Lipgloss (Taffy)

These eyeshadows were my first suggestion and I was so happy that she liked them! The groom would also have exactly that peach golden tone on his tie so it was spotless :)

Hope you were inspired too, regardless of whether you are getting married or not;)

Hug!

Acrylic nails at home

Annika (who Miska and I run our company with) is the most independent person I know. She does exactly everything herself and what she does not know she learns!

As long as I have known her, she has fixed her own nail extension with chalk-white French manicure. Now after a number of years I suddenly became curious about how she does, so now she has taught me that! :)

The result I am looking for is:

  • Strong nails that do not fall off
  • Stylish and fine nails even without nail polish
  • Durable result on the nail polish when I want to paint the nails in one color

So I myself have not lengthened my nails (as Annika does) but only made acrylic on my natural ones for a lightening and strengthening.

Did you know that nail polish lasts longer on a built material than on the natural nail because the nails produce oil? I thought it was just because it will be such a smooth surface on built nails, but a nail therapist told me before that the nail bed produces oil that makes the nail polish drop :)

I do not use a UV lamp but mix glue and nail powder and then I spray with a "glue activator" that hardens everything.

What you need:

  1. A small glass bowl to mix in
  2. Nail powder, I have a white one because I want a lightening of the nail, so it looks more stylish without having nail polish :)
  3. Nail glue (it's like a clear liquid)
  4. Glue activator (spray) that hardens the glue
  5. Ordinary nail file
  6. Polishing nail file
  7. Transparent nail polish if you want a nice shine on the nail.
  8. A brush (or two) you are not afraid of, it does not have to be great, you can kind of use those plastic watercolor brushes that come in children's paints you know? :) Because it gets kind of ruined later.

It is Annika who has bought this starter kit for me so I unfortunately have zero control over where you can buy everything. Shout out if you want to know and I'll ask her!

If you want to make an extension, you also need tips, then you glue on the tips before and then you do all the steps that I will explain below.

But I have quite long nails anyway so I do not need it + do not want French because then you have to redo them as soon as the tip grows too far out. My hope is that it will last so well that I only need to replenish the outgrowth when they grow out. I have never seen Annika with a broken nail so I guess it will hold me just as well :)

I could not take photos step by step because you need to be quite fast so that the glue does not dry out. But in the future when I get the speed so maybe I can show you!

Here's how I do it:

  1. File the nails to the length you want
  2. Pour glue into the glass bowl
  3. Pour in nail powder and stir with the brush so that it becomes a mess, something between runny and thick :) If it gets too thick, you can easily pour in more glue. If it is too thin, it is not possible to build up the nail and if it becomes too thick, it will just be sticky and damn.
  4. Apply to the nail, if the cream is well mixed, it is quite easy to spread it evenly because it "flows out" a little. Check at different angles so that it looks even. Be careful not to get it on the cuticles or on the skin next to the nails.
  5. Spray glue activator. I usually do it between each nail but Annika finishes each hand and then she sprays on all 5 nails at the same time. But I do not want to risk accessing the nail and destroying so I harden immediately.
  6. Polish the nails with a polishing file (my file has 4 steps) then the nails will be smooth and smooth!
  7. If you happen to get major irregularities somewhere, you can file with the usual nail file before.
  8. Finish with transparent nail polish

Clear!

sustainability
As for durability and I can not say much yet than I have not had this for so long, I have got a small crack in the thumb nail after 1 week when I happened to hit it hard in a chair hehe. But I pulled on some nail glue and it seems to hold up well anyway. But other than that, they are still whole and nice 1.5 weeks after anyway!

Results
The nails turned out so good I think! Great shine, nice lightening and they feel hard and durable without being thick. I like that they still feel thin and natural as well.

Fint va? :) I like that it is bright and fresh at the same time as it is a bit transparent so that you can see the tips a little through.

Note I am aware that many will think I am completely crazy crazy who risks ruining my nails like this at home! You can get reactions if you happen to harden acrylates on the skin so you have to be careful and responsible. Annika has been doing this for any number of years, but you should be aware that it is not something to play with.

But you have to live a little too;)

If you want, I can update you with more posts about this when I have gained more experience myself? And if you have any questions already now, you know that it's just a matter of shouting :)

Hug hug!

Sunset makeup tutorial (Orange makeup with glitter)

I have a real craze for yellow right now, every time I sit in front of the makeup mirror and think about what I should achieve today, my fingers always want to walk towards my yellow eye shadow from Paese haha.

Today it became the "fire colors" yellow, orange and red and then I broke off the whole thing with olive green under the eye. I think it's nice!

Almost like sitting in the grass and watching the sunset;)

Face primer - Paese Makeup Base (Matte)
Concealer - Pixi Pat Away Concealing Base (1 Cream)
Foundation - glo Pressed Base Foundation (Golden light)
Powder that neutralizes redness - glo Redness relief powder
Contouring - Contouring Palette (2)
Rouge - Blush (35)
Fixing Mist - Pixi Makeup Fixing Mist
Powder - Paese Bamboo Silk Powder

Eyebrows - glo Micro Brow Liner (Dark brown)

Lipstick - Paese Silky Matt Liquid Lipstick (706)

Could not help but dabble in some glitter too;)

  1. Eyeshadow primer, Pixi eye bright primer
    Yellow eye shadow along the globe line, Paese neo eyeshadow (662)
  2. Orange eyeshadow on the inside and outside of the eyelid and under the yellow in the globe line, Paese neo eyeshadow (663)
  3. Red eye shadow between the orange on the eyelid but not exactly in the middle, Paese neo eyeshadow (664)
  4. Light eye shadow in the corner of the eye and in the middle of the eyelid, Paese opal eyeshadow (Colorado)
  5. Green eyeliner under the eye, Paese Linea Automatic Liner (Olive Glam)
  6. Pull out the eyeliner like a thin wing in the outer corner of the eye
    Blur the eyeliner with a little light green eye shadow on the brush, Paese opal eyeshadow (Atacama)
    Yellow eye shadow at the bottom of the lower lash line and over the eyeliner
  7. Green glitter on the inside and outside of the eyelid and under the eyeliner, Mood Wood Natural Glitter (Mint)
  8. Black mascara on all lashes, Magnetic lash mascara

Clear!

I really like the colors! :)

Hugs are ♥

My business week v. 33

This week has not been the most interesting this year, but it has been a lot of preparatory work that shows results soon and waited for different answers here and there.

But I still got a lot done and had a lot of customers so I have not been lazy if you say so :)

Target image June 30, 2019!
Last Monday we had planning day again me, Miska and Annika and now the target picture for 2019 is nailed! In addition, our first strategic focus, ie what we should focus on the most, the first 3 months.

In 3 weeks we have a kickoff and will present this to the whole team, I am so tagged!

Goal image in the making :)

Three happy tiredies after a long day :) Love to sit and watch with Annika and Miska !!

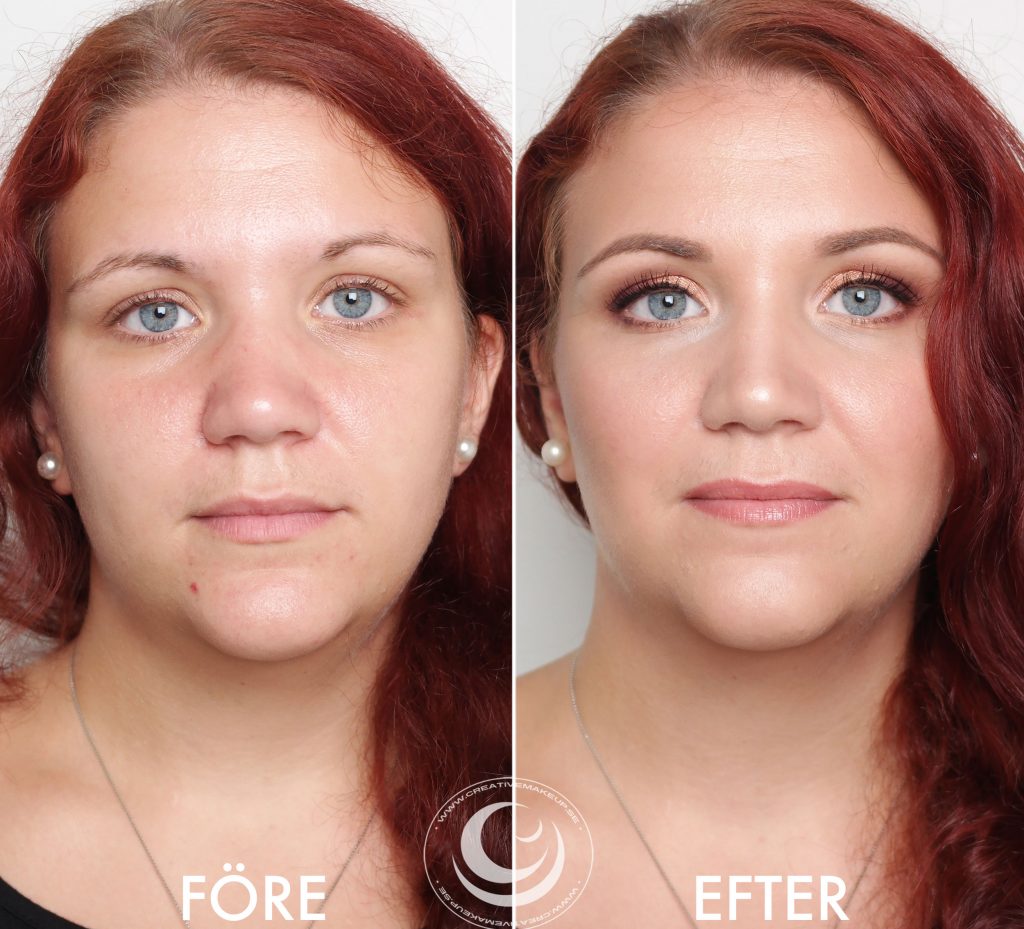
Sample make-up and many customers
It's been a fun customer week now! I have done two test make-ups for weddings + a make-up consultation and I have had to take before and after pictures of all three so I will show them in the blog later.

The only day completely without customers this week was last Friday so then I had time to catch up with some other admin job :)

We had a sunny Saturday morning and I took the opportunity to work a little without while Miska painted a new painting :) Next Saturday I am fully booked with bridal make-up so I take the opportunity to enjoy a 2-day weekend!

News from Pixi and preparation of blog material
I have been so diligent in producing blog material lately and have photographed many more step-by-step make-up than usual. So very soon I am ready to go to Spain and thought to be more or less blogging for 3 weeks!

This Spain puff in the back has actually not been a bit demanding, I just got more inspiration. Planning blog posts and not just "blogging for the day" is so much more fun :)

I have received a press release from Pixi that will be shown in the blog soon as well, so fun! I got this absolutely incredible kit as a blogger and not as a reseller.

I was so proud on the way to the car when we were going home haha!

I have also placed an order for some news from Pixi! On the one hand, H2O Skintint and Pat Away Concealing base have come in darker shades as well - YEEES! :) And then I will bring in new shades of Shea butter lip balm and Endless silky eye pen, so fun! Then they have a new super cool mascara + "glitter cream" for the eyes that I ordered testers for as well - if they qualify in the webshop, you will see the news with me this autumn!

It takes a little longer for me to get news than other webshops, because I test everything so carefully first :)

Check out how smart this mascara is! There are two brushes in the same sleeve (the narrow one sits like inside the big one) if you unscrew the top you get a narrower brush that accesses all the small strands and is perfect for the lower lashes, and if you unscrew the whole top you get a large brush which gives more volume. I think so extremely smart!

Hope it keeps the measure :) Continuation follows!

Excited by cortisone
Last Friday I went to work later due to doctor's appointment in the morning to check my lungs / fever which I wrote about last week. He didn't really take me seriously at first, "he said.you may have asthma then", But then when he listened to my lungs he changed quickly so it was nice :)

He said that I have inflammation in the lungs (and that it may have caused the throat infections and that my sore throats have not been "real" sore throats) so now I have left more samples and take cortisone tablets.

He said "you should take the tablets in the morning, because you can get quite excited by cortisone so it can be difficult to sleep”. I love the word choice "excited" and not just "lively" haha! It is certainly a placebo but thanks to this I have felt incredibly excited and happy afterwards haha!

Perfect medicine for a business owner;)

Anyway, I only get infected if I have a lot of cough (which I do not have) and do not need to rest because I no longer have a fever. So I have been approved to work as usual! Wihoo!

I know that inflamed people are spelled with 2 M but on Snapchat you apparently could not write such long words haha.

Next week will be a little more intense so now I will turn off the job brain for a while and take new steps next week.

Hug hug! ♥

en_USEnglish