Pride Makeup Tutorial (Rainbow Makeup)

Now it's Pride Week in Stockholm! :) Are you going there ?? Here is a make-up inspired by the colors of the rainbow in honor of the day, a pride / rainbow make-up ♥

Bassmink:
Face primer - Paese Makeup Base (Matte)
Concealer - gloMinerals Under Eye Concealer (beige)
Foundation - gloMinerals Pressed Base Foundation (Golden Medium)
Contouring & highlighter - Pixi Contour Creator
Rouge - Paese Powder Blush (35)
Fixing mist - Pixi makeup fixing mist
Net matting powder - Paese Bamboo Silk Powder

Brynpenna - gloMinerals Micro Brow Liner (Dark Brown and Light Brown)

Lips - gloMinerals Lipstick (Blush)

Fint va? I LOVE the colors! :)

All eye shadows are Paese Neo Eyeshadow if nothing else is mentioned, I write the number of the shade after each step :)

  1. Eyeshadow primer, Pixi eye bright primer
    Light purple eye shadow innermost of the eyelid (654)
  2. Purple eye shadow next to the light purple (650)
  3. Blue eye shadow next to the purple (661)
  4. Light blue eye shadow next to the blue (660)
  5. Turquoise eye shadow next to the light blue (687)
  6. Green eye shadow next to the turquoise Paese Opal Eyeshadow (Atacama)
  7. Yellow eye shadow next to the green (662)
  8. Orange eye shadow next to the yellow (663)
  9. Red eye shadow next to the orange (664)
  10. Fade out any eyeshadow
  11. White eye shadow in the corner of the eye and at the bottom of the lower lash line, Paese kashmir eyeshdaow (601)
  12. Turquoise eye shadow in the middle of the lower lash line
    Blue eye shadow at the bottom of the lower lash line
  13. Purple eye shadow under the shadows on the lower lash line, at the end of the eyelid and a little up towards the globe line
  14. Black smoky eyeliner with wing, Kryolan HD Cream Liner (Ebony)
    Orange eye shadow over the eyeliner wing
  15. Black mascara on all lashes, Magnetic lash mascara

Clear! :)

If you want to see another pride make-up, you can check it out this post with a rainbow make-up like I did 2 years ago now :) Still think it's great! A little more advanced to do but very fun.

Hugs are!

Avocado Makeup

As a makeup artist, I am often asked what I am inspired by, and in 9 cases out of 10, I am inspired by the products! I usually check my boxes and think "what do I want to use today" and then it will be as it is :)

But some days, like today, I was inspired by something more concrete! I have namely got a craze for "avocado butter" as I call it, it is simply mashed avocado with a lot (!) Chopped chives and a little lemon and a little salt. So good on the sandwich instead of butter!

In other words, this make-up is inspired by my breakfast - avocado! Lol :)

A little cooler look than I usually do! You suddenly get a completely different self-confidence in front of the camera when you look a little tougher haha. It's crazy how much makeup affects!

Bassmink:
Face primer - Paese Makeup Base (Matte)
Concealer - gloMinerals Under Eye Concealer (beige)
Foundation - gloMinerals Pressed Base Foundation (Golden Medium)
Contouring & highlighter - Pixi Contour Creator
Rouge - Paese Powder Blush (35)
Fixing mist - Pixi makeup fixing mist
Net matting powder - Paese Bamboo Silk Powder

Brynpenna - gloMinerals Micro Brow Liner (Dark Brown) and gloMinerals Micro Eye Pencil (Teal) in the outer edges for a turquoise effect.

Lips:
Turquoise pencil on the whole lips, gloMinerals Micro Eye Pencil (Teal)
Red lipstick at the edges, gloMinerals Suede Matte Crayon (Bombshell)
And a little red glitter attached Kryolan Cake Liner Sealer

Everything in the whole make-up, except the red glitter, is from my webshop :)

  1. Eyeshadow primer, Pixi eye bright primer
    Light eye shadow on the inside of the eyelid, Paese opal eyeshadow (Lady of the lake)
  2. Green eye shadow on the entire eyelid, Paese opal eyeshadow (Atacama)
  3. Black eyeliner, Kryolan HD Cream Liner (Ebony)
  4. … Continue with the eyeliner out to the outer corner of the eye
  5. … And fade it on the underside and down on the lower lash line with Nanshy Pencil Brush
  6. Dark green eye shadow in the fading of the eyeliner under the eye, Paese opal eyeshadow (Atacama)
  7. Turquoise eyeliner along the waterline, gloMinerals Micro Eyeliner (Teal)
  8. White eye shadow in the corner of the eye and over the eyeliner, Paese cashmere eyeshadow (601)
  9. Red glitter attached with Kryolan Cake Liner Sealer
  10. Black mascara on all lashes, Magnetic lash mascara

Clear!

Hope you were inspired ♥

Make up pigment spots

Quite often get questions about removing pigment spots on the face. Most products and make-up tips I can take pictures of myself as I have very mixed skin with oiliness, pimples, dryness sometimes, a stubborn wrinkle, etc.

The only thing (type) that is missing are pigment spots, and how to make up pigment spots is also a question that I get quite often. But now finally comes such a post! I got hold of a great model for this that I have made up today and now offer my best tips :)

Of course, there are lots of different ways to cover pigment spots / make up pigment spots depending on what you like to use for products. But I will show you my best tips to get 1. a quick application 2. long durability and 3. a natural result that is not comprehensive all over the face.

Therefore, I have made up her face halves in two different ways and with different products. I will show everything step by step further down in the post but here is before and when she was completely done:

Make up pigment spots before and after

Make up pigment spots before and after

Fint va? :) The different halves of the face are similar except that one is matte and the other has more luster.

Before I go into exactly how I have done, I thought I would start with general tips to think about before choosing products or application methods:

A concealer with a high degree of coverage

Sometimes I have heard the make-up tip that you should have an enlightening concealer to make off pigment spots. And it sounds pretty logical too, not entirely impossible that I thought so myself before I gained more experience of applying makeup to many people with pigment spots.

The problem is that if you only lighten a dark pigment spot, it will have the same effect as having a too light foundation on a dark-skinned person - the skin will be gray.

Therefore, it is important to have a concealer with a high degree of coverage so that you cover the pigment spot properly and not just lighten it up.

Warm tone on your concealer

If a little of the pigment spot shines through, it can look a little gray. So a tone that goes for yellow or peach is preferable even if you have a cold skin tone.

Use powder for your concealer

If you have a very dark pigment spot, you may need a slightly thicker layer of concealer, and it can be more difficult than it sounds because if you just apply a thick layer with the cream, you often happen to "pull away" much of it when you want to fade out. the.

My first powder tip is to powder the area before applying the concealer. Then it becomes as if it adheres better to the skin and you immediately get more coverage. The second tip is that I always prefer more thin layers over a thick one, so if you want more coverage than a thin layer of concealer, first add powder, then concealer, then powder, then a layer of concealer, and fix it with powder. There should be very little of each layer :)

Dutta!

Both when you tone out your concealer and when you apply more basic products (eg foundation and powder), I recommend dutt movements instead of pulling with the brush. Because if you pull, there is a risk that you pull off the cover that you have worked on.

I also prefer to always use brushes if I want to achieve a high degree of coverage, ie do not apply or fade with my fingers.

Do you want to cover your whole face?

If you only have one pigment spot that you want to cover, this tip does not affect you in the same way, but is more for people with more pigmentation on the face. This is because when you sit in front of the make-up mirror and look at the pigment spots, you can easily stare blindly and then you cover just about everything and then you feel too made-up because you do not really want a full-coverage base.

If this is the case - decide in advance which areas you want to cover the pigmentation completely on, and let some irregularities appear on other parts of the face. Then the whole make-up looks more natural and you have at the same time reduced the pigmentation to a very large extent.

Because you must not forget that pigmentation and stains are very charming too :) When I make up people with pigmentation, they often agree with me about this, so it is not something that only "I who do not have pigment spots myself" thinks but most people want that I cover a little completely and let a little unevenness be visible.

Option 1 for removing pigment spots:

For the first half of the face, I have used mineral-based products from gloMinerals. The concealer is available in several shades (from light to dark) and you can mix the exact skin tone using the two colors in the jar. You thus get a high degree of coverage in the same color as your skin tone. Can be used for all types of foundations but I use it for mineral foundation today to show you.

For mineral foundation, I apply the concealer before foundations, but if you use this concealer for a liquid foundation, you can choose whether you want to apply before or after.

PRODUCTS:

Concealer - gloMinerals Under Eye Concealer
Powder - Palina Prowder
Foundation - gloMinerals Pressed Base Foundation

The entire product kit above and the application technology that I will show are good for you who want:

  • Mineral-based and mild products
  • A matte base, you can of course add a little luster afterwards but the base itself is matte.
  • Quick application
  • Varied coverage ratio. With these products, you can get full coverage of the entire face or a semi-covering result. Perfect for varying everyday life and parties, or if you want more coverage on certain parts of the face and less on other areas.

Here you see before and after the half of the face with these products, nice huh? :)

Here's what I did:

    1. Powder the area with a transparent powder, very thin
    2. Add a layer of concealer. Fade the concealer by dabbing at the edges of the area. So do not smear by pulling with your finger / a brush on the entire pigment spot because then you remove all concealer, but do as when you fade out an eye shadow - fade out at the edge. For example. has Real Techniques good brushes!
    3. Wrap on a layer of powder so that the concealer is fixed. If necessary (not everyone does), add a little concealer and fix with powder again. This step was only needed on this pigment spot which is extra dark, on the others a layer of concealer was enough.

Keep in mind that you should have foundation over this as well, so even though as much as possible should be covered at this point, it does not matter a little of the pigmentation is still visible, because there will be more coverage over this as well.

Make up pigment spots 3 steps

4. Apply mineral foundation with dab / pressing movements on areas with concealer. And in any way (massaging or dabbling) in the rest of the face. For example. has Real Techniques good brushes.

I applied more foundation on areas with pigment spots and thinner in the rest of the face to get a more natural result.

Then the coverage rate is complete!

Option 2 for removing pigment spots:

On the other half of the face I have used liquid products from Pixi. And unlike gloMinerals concealer which you choose a shade that matches the skin tone, this is a color correcting concealer, ie a concealer that is peach colored and not only provides coverage but also neutralizes the color. It is an effective way to cover just pigmentation because even if it would shine through, the color makes the skin not look gray.

But all these peach concealers are quite light so they do not match your skin tone perfectly and are only suitable for people with relatively light skin. Can be used for all types of foundations but I use it for a liquid foundation today to show you. If the peach color is close to your skin tone, you can have it after the foundation if you want, but if it (as on my model) differs somewhat from the skin tone, I use it before foundation.

PRODUCTS:

Concealer - Pixi Correction Concentrate
Foundation - Pixi H2O Skintint
Powder - Bamboo Silk Powder

The entire product kit above and the application technology that I will show are good for you who want:

  • Prefers liquid products and creams
  • A bass with lusts. If you like liquid products but still want a matte base, you can easily matte down with powder afterwards.
  • Semi-covering results all over the face, but completely covered pigment spots. Gives a very natural look.

Here you see before and after on this half of the face :)

On this side, the pigmentation is a little more spread out and not as clear spots but more "one area".

  1. Powder the area
  2. Apply a thin layer of concealer with a brush, e.g. has Real Techniques good brushes.
  3. Dab on more concealer if more coverage is needed somewhere. But on this side, no pigment stain needs more layers of powder and concealer than on the other side.
  4. Powder again to fix concealer.
  5. Apply foundation, be very light on the hand so that you do not smear the concealer.

Make up pigment spots 3 steps

Here you see the transformation step by step :)

And with contouring, blush and filled eyebrows, she looked so happy :)

In conclusion, I want to emphasize that the above tips in the post can be combined with each other as well, for example, the model decided to in the future to use gloMinerals Concealer together with Pixis foundation. This is because she wants a concealer that matches the skin tone if one day she just wants a little concealer and no foundation, and because she wanted to test Pixi's liquid foundation.

If any of you still have any questions, do not hesitate to contact us, either in the comments field or via email at helena@imakeyousmile.se! Can also tips on the post about that reduce redness of the face, check it out! :)

HUG!


Tutorial - Pink party makeup

I had this make-up when I was out dancing in Öregrund :) I had an all-black dress and my slightly dull not-washed-in-6-days-hair just let go, so I wanted to do a little more fun make-up to spruce up it all and ran on bright pink lips and pink glittery eyelids!

I thought when I picked out everything that "this will be VERY pink" but when I was done then it still felt like a pretty natural make-up haha :)

Hope you like the look too!

Bassmink:
Face primer - Paese Makeup Base (Matte)
Concealer - gloMinerals Under Eye Concealer (beige)
Foundation - Pixi H2O Skintint (2 Nude)
Contouring & highlighter - Pixi Contour Creator
Rouge - Paese Powder Blush (35)
Fixing mist - Pixi makeup fixing mist
Net matting powder - Paese Bamboo Silk Powder

Brynpenna - gloMinerals Micro Brow Liner (Dark Brown)

Lipstick - gloMinerals Sude Matte Crayon (Sorbet)

The glitter is attached Kryolan Cake Liner Sealer - a liquid that is actually there to make cake eyeliners waterproof (instead of mixing with water) but when I discovered that it works EXTREMELY GOOD to attach glitter, I was very happy :)

I use it in the same way as Mixing Liquid from Make Up Store. Although this one from Kryolan does not feel as strong against the skin and eyes, I can not have mixing liquid under the eyes without them starting to flow, but with this one it goes gallantly.

  1. Eyeshadow primer, Pixi eye bright primer
    Apricot / beige eye shadow in the middle of the eyelid, Paese opal trio (colorado)
  2. Light yellow eye shadow in the inner part of the eyelid and in the corner of the eye, Paese opal trio (colorado)
  3. Light pink shimmer on the apricot beige eye shadow (had the apricot / beige underneath as this shimmer is not full coverage), NYX Roll On Skimmer (Mauve Pink)
  4. Brown eyeshadow at the end of the eyelid and along the globe line, Paese opal trio (colorado)
  5. Brown shade also along the lower lash line, same as above
  6. Fade the edges with a soft brush, Nanshy blending brush
  7. Glitter (from Make Up Store, the shade Nova, but it does not seem to be available for purchase anymore) attached Kryolan Cake Liner Sealer.
  8. Black eyeliner with wing, Paese liquid eyeliner
  9. Black mascara on the upper lashes and the outer lower lashes, Magnetic lash mascara

Clear!

Hugs are ♥

Fix long & nice nails at home (Step by step)

My nails were really bad before, fragile, soft and slicing all the time. But today I have very long, healthy & nice nails and sometimes I barely recognize them because they are so good, even though they have been so long now haha. I had lived my whole life with bad nails before :)

How to get beautiful nails at home

Now I thought I would give you tips to get long, healthy & beautiful nails, how I care for them to keep them beautiful, and also how I do French manicure because it is so nice on long nails and makes them look even longer than to have a color on the whole nail. I also offer some reviews on some nail products I have received press releases on.

Hope you like the post and shout out if you have any questions!

Fix long and healthy nails at home before and after

Here you see my nails naked in the before picture and then after a manicure á la Helena!

Make your nails grow strong and get long and healthy nails:

This tip is the only thing I can think of that has made me get long, healthy & beautiful nails, and that is nail oil! I never lubricated the cuticles before, then I started doing nail extensions and then there was so much nagging about nail oil as fragile nails can make the nail extension come off more easily - which it did on me kind of all the time.

Then I got into the routine of nail oil and when I then stopped with extension (which was over 2 years ago) I continued to lubricate the cuticles and since then my nails have been so much better!

Had someone told me how much difference nail oil makes to the quality of the nails, I probably would not have believed them, and I do not know if it applies only to me or if it applies to everyone, but for me nail oil at least made a HUGE difference :) And I has not made any other change so do not think it may be due to anything other than the oil.

How often should you lubricate your cuticles?

Many people say "I use nail oil" and when you ask how often it is like once a week. Better than nothing at all, but it is needed much more often if you want to see any difference in nail quality. My nail therapist told me 3 times / day, which I did in the beginning but no longer. But 1-2 times a day I lubricate anyway! Of course, you can completely forget any day, which is not a disaster when you get into the routine, and some days it will be more times. But at least once a day I would recommend.

bitch for long and healthy nails at home

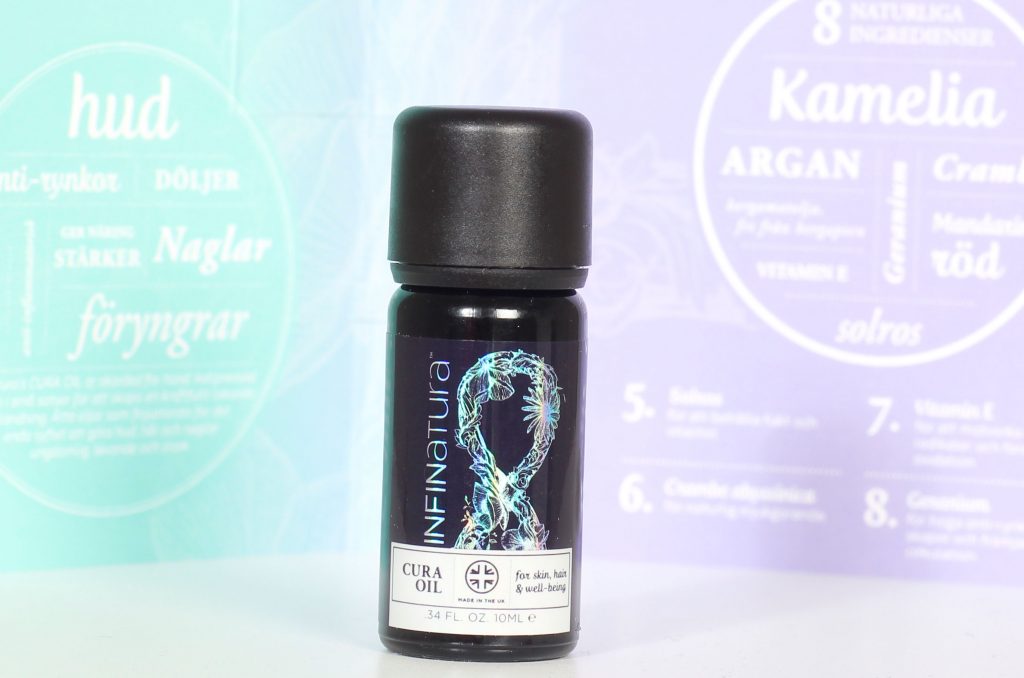
I use most often Infinatura Cura Oil (adlink), I use the big bottle for all hair, skin and nails :)

How to get into the routine?

"God so hard I will never do that" many of you thought when you read "3 times a day" right? ;) Yes it is a lot, but the only difficult thing is to remember it because it is not directly difficult or time consuming. I always have nail oil on the desk, but you can put it anywhere you see it often. In the handbag, it rarely does me any good. Next to the toothpaste or next to the bed are also good places!

Please hand care products

Not drying out the nails more than necessary is also an important detail to keep in mind. Of course, you should paint your nails and play with different nail polishes, but a simple thing is to replace your nail polish remover with a remover without acetone! For example Nailmatic Essentials Care - Dissolvant / Lavender Nail Polish Remover (adlink) it smells of lavender, acetone free.

What you choose for hand soap is also good to think an extra turn around! Many people use fine, moisturizing products for the face and body, but the hands that you wash the most, you use a strong soap 20 times a day. This gives not only dry and chapped hands but also nails and cuticles. A tip on hand soap is Aesop - Reverence Aromatique Hand Wash 500 ml (adlink)

So, a mild and moisturizing hand soap and an acetone-free remover for the nail polish, you do the nails a big favor :)

Now for the manicure:

1. Polishing file

I use polishing file for the nails but really want to emphasize that you do not over-file! The nails often become striped (in structure), which is because the nail has hard fibers and around these the nail is much softer. So when the nails are striped, the soft has been worn and there is more of the hard left. If you then file away the hard as well, the nail will be very soft, and it will be quite the opposite of what we want to achieve. In addition, they can become too thin if you file a lot, and you do not want that either.

I file gently on the nail so that it becomes a little smoother and shinier, but is very light on the hand and does not file much at all. A little also makes a big difference. Then it is better to use varnish that fills in the irregularities that remain.

2. Nail cuticle remover

Oh what I love this product! A cream you put on the cuticles that softens so that you can easily remove old skin. As after a long hand bath fixed in 1 minute. Top! I like it from Makiash but see that they do not seem to sell it anymore, too bad! Trind Cuticle remover is also really good.

And corner - this on the cuticles on the toenails, so good now in the summer :)

3. Keratin balm

This is a product I started with recently, but already after 2 applications I feel a difference on the nails so I really want to recommend this! It is Trind Keratin Nail Restorer which is a conditioner you have on the nails, it is shiny when applied but when it dries it is not visible at all. It contains keratin and repairs damaged nails. I think my nails feel more moisturized and not as "brittle" as before :) Really thumbs up!

You can either apply it, let it dry and then apply any nail polish, or you can leave the nails unpainted and then you can paint on a new layer every day.

4. Base coat / Keratin protection

Together with the above conditioner, Trind recommends using nail polish Keratin Nail Protector also. I think this product is good if you do not have nail polish over, because it takes quite a long time to dry so you have to do more steps then you lose patience, and even though it says in the product description that you may have colored varnish over this so I think that the nail polish you apply later lasts much shorter. It kind of can be pulled off in a big chunk.

In other words, I use this for this tutorial but can really only recommend it if you do not have painted nails. It fills in irregularities, gives a nice shine to the nail and, as I said, even more care for worn nails.

So I use first Keratin restorer (conditioner), then this Keratin Protector and after that nail polish.

If you do not use this particular product, I would base with a regular base coat, preferably one that is a little extra leveling.

5. White tops

For my tops, I used the nail polish Essie Coconut Cove which is great for French manicure! The formula is very thin so it is easy to get even edges and in addition the white color is a little milder than chalk white which I think is nice too.

The reason I did French manicure in this post is precisely because it emphasizes that the nails are long. Sometimes when I have full-colored nails, I am shocked by how long the nails look when I remove them and you can see so clearly how much longer than the finger they are.

When I paint the tops, I do not use any templates at all, but run freehand. I think it's easier as the edge gets much nicer. The most important thing is not to have a too thick varnish because then it is very difficult! I paint sideways with the brush and make a line that is not completely straight but slightly bent. Then I'm not super happy that everyone is exactly the same in length, etc. because after a few days one has gone off a bit at the top and they are uneven again hehe.

6. Light nail polish on the entire nail

After that I apply a light, transparent nail polish as a top coat! I like to have a light varnish because it gives a milder effect, but if you like more contrast (it's great too!) You can have chalk white tops and just a transparent topcoat then.

The light color I have used is Essie Gel Couture Bridal Collection 2017 in the shade Dress is more. Just a thin layer, because it gives quite a lot of pigment if you make thicker or more layers.

Summary for long, healthy looking nails at home step by step:

Fix long and healthy nails at home step by step

Here you see all the steps in the manicure I described above! :)

Fix long and healthy nails at home

Stylish and fresh, really nice nails!

Should I only recommend three things, I say 1. nail oil 2. cuticle remover and 3. a good undercoat or similar that fills in the stripes of the nail so that you get an even, fine and durable result without having to file the top of the nail so much.

Hope you got some useful tips on how to fix long, healthy & beautiful nails at home step by step. If you have any questions, just comment below! :)

Also read the post "Make acrylic nails on yourself".

Hug!

en_USEnglish