Make up the eyes bigger - step by step!

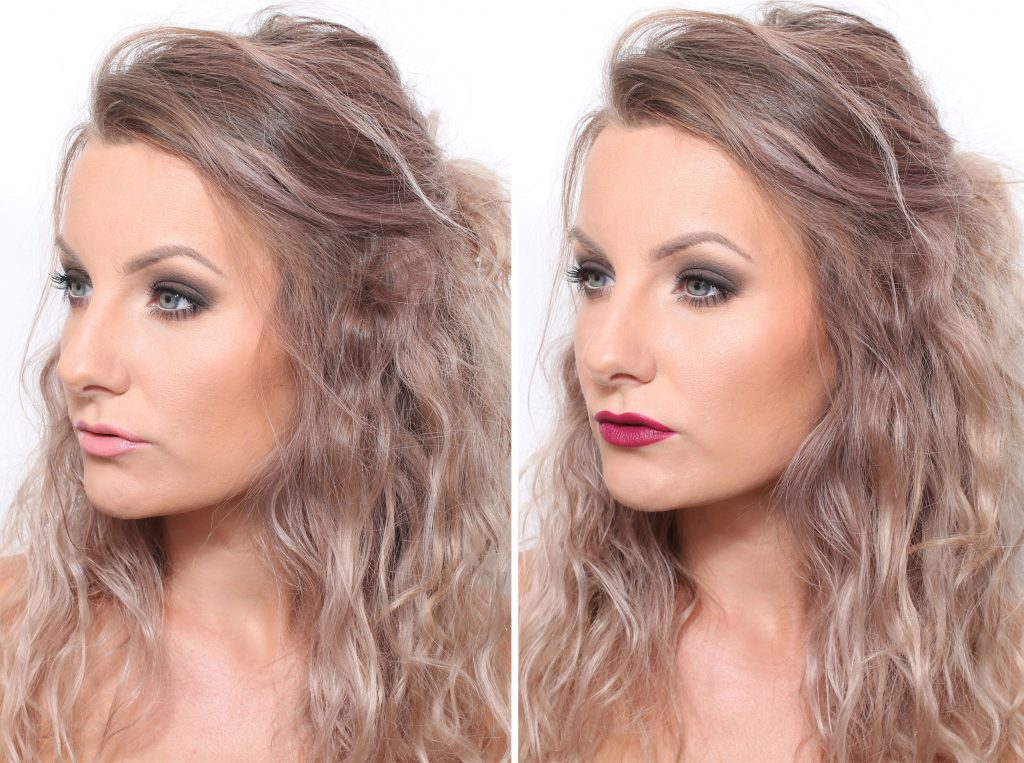
One of the most common makeup tips people ask for is: how do you make your eyes bigger?

Today's make-up enlarges the eyes very effectively and here is both a step by step guide and a detailed description of what a difference all tips make! :)

There are different ways to make your eyes bigger, but the easiest way is to think about these details:

Lighten up
Light up the waterline with a light eyeliner and right at the root of the lower lashes. The light along the waterline makes the eye look more open and the light at the root of the lower lashes makes the eye look bigger.

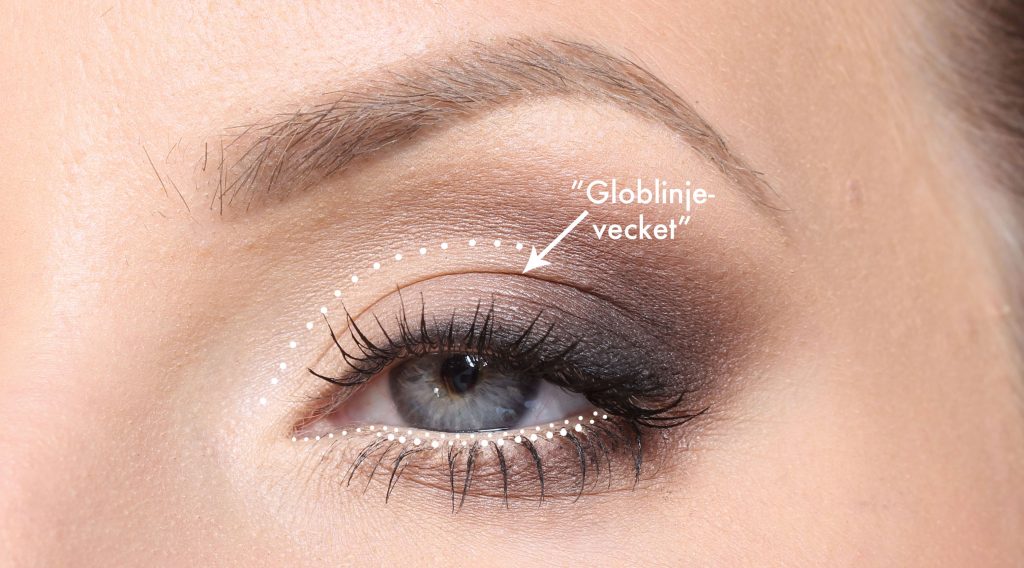
Also lighten the eyelid and corner of the eye with a shade that is lighter than your own skin tone. I cast the shadow over the globe line crease as well, which creates the illusion that the eye is larger.

Mark
It is the light shadows that magnify and make the eyes "pop", but I always put dark shadow around also to 1. mark the magnification and 2. get more depth in the gaze.

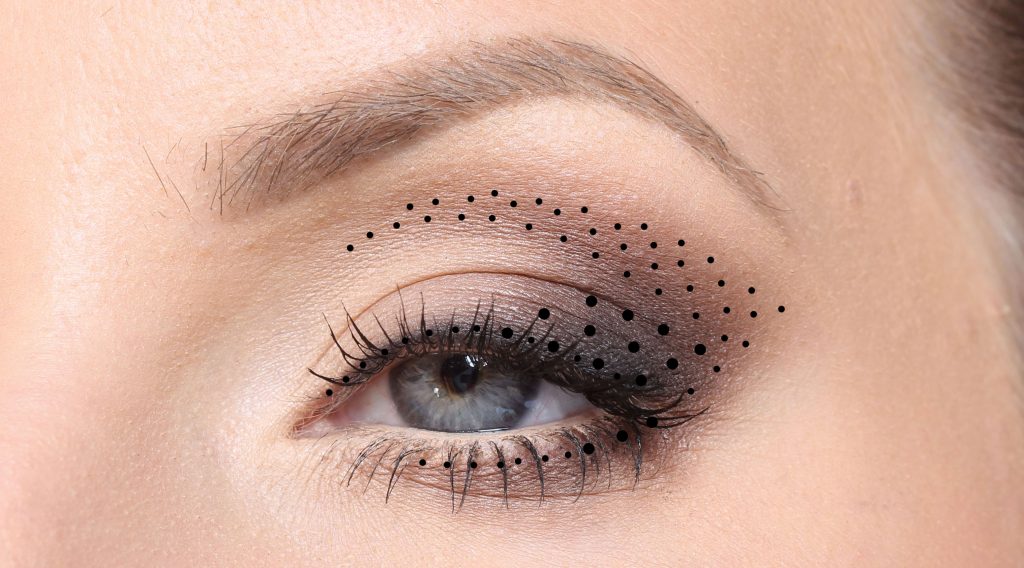
Apply a dark shadow on the outside of the eyelid and up over the globe line, that is, above the light shadow.

Put a dark shadow under the eye below lash root, so do not put anything up against the eye because you have brightened up there before.

Mascara
It's no secret that mascara enlarges the eyes, but there are two more tricks:

Complete the mascara with a lashliner! Then the lashes look fuller and the eye gets a more lift. More about that in the paragraph below :)

2. I apply mascara on both the upper lashes and the lower lashes, but on the lower lashes I do not apply only to the root (but not so far that it looks like I only have mascara on the tops) because it also gives the illusion that the eye looks bigger because we light up there.

Another thing too: Many people think that the more lashes the bigger the eyes, and yes to some extent it is so but you do not have to overwork the lashes because we have brightened the eyelid for a reason - and if it is only black lashes above the eye when you look straight ahead, you cover for all the work you have done on the eyelid.

Lashliner / fringe marking
Make a lashliner / lash marking before applying the mascara. Read more about how to do it in this post. A lashliner fulfills two functions when you make up the eyes larger: 1. Eyeliner lifts the gaze and the eye looks more "awake". 2. Lashliner is a narrower variant of eyeliner and is made between the lashes, so it is not so wide that it takes up space of the eyelid. The wider the eyeliner you make on the eyelid, the smaller the eyelid will be.

In today's make - up I have done this with a black eye shadow, I made it narrow like a lashliner on the inside of the eye (where I enlarge the eyelid) but at the outer edge I want to lift the eye and then I smoked wider there.

Contrasts
The contrast between light / dark emphasizes each other. It is of course possible to make the eyes bigger according to these tips, but with more discreet tones than what I did in this post - but you do not get quite as much effect. Using a shade that is lighter than your skin tone and a dark color that is quite a lot darker than the light color, it enlarges the look more than a medium light and a semi-dark shade.

BASE:

All products are in my web shop Creativemakeup.se!

Face primer - Paese Makeup Base (Mattifying)
Powder - Paese Bamboo Silk Powder
Concealer - Pixi Pat Away Concealing Base (1 Cream)
Foundation -
 glo Pressed Base Mineral Foundation (Golden medium)
Powder that neutralizes redness - glo Redness relief powder
Contouring - Contouring Palette (2)
Rouge - Paese Powder Blush (38)
Fixing Mist - Pixi Makeup Fixing Mist

Eyebrows - glo Micro Brow Pencil (Light brown)

Lip pencil - Benecos Natural Lip Liner (Brown) all over the lips

Of course, all these tips work regardless of color choice, only the contrast between light / dark is important. Then if you instead choose a bright yellow eye shadow on the eyelid and a dark green along the globe line, it doesn't matter :)

EYES:

All products are in my web shop Creativemakeup.se!

Prime with eye primer before you start! I use Pixi Eye Bright Primer. All eye shadows are from the trio palette Paese Matte Eyeshadow Trio (101) in addition to the black.

  1. Light eyeliner along the waterline and down a little on the lower lashes, glo Precision Eye Pencil (Peach)
  2. Dark brown shadow along the lower lash line (below the light pencil)
  3. Fade with a little light brown shadow on the brush for a softer fading.
  4. Dark brown shadow at the end of the eyelid
  5. And up over the globe line
  6. Light shadow in the corner of the eye and up the innermost part of the eyelid + above the globe line
  7. Light brown shadow in the middle of the eyelid
  8. Black eye shadow as a lashliner (thin on the inside of the eye) and soot wider at the outer edge of the eye.
  9. Black mascara on the lower lashes but not all the way to the root, Magnetic lash mascara
  10. Bend the lashes on the top and apply mascara on them as well.

Clear!

Hope you were inspired and that the tips were helpful :)

Hugs are! ♥

Perfect everyday eyeshadow!

Today's make - up is done with my new everyday favorite - Glam Eyeshadow in the new 204 from Paese! :)

This eye shadow is very nice all alone (and together with other eye shadows of course) and incredibly fast applied - dab on the entire eyelid and draw a few quick swipes along the crease line and under the eye, of course!

Light shadows are more discreet and quickly applied than dark, but if the color is lighter than the skin tone, I do not like to have it around the whole eye, then I want to supplement with darker along the globe line and at the outer edge.

But the shade 204 is a bit darker than my skin tone but still so light that it is quickly applied and discreet. At the same time, it has a nice glow and shines in apricot / beige so it enlivens the eyelids too! :) Love !!

The most important thing about an eye shadow is that it should be nice in reality (of course) and most eye shadows look the same in the picture as in reality. But shadows that change in different tones are really very difficult, never look as good in a picture as in reality!

The shade 204 is such an eye shadow that is super nice but which does not look so special in the picture. It is a cool light brown / beige tone that shimmers in apricot / gold, but on today's make - up it looks more purple, is not it strange?

I do not like to have bad mobile pictures in my posts but I had to take flash photos with my mobile to get a picture that will be as similar as possible:

The shade is quite exact as in this picture, although it is not as clear glitter grains as in the picture but the shimmer is more of an even glow :)

Swatch image taken with the mobile phone:

Swatch photo taken with my photo lights, so the same as the makeup photos in this post:

I hope you get a pretty good overall picture of what the shadow looks like anyway! :)

BASE:

Face primer - Paese Makeup Base (Mattifying)
Foundation -
 Pixi H2O Skintint (2 Nude)
Concealer - Pixi Pat Away Concealing Base (1 Cream)
Powder that neutralizes redness - glo Redness relief powder
Powder - Paese Bamboo Silk Powder
Contouring - Contouring Palette (2)
Rouge - Paese Powder Blush (38)
Fixing Mist - Pixi Makeup Fixing Mist

Eyebrows - glo Micro Brow Pencil (Light brown)

Lip pencil - glo Lipliner (Vino) on the whole lips

In this eye image you can also see more clearly how the shadow is in reality!

Surely it really is a perfect everyday shade? :)

EYES:

Prime with eye primer before you start! I use Pixi Eye Bright Primer.

  1. Shimmery shadow on the entire eyelid and along the globe line, Paese Glam Eyeshadow (204)
  2. The same shadow under the eye
  3. Light shadow in the corner of the eye and under the brow, Paese Glam Eyeshadow (201)
  4. Black shadow along the upper lash line, Paese Kashmir Eyeshadow (602)
  5. Black mascara on all lashes, Magnetic lash mascara

Clear!

I have tattooed the waterline light + black lashliner (lash marking) between the upper lashes. So for exactly the same result you can supplement with a light eyeliner (e.g. glo Precision Eye Pencil in the shade Peach) along the waterline.

Hugs are! ♥


Light or dark lips?

A while ago I showed you a matte brown sweep (in this post) which I supplemented with glossy, bright lips.

However, the decision anxiety was total haha, light glossy lips or dark carpet? Both are so beautiful!

So for fun I tested both :)

In the last the post you will find the entire product list, but the dark pink lipstick I added now is also in my web shop - Suede Matte Crayon in the shade Rumor from the brand glo Skin Beauty!

I left the hair the same but a brown sweep can really vary extremely much depending on how you style everything around. For example. red lips and a tight knot!

Maybe such a post would be fun to make at some point? Several different looks with the same eye makeup :)

Would be fun to know which lip color you like best! Partly on me but also which one you had chosen for yourselves :)

I noticed before (it was a long time ago though, so do not know if it is still so) that I usually got more likes on Instagram on my makeup pictures with bright lips. But that does not have to mean that people like bright lips more, it can be as simple as the eye make-up sticking out more in the pictures?

I sometimes hear that I am photogenic, but I only have my certain angles that I always test and then after about 100 pictures I choose the 4 best and the rest is usually shit haha. Unreasonably bad even - considering that I'm probably taken a million pictures of myself since I started a makeup blog in 2010.

That the angles would be the same in these pictures with light / dark lips was thus not planned even though it looks like that, I did not really intend to publish both but I came up with it afterwards. It's simply that I only have a few poses that I always do haha. I will never be good on cards if someone else takes pictures :)

Once when I posted before and after image on a concealer or foundation or something, I got a comment that I edited the result because it was the same image before and after, although it was not I just looked exactly the same on all pictures haha.

Anyway! Have a nice day everyone !! ♥

Black & White with Paese Matte Trio 104

Last week I showed a post with five make-ups done with the trio palette Paese Matte Trio Eyeshadow in the shade 101. A matte eye shadow that is divided into three colors (light beige, light brown and dark brown) that is incredibly useful for both everyday make-up and party make-up!

There are two more shades for that eye shadow as well - 103 and 104. The shade 103 is also beige / brown but lighter and warmer than 101.

And the eye shadow that I will show you now - 104 - is grayscale with white, gray and dark gray! In today's make - up I have done a classic light-to-dark make-up with light on the inside of the eye, medium dark in the middle and darker on the outside, to show you each color properly :)

Hope you like the makeup!

BASE:

Face primer - Paese Makeup Base (Correcting)
Concealer - Pixi Pat Away Concealing Base (1 Cream)
Foundation -
 Pixi Beauty Balm (3 Warm)
Powder that neutralizes redness - glo Redness relief powder
Powder - Paese Bamboo Silk Powder
Contouring - Contouring Palette (2)
Rouge - Paese Powder Blush (55)
Fixing Mist - Pixi Makeup Fixing Mist

Eyebrows - glo Micro Brow Pencil (Light brown)

Lip pencil - glo Lip Liner (Moxie) all over her lips

The darkest color in this palette is dark gray / gray black and is therefore easier to work with than a carbon black shade. The result is less hard and it is easier to get an even fade.

This one is absolutely wonderful to make smoky eyes with, especially for you who do not find it difficult to fade a carbon black shadow!

EYES:

Prime with eye primer before you start! I use Pixi Eye Bright Primer.

  1. Gray eye shadow in the middle of the eyelid
  2. Dark gray eye shadow at the end of the eyelid
  3. Same shade along the globe line, fade out.
  4. The same shade along the lower lash line
  5. Gray eye shadow in the fade (both along the globe line and the lower lash line) to get an even softer fade.
  6. Light shadow in the corner of the eye and under the brow
    Moisten a brush (I moisten with Pixi Makeup Fixing Mist which I have for the face too) and apply the dark gray shade as an eyeliner.
  7. Black mascara on all lashes, Magnetic lash mascara

Clear!

I have tattooed the waterline light + black lashliner (lash marking) between the upper lashes. So for exactly the same result you can supplement with a light eyeliner (e.g. glo Precision Eye Pencil in the shade Peach)

Hugs are! ♥


Sunday post v. 33

At the time of writing it is Friday and this post is timed because on Sunday I am in Spain !!!!

Jobflow & Roadtrip in southern Spain!

Miska and I rent a car and travel around southern Spain again, just like last autumn in other areas. We fly to Malaga, are away for 18 days and stay in 8 different hotels! Our route is Frigiliana - Granada - Montefrio - Caminito del Rey - Júzcar - Tarifa - Marbella - Los Romanes.

We were in Tarifa last year also fell in love! We just have to go there again!

I do not think that other people's holiday pictures are great fun when you go on a charter, but on the other hand people who visit different places and film a lot, I think it is great fun! I thought I would be good at updating Insta Story this trip (was half good last year) so follow me on Instagram @ Imakeyousmile.se if you want to keep up at a distance :)

Here I am in Ronda last year ♥

I have had a real autumn feeling lately and got into a real flow with the job! Such a flow that I almost felt that it was bad timing to travel away right now, I have enjoyed cave in and work long days.

But much of the work I have done has been preparatory for the autumn and preparatory for me to be able to be free for 2.5 weeks. So for the first time, it does not feel at all stressful or difficult to go away because everything is like finished! :)

There will only be two makeup posts a week during these two weeks, but I have at least prepared a lot! Here above you see my "blog almanac" where I always write in my posts.

All green posts are ready and published / timed
All yellow posts have started
All blue posts (do not have such now) are planned posts but for which I have not photographed material yet.

A better home office!

Before
A customer asked me this week "you say you live small, but how small is it? Do you have a sofa and TV and stuff anyway?”.

We live in a small guest house with a room and a small attic upstairs. The upper floor feels more like an attic than a room because there is a low ceiling and sloping ceilings on both sides, so the side walls are about 80cm high? :) In the room downstairs we have space for a bed, a small table with two chairs and then there is a kitchen area.

We have toilet and shower as well. When we went to Finland to visit my sister, I showered läääänge and enjoyed all the place - in the cabin of the boat. Then you know you have a small shower at home haha!

We make it work! :) But it is not an optimal accommodation when working from home, it starts to be a small problem that I always work downstairs because it feels like a prison in the end to do everything on exactly the same chair. We sleep, work, eat and are free in the same small room. I work at the table when Miska works in bed, then we change.

Annika has had the attic as storage. We have no closets so we have clothes on racks there, but otherwise it is an old bed, garbage bags, stuff and a whole lot of winter jackets. Plus I printed a small desk + my photo lights at the bottom, so I can take pictures of my make-up there.

When I have to put on make-up, I first have to crawl under the make-up lamps, then there is a narrow path to get to the chair on the other side, which I rarely do without accidentally knocking over lots of things on the way haha.

Change!
Now to the point - this weekend I got approved to remove Annika's stuff, even the bed! So that's why I did not write a Sunday post last week because my Sunday was spent in the attic cleaning, cleaning and furnishing! :)

Guess how WONDERFUL it was to move all the work stuff upstairs later and make a home office in the attic? I njuuuter!

Now the downstairs is only for free time! It is important to be able to distinguish between work and leisure !!

I did not photograph a role model, but this is what it looked like before the furniture chaos was at its worst!

In the middle of it all, I told Miska ”oh what I feel like a mother now, partly because of the project itself but also because I thought the idea that it would be great with a cleaning beer" Lol.

A moment later he came up with this "drink" for me:

My favorite candies and a Toblerone drinking stick haha! So fun and also so worth having had time to taste in the meantime :)

After
Now I have a spacious make-up area with a table next to it = I do not have to have all the brushes and products on the desk = I can use the desk as a workplace for computer work too!

Nothing fancy as you can see, but it's such a nice improvement haha!

Next to it, I also have a reclining armchair with such a high backrest that you kind of get stuck with straight legs, so when I need to change position, I can jump over to the armchair! Very ergonomic and good with variety because I often sit for several hours in a row. I know you have to get up and move in between but I do not like to break my focus when I work.

So nice, haha!

I must add that it is a little difficult mentally to understand that I am moving forward in my career when everything I see physically in front of me looks like I am going backwards. A year ago I had a large house with an entire room as a walk in closet for only beauty products and a salon of 367 sqm and my own office at work. Everything is much more stable now than then, I feel better and the company is safer. But when you have a bad day, it is easy to look around and whip yourself with the thought "it's almost 4 years since we started the salon, I have toiled like an animal and not even taken out a salary half the time - to now be crowded among things in a dark wind and still have financial anxiety”.

Fortunately, most days are good days! :) And then I think instead: think that I have built up a company with such a good team that handles everything so well that I can work 90% from home! I live cheaply and can save money for a dream house in Spain and we also have so much fun here with Annika and Mileya. Mileya is 7 months now and just growing and growing, she has learned to sit by herself, crawl and stand up to things over the course of 3 weeks!

It all depends on how you see it haha! The most important thing is always the "soft values", that my life looked more successful in appearance a year ago really does not mean that it was! On the contrary indeed! :)

Here I sit in the evening and work in my little corner in the attic! I have really taken advantage of the workflow period I had and started working immediately after breakfast (usually around 8 o'clock) and then I have worked until 20-21 in the evening. You get a lot done on such full days! :)

Make an autumn schedule, again!

You never do things 100% unnecessarily, you always learn something! But what if I had known when I was struggling with the autumn schedule this spring that everything was in vain haha!

This spring I talked to everyone in the staff about what they thought about the current schedule, routines etc. Then I did a huge job (excessively well done I realize in retrospect) with 1. a new schedule which only took a very long time 2. an example schedule in the booking system so that they would get a clear overview of how their times synced with colleagues and 3. a long document where I described the improvements and how the schedule facilitated the routines with lunch and booked time for "tasks" without customers where the person who finishes 14 is responsible for the webshop, the person which ends at 4.30 pm is responsible for customer contact with answering emails etc. and the two that end at 8 pm are responsible for cleaning and orders. Kind of like that. I thought it was great!

It turned out, however, that no one thought the schedule was good, no one wanted to end at 4.30 pm, no one wanted lunch, everyone wanted the "task booking" at a different time than I had decided, etc. haha. Everyone simply wanted exactly the old schedule, so that's how it turned out :)

Cut to the chase - this autumn one of the makeup artists (who is a substitute for Lisa who is on maternity leave) will stop and we will not have time to train a new person before Lisa returns. And since the previous schedule is adapted for 4 people who work shifts, we now needed to change the entire structure in any case! So I did the autumn schedule twice unnecessarily this spring and now I had to make a third attempt! :)

Now it went a little smoother than the first time anyway haha, but it's a lot of work anyway because I want to make everyone as happy as possible, but when they think that different things are good / bad, it's really hard. It would have been easy if it was an office job, but we have opening hours to adapt to and preferably everyone should work alone as little as possible, but it is also a bit too crowded for all three to work at the same time. Lots to think about!

Now it's done anyway! Pjuh! :)

I have also had some customers at the salon, worked with reports, salaries etc. at the turn of the month and also worked with the makeup brand I plan to start if everything goes as it should;)

But I do not have time to write more now because we have to go to Arlanda now! I have not finished packing yet and Miska just said "we will leave in 40 minutes" waaah. I was too chatty on all the other points in the post so time just ran away haha.

Now I have to run! Hugs are !! ♥

en_USEnglish