Review - NYX Double Stacked Mascara

NYX has a fiber mascara, NYX Double Stacked Fiber Mascara (adlink), which just like Santhilea Magnetic Lash (which I always use otherwise) does not have the fibers mixed in the mascara itself but these come in a sleeve on the side of. You apply mascara first, then fibers and then mascara again, then the fibers settle on the lashes as a thickening and extension.

I received the mascara in a press release quite some time ago and now I have finally put it to the test! :)

At once I say diss to the fibers, not that they are bad in themselves but because I do not understand the thing with just white fibers! I want to be able to focus only on painting the fibers nicely and not also have to think about embedding them completely in mascara so that nothing white is visible. The fibers that I otherwise use are already carbon black, so if they are not covered by the mascara for 100%, it still looks nice.

However, the mascara is not expensive so you can skip using the fibers and only use the mascara, and I like the mascara itself :)

So now I thought I would skip the fibers and focus more on the mascara!

Award
It has recommended a starting price of SEK 179, so I think more that the fiber sleeve can be seen as a bonus type.

Speaking of which, there is mascara for SEK 143. HERE (adlink) and it says "only a few left in stock" so that's a tip! :)

Appearance & result
This is what the lashes look like, without fibers only mascara :) Nice huh? Good volume and length but still separated and fine.

I still have a little bend left on the lashes after my eyelash permanent (lash lift) so they are a bit bent even though I did not use a bender.

Packaging
The sleeve is large but contains 8 ml, which is "normal" for a mascara, so only the packaging looks great.

Mascara brush
The brush is a pretty "classic" mascara brush and I think it gives just the right amount of mascara and combs the lashes well!

Application
I think it is very easy to paint! The brush is not stingy in color, but you quickly get a lot of mascara and volume, but it also does not give too much mascara so that it becomes difficult to paint or clumsy. You can easily build on a little more without it becoming clumsy.

sustainability
For me with very oily skin, it is at this point that most mascaras fail. It is difficult to find mascaras that are not dissolved by oil and smudges on the brow bone. This mascara is water-soluble and does not crumble or smudge, so it lasts great!

It's not as easy to wash off as I'm used to though. I think this is an important point on a good mascara and also a difficult balancing act - it should sit well all day but disappear easily once you remove it! But it is also not difficult to wash off so it is not a big minus.

Summary - I will not use the fibers but the mascara itself gives nice volume, length and can be applied quickly, a lot of color directly and no lumps or strangeness! Good durability without crumbling or smudges, not waterproof but still not the easiest to wash off. Affordable even if you do not use the fibers or if you only use the fibers for parties as you have more time to do with the lashes.

If any of you tested this, it would be fun to hear what you think :)

Hug!

My business week v. 9

This week has been on the same "admin job track" as last week! Lots of to-do things that have been tackled and a good mix between creativity and musts :)

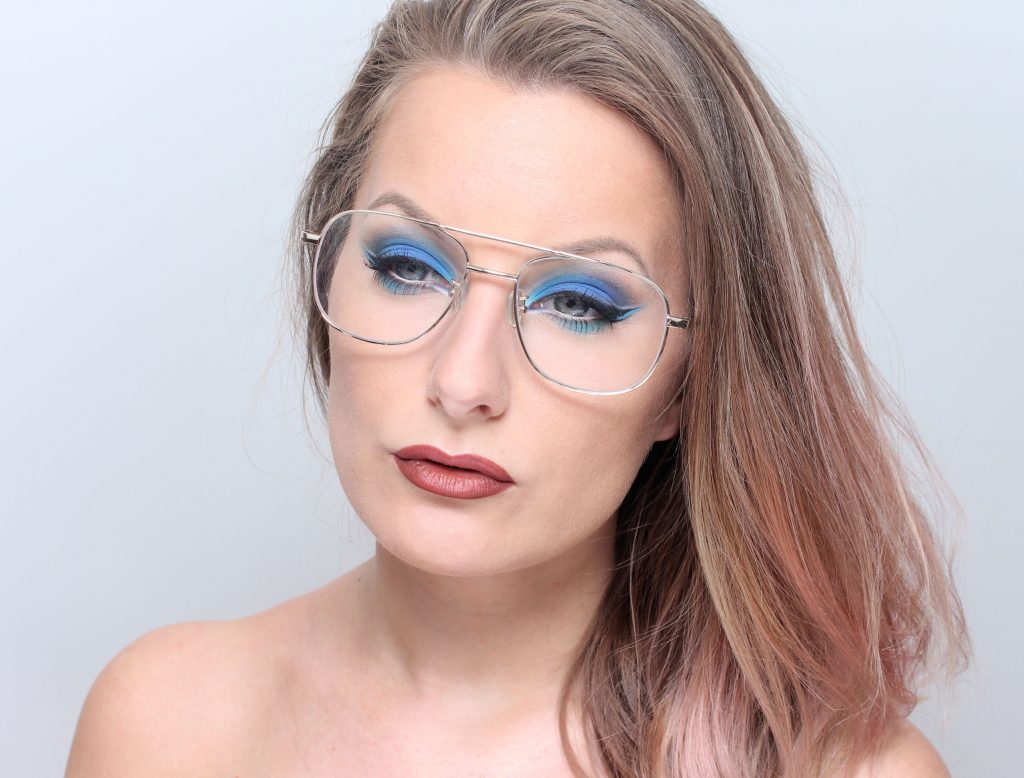
The film application for TV programs
Then I also helped make a video for a person who is going to apply for a TV show. Even though it was not a job, I have been able to use my make-up skills, film equipment and also edited the entire film! It was so cool! An evening project this week :)

Happy staff room!
We have set up a large whiteboard in the staff room (where we also have our meetings) where we will, among other things, write down everyone's to do's after the meetings. For example. was one thing on the action plan (where we list all the do's) from the last meeting to buy pencils for the whiteboard and when I came to work one day it was so nice in there:

Annika has bought pens and magnets and also pasted on our logo (in different colors) on all magnets so each magnet is a Creative Makeup logo! The finishing touch - just like our brand! ;)

Clearer descriptions of permanent makeup variants
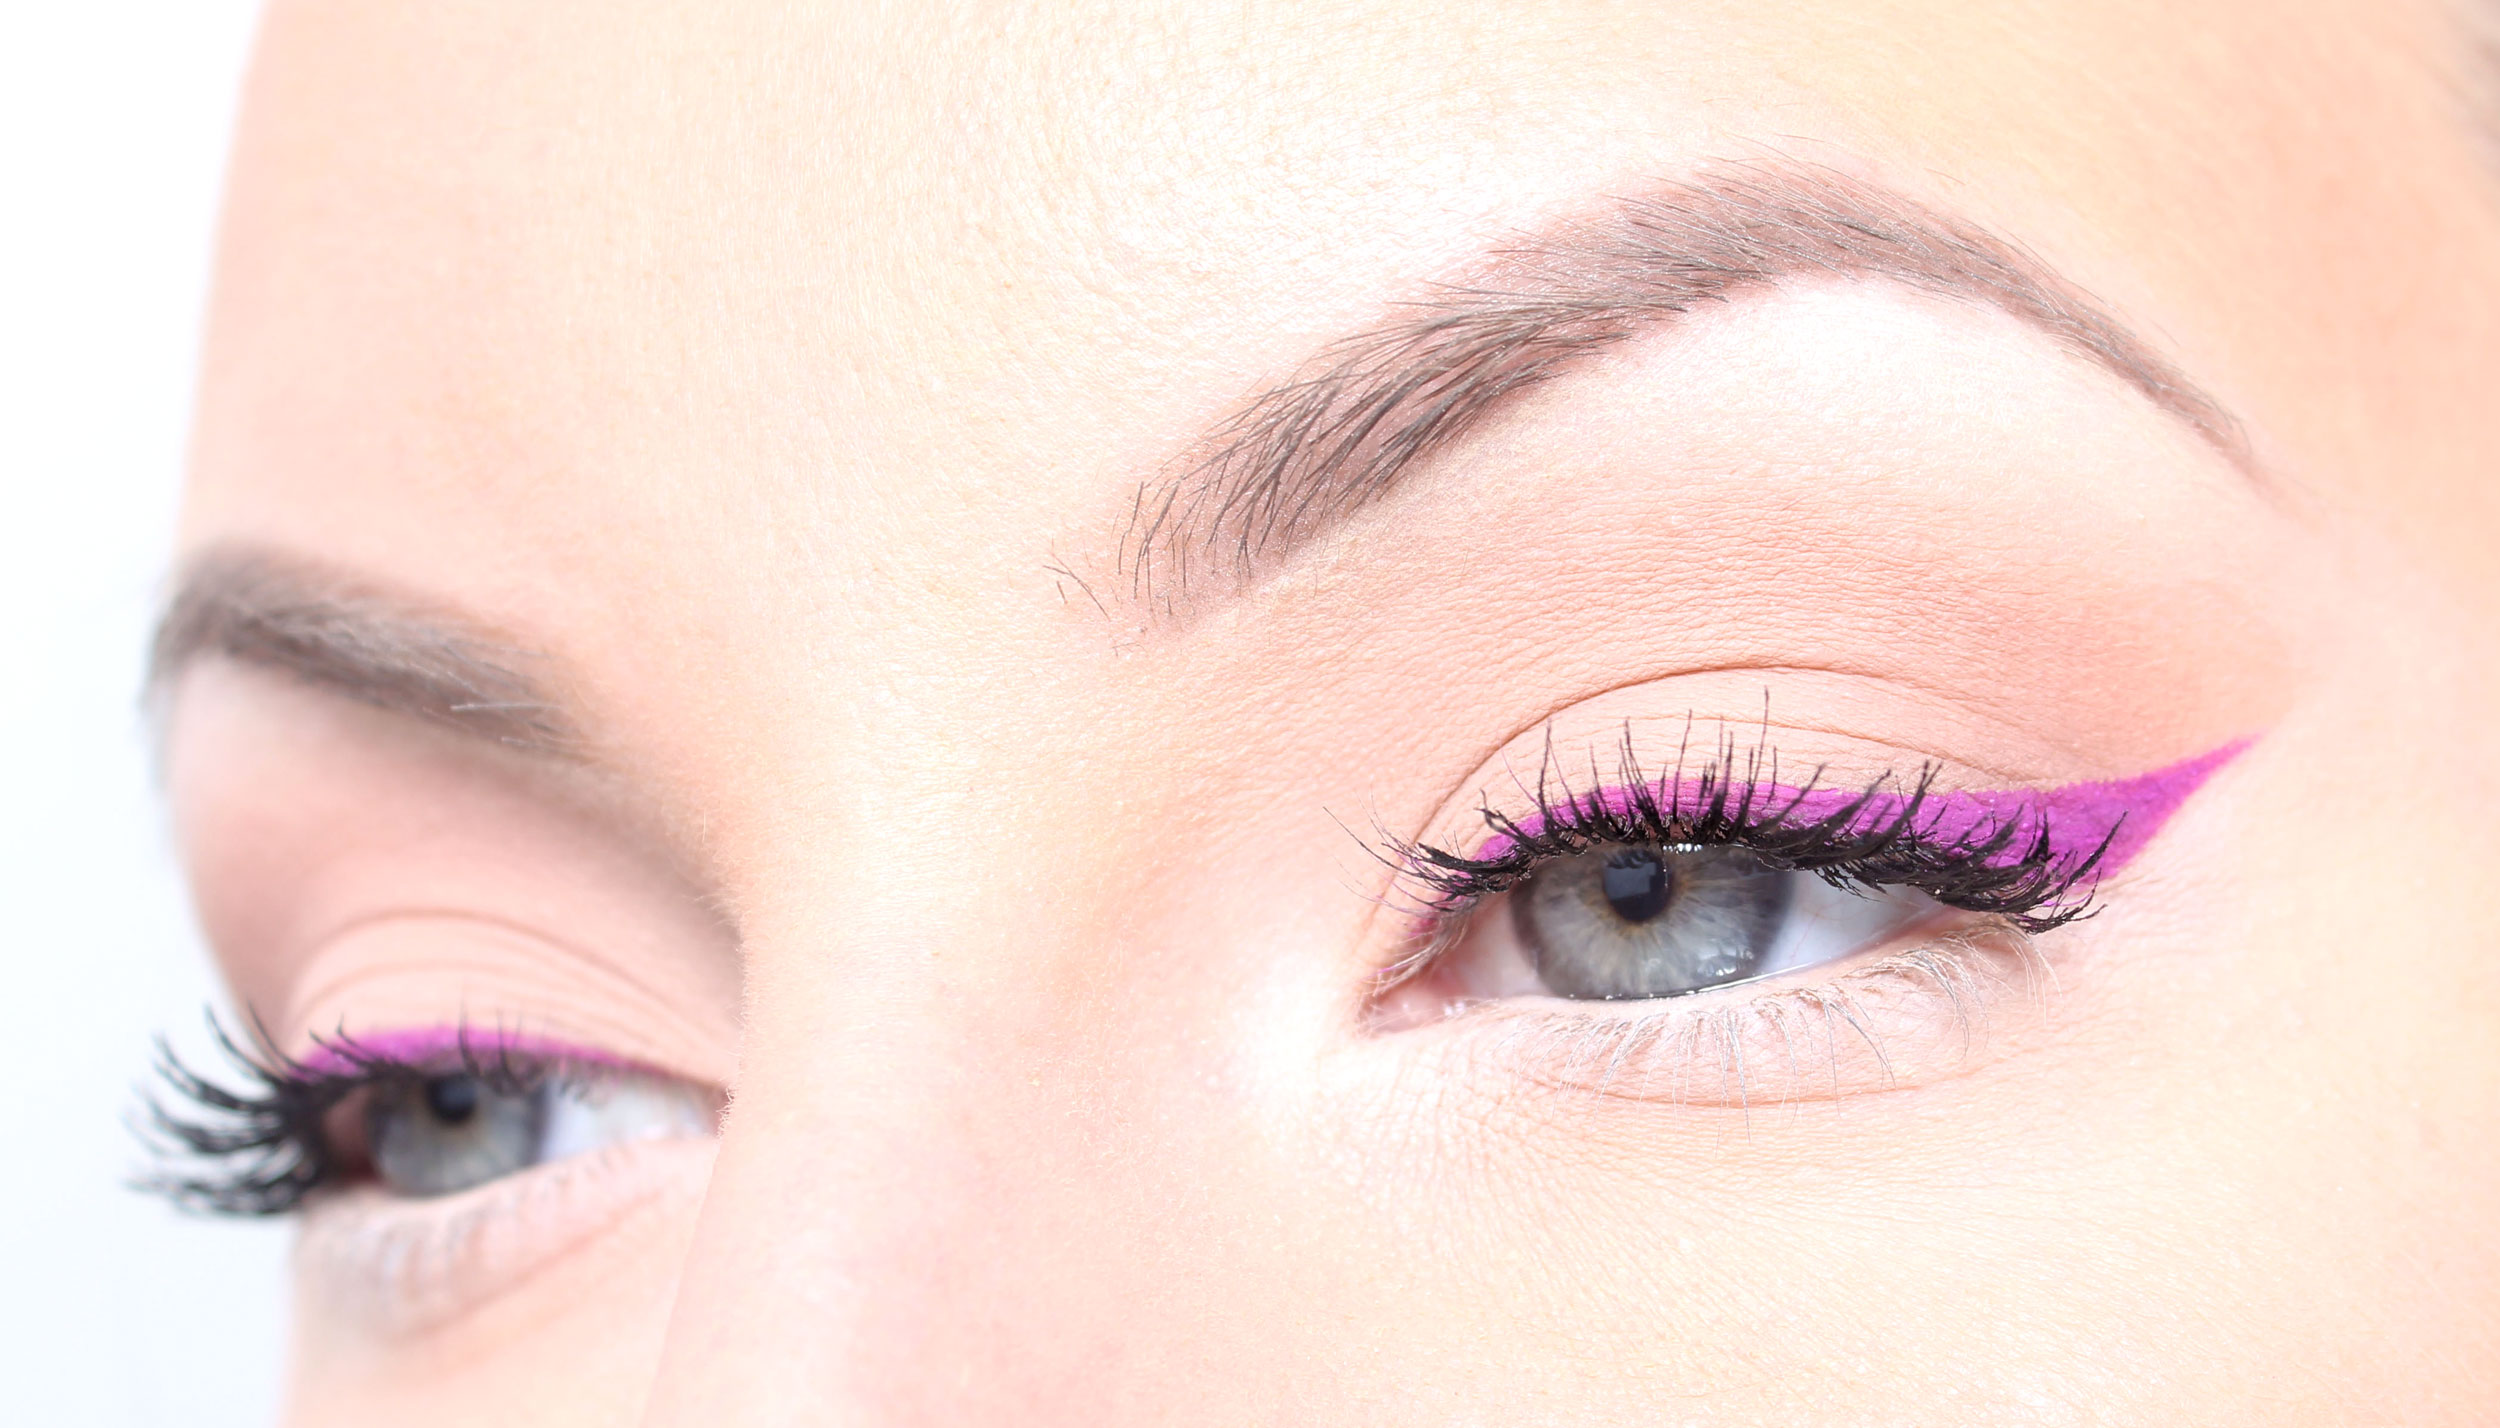
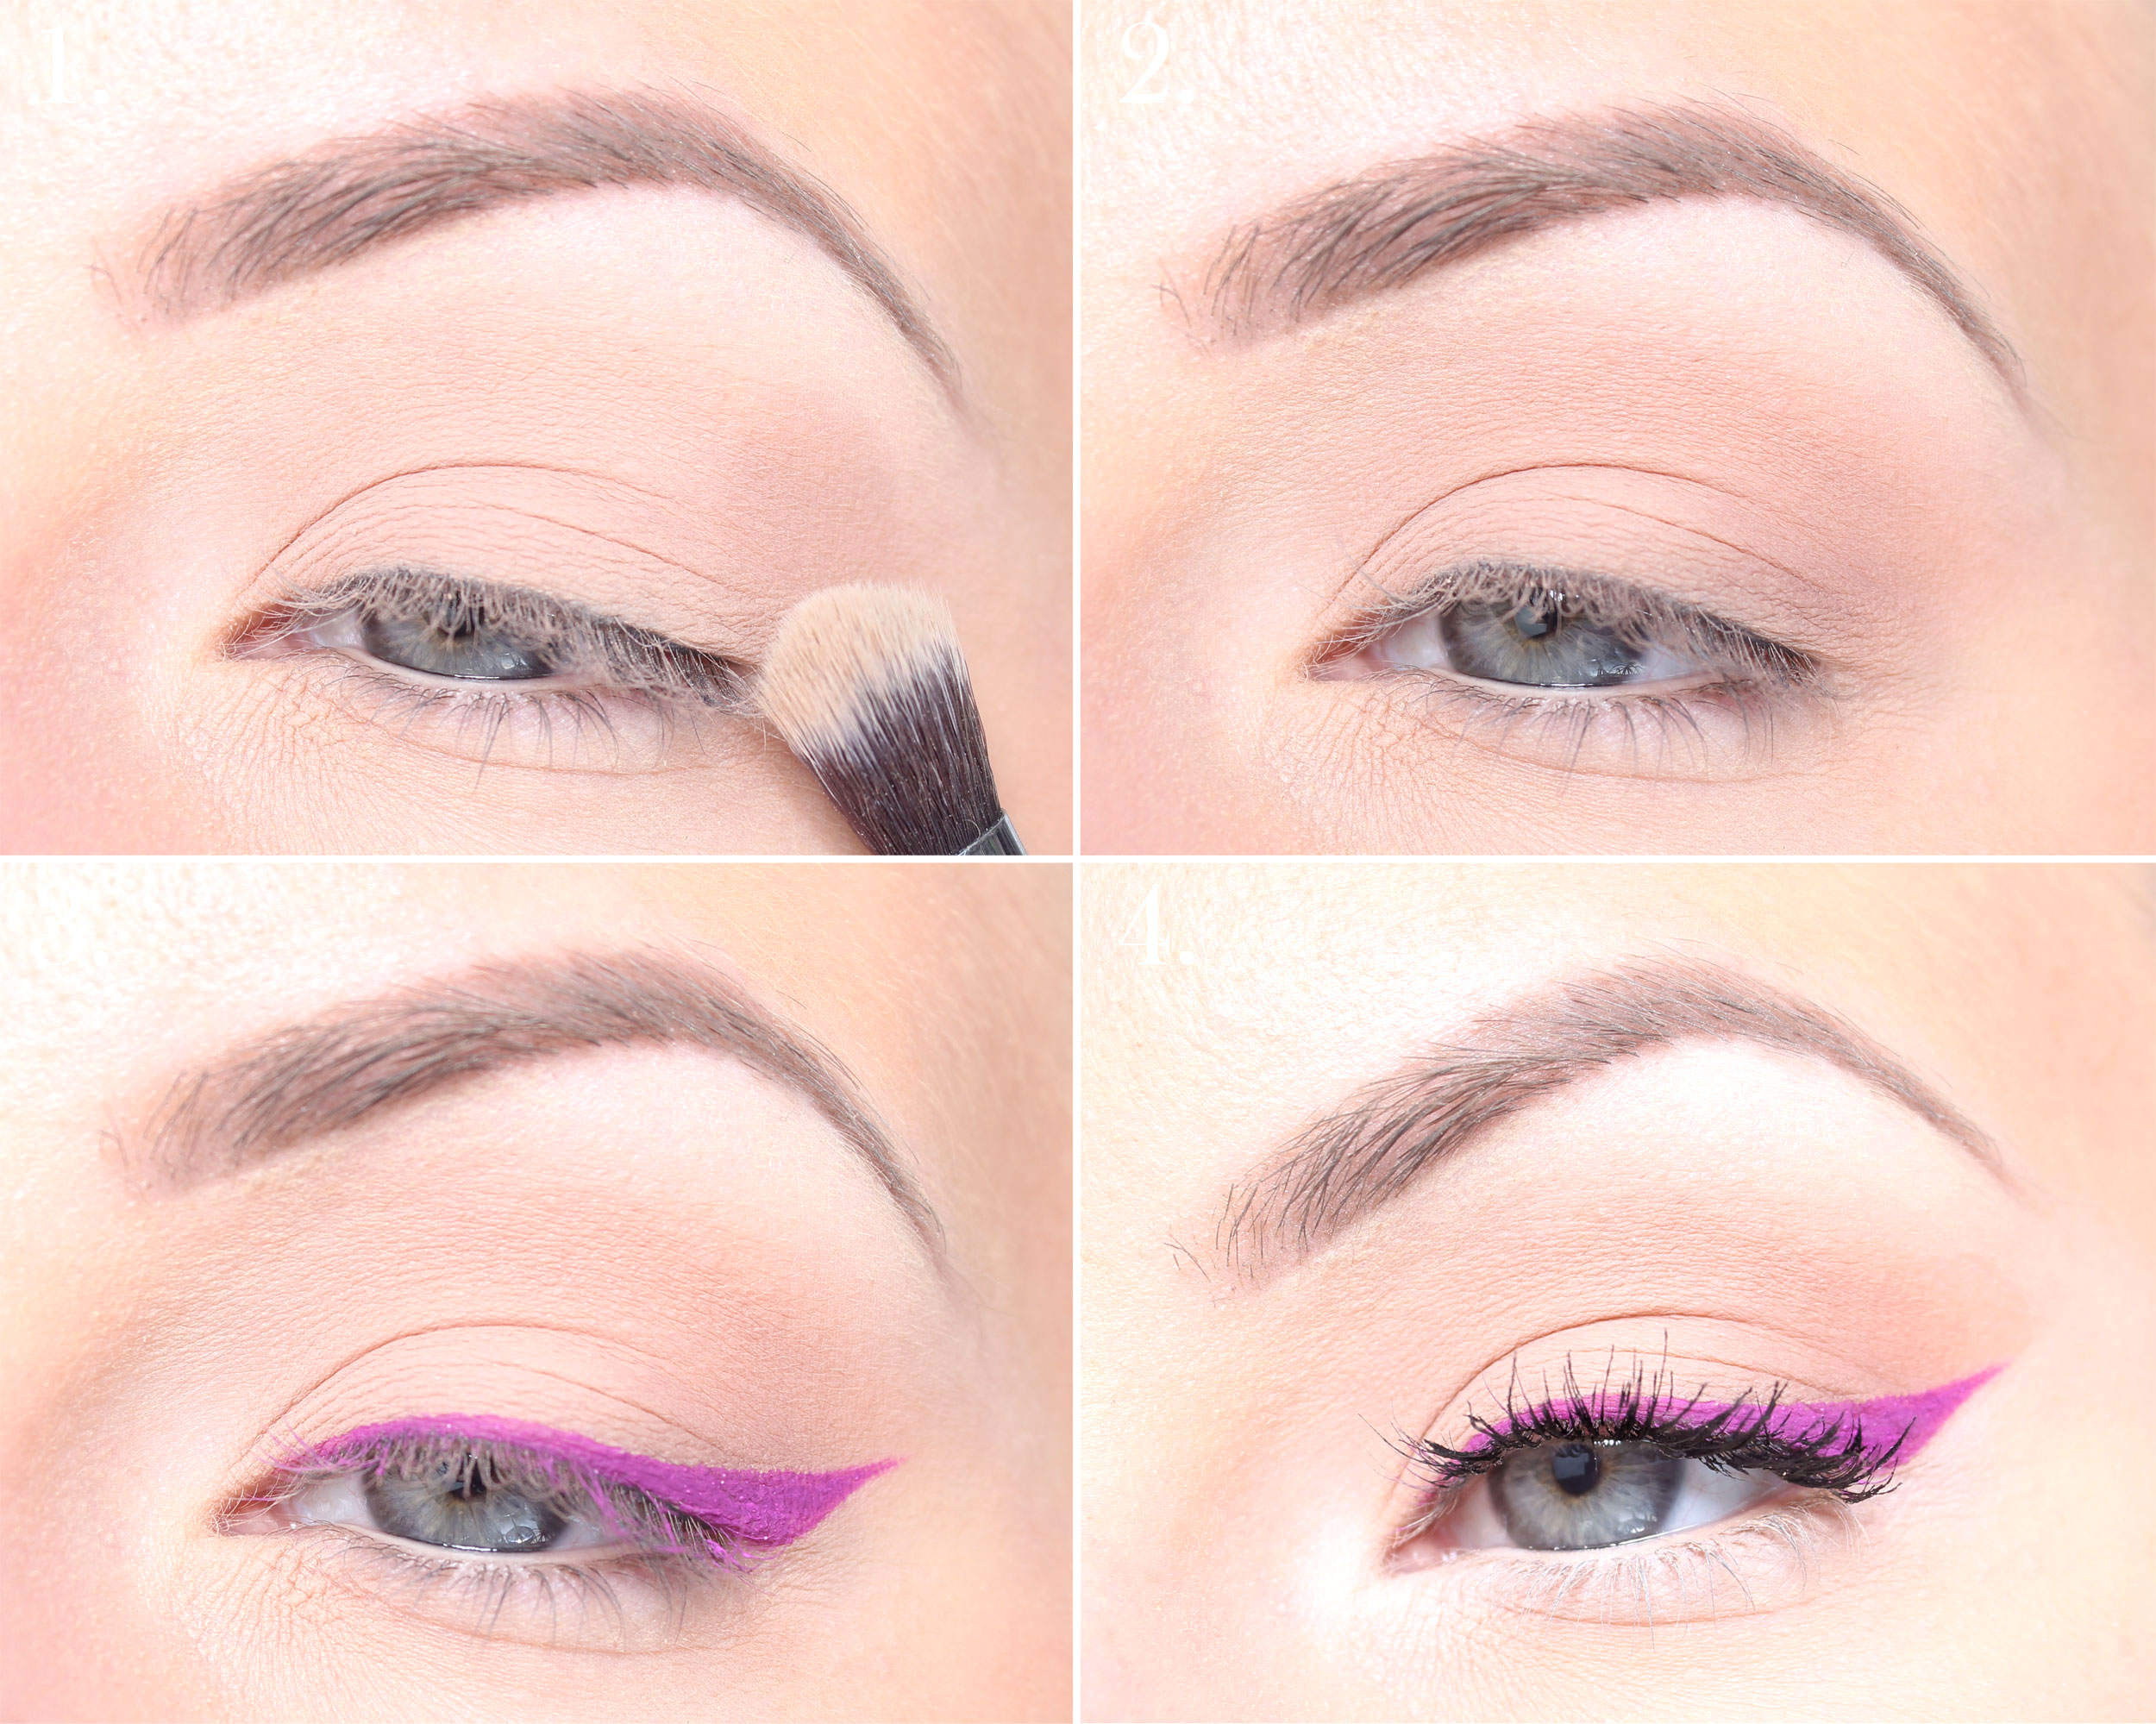
When you tattoo permanent makeup, there are several different variants you can choose from, not only "eyeliner" and "lips" but you can make the eyeliner thin, wide, up + down, sharp, smoky, a little drawn out, different colors etc.

Most details you get help to decide on the spot if you are unsure, you draw before you get a tattoo so you can see the result before. But what you need to decide before is the size so that you book the right amount of time and can see before what the price will end up at.

The same is with lips, you can make an intoned contour, 3D / ombre, the whole lips in the same color and add highlights :)

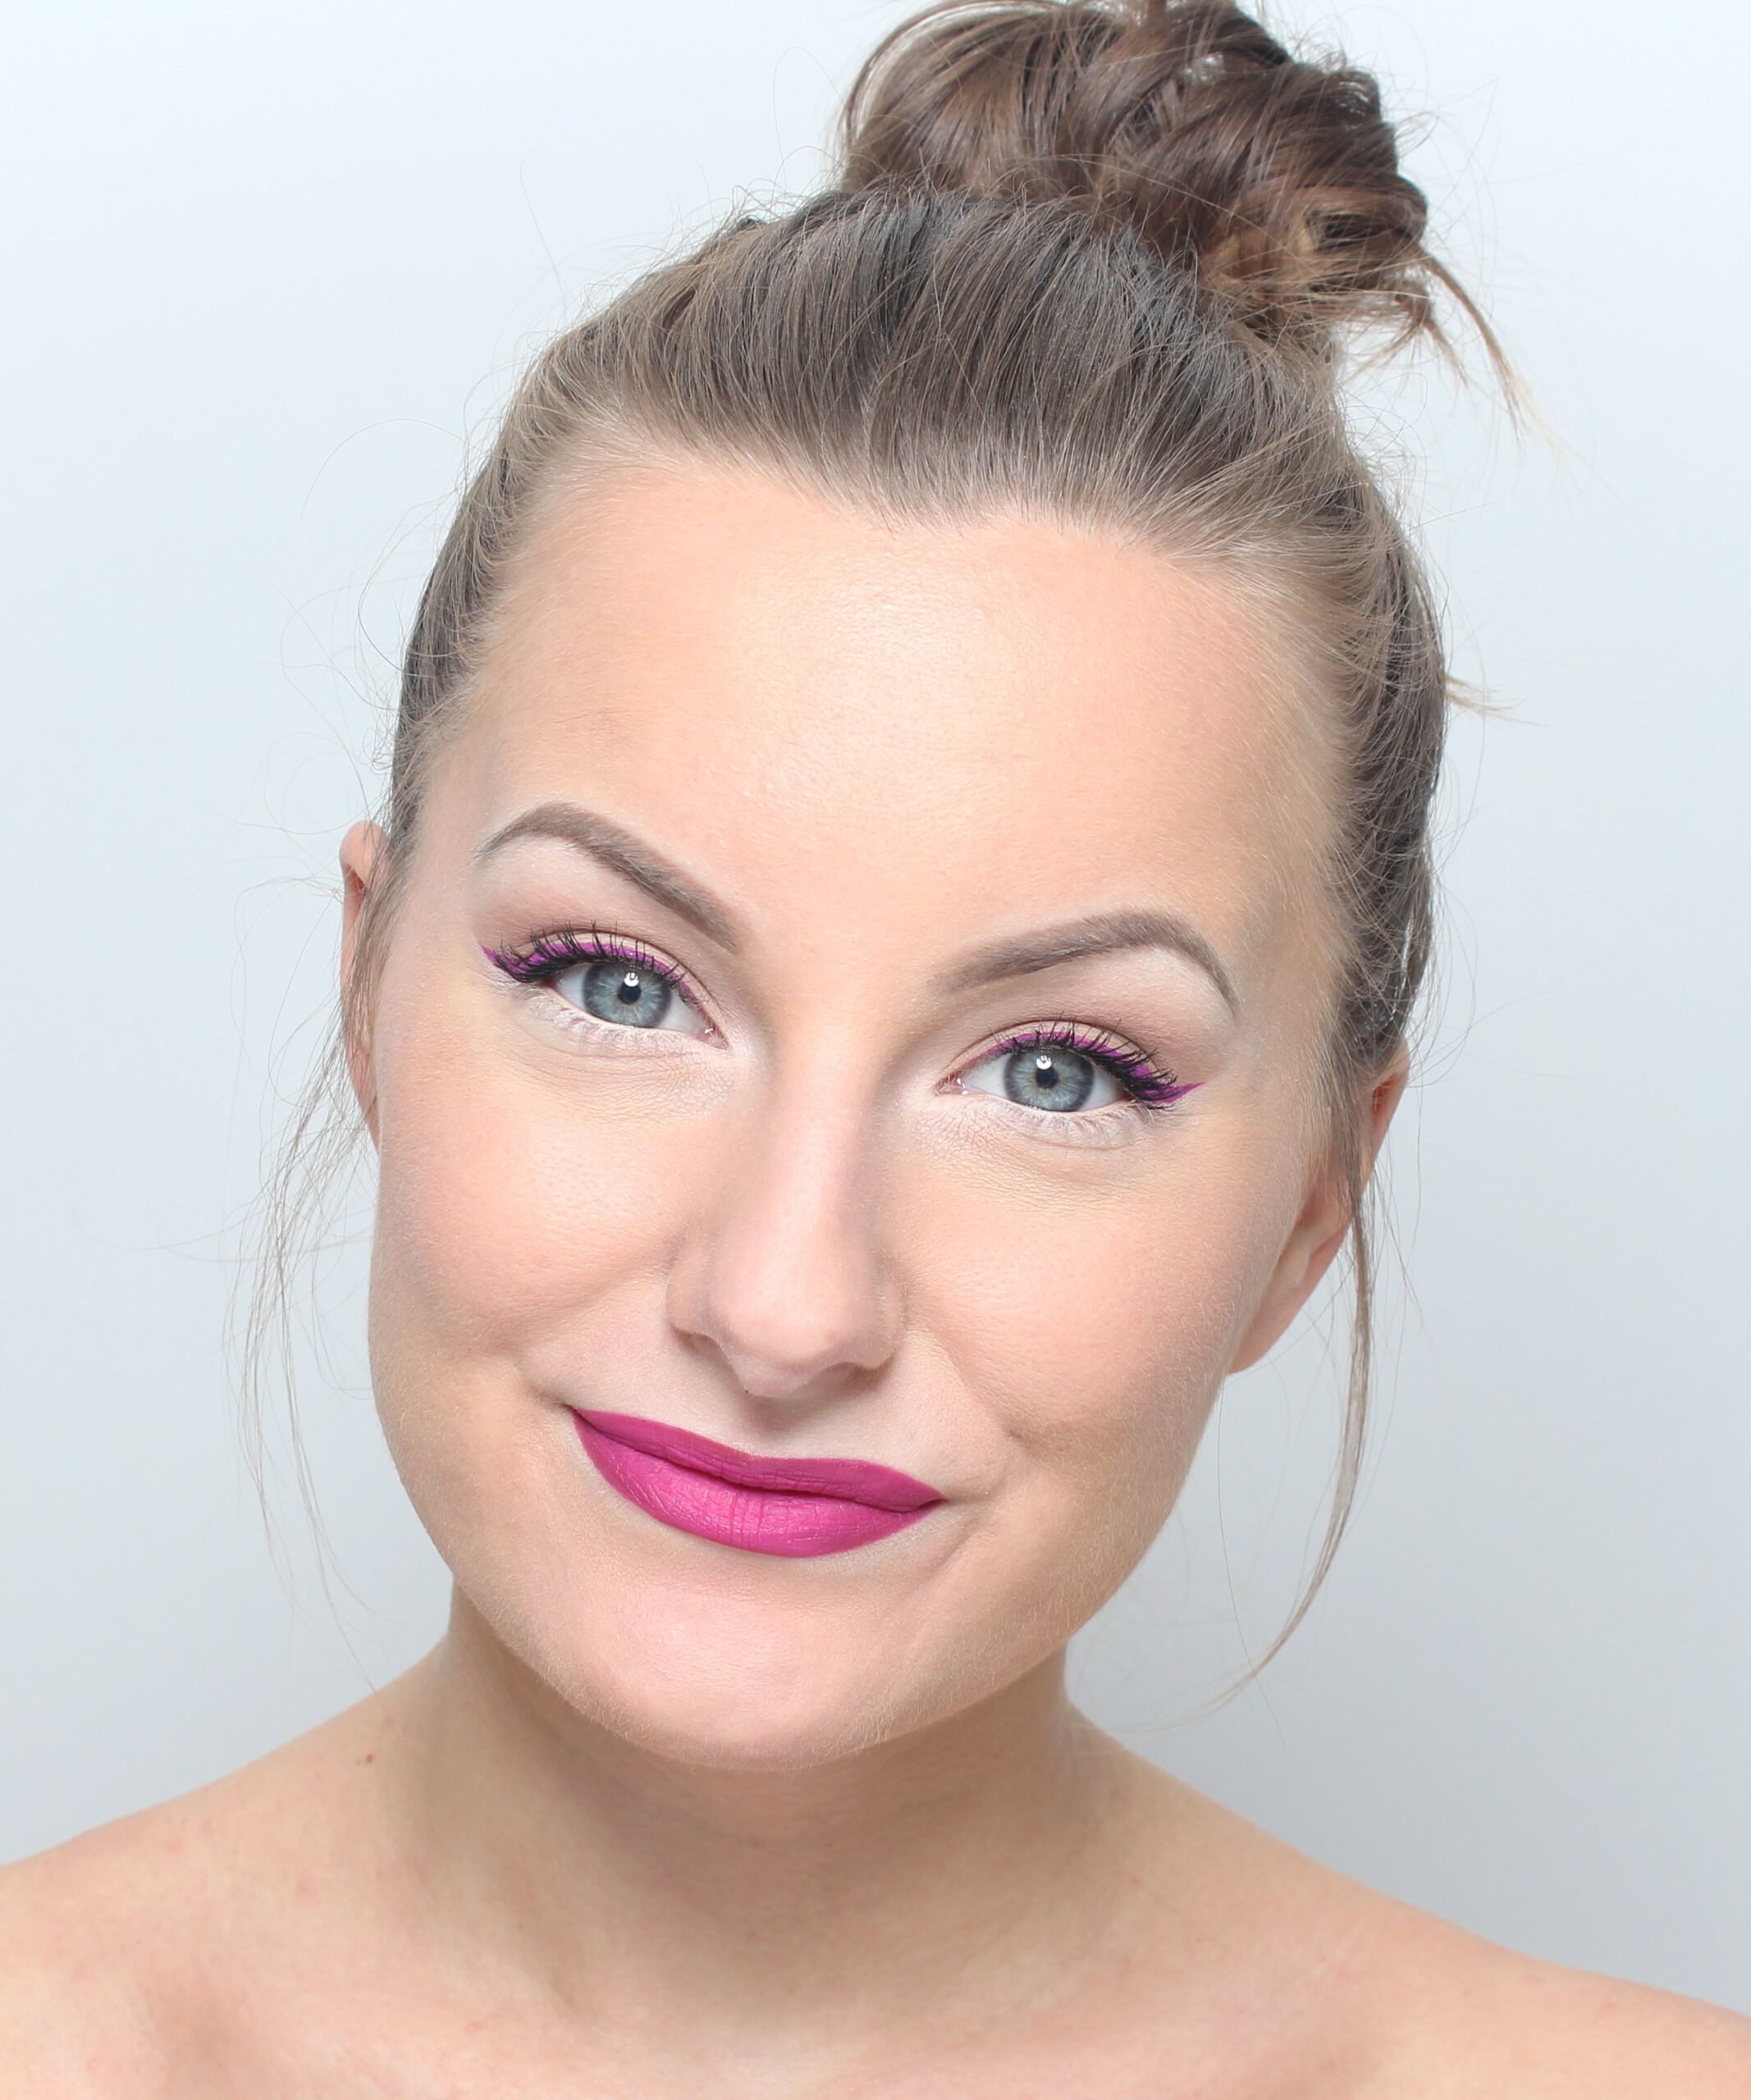
Therefore, I have taken pictures of one eye and lips that Annika has drawn all the variations on so that you can clearly see the difference! Before, we only showed pictures of tattoos that we have done, but when everyone has different eyes, it has not become as clear.

Here is the result:

Surely it is clear and good? :) If you are wondering more about the different variants, you can read on ours website!

Eyeliner LIGHT is actually a new eyeliner that we added when we noticed that there is too much jump between lashliner and medium, there are many who want wider than lashliner (thinnest you can do, right in the lash root, just as narrow all the way) but that they do not want to be quite as wide as medium which is a clear eyeliner over the French edge.

As I said, you can vary the eyeliner a lot, all the above variants are under the price range "Medium". The smoky ones are also two-colored in both black and brown. But if you are unsure, it is enough to book "Eyeliner medium up" or "Eyeliner medium up + down", we will help to decide the rest of the details at the salon later :)

Here are the pictures of the different lip variants:

Fint va? :) The color we drew with is quite dark to clearly show the differences, but there are lots of colors to choose from and you can make very light as well or match your own lip color completely if you just want a slightly sharper shape or adjust symmetry.

If you want to make your lips bigger, it goes under the same price range, the only thing you need to decide is one of the above variants :)

Prices and html codes
Doing all variations on permanent makeup has been a teamwork between me and Annika, but what was most work for me was actually to edit the new info everywhere! The website, the price list, the booking system and then explain all the changes to the rest of the colleagues as well.

And when I started rowing I came up with more improvements that we changed, it is not interesting to print exactly everything but I had a long list of improvements that I brought up with Annika and it became a project that took me the next whole day to get ready! Exhaled and felt really happy when I was done :)

When you change the price list on the website, I do it not in plain text but in html codes. So it's a little puzzle! So a simple point like "change in the price list on the website" takes quite a lot of time.


Problem solving and coding when you sleep!
I feel so good every time I work alone until I go to sleep and think it's so nice to get a lot done on the evening twig, I kind of have nothing against it. But once I go to sleep, I'm up in work mode and find it very difficult to fall asleep. I need a quiet moment in between to unwind my head! And when I finally fall asleep, I dream stress dreams about work instead, like all night!

This is exactly what happened on Thursday BUT the dream of the job still led to a good thing which was a bit fun haha.

It is difficult to explain quickly, but we have briefly different measurement documents where we enter statistics, such as excel, and it is a thing that we have changed, which means that twice a month I need to calculate a little on the calculator, which is not difficult at all but you prefer to just write everything and then the document takes care of itself. Streamlining :)

But in the dream, I came up with a solution with how I could change the codes so that it counted correctly by itself. Sick dream I know, I have not even really put much thought into this. I was so curious when I got to work, realized what I had dreamed and would test if it actually worked, you know dreams are not always so logical, but listen and be amazed it turned out just fine haha!

So happy what I then haha!

Hairology meeting & rehearsal training
This week I have had a meeting with Diana who is our contact person at Hårologi, we meet regularly and it is always just as rewarding! Mainly we talk about how everything goes, plan new trainings (I will for example go to a thing in Gävle in March and in addition our barber will be trained as a hairologist as well) but also we run rehearsals so that all knowledge from the training kept fresh in the memory :)

Because I can say that the education is really useful for food, so repetition is super important even for me who is nerdy and rarely forgets things that are interesting. But there is so much to keep track of with the hair's various crosslinks, pH values etc.

But above all, this meeting has led me to prepare a rehearsal lesson for all the other hair pathologists at the salon as well! They have exactly the same education as me + help more customers with Hairology than I do, but these "geeky skills" that I delve into are very good that everyone repeats!

Here I sit with Viktoria in front of the fire and prepare some questions about Hairology! Thought this was unreasonably fun, the most fun thing about talking to Diana is getting to talk to someone who is also passionate about products and is interested in really in-depth knowledge. In this case how the hair works, why makes the products different etc. So much fun!

New month!
This week was a new month again, which means new campaign pictures to be published (and exactly EVERY screen in the salon was a hassle, how sick) and then the salaries from February will be fixed, statistics and budget documents will be made. So I've been sitting with some of that too.

Now I'm going to Uppsala and celebrate my friend Frida's birthday today woop woop!

Have a great Sunday everyone ♥

5 makeup tips for glasses

There are lots of make-up tips for you with glasses, a little depending on what shape the frames have and what effect you yourself are looking for. Here are my top 5 tips that will suit everyone with glasses!

Contents 5 make-up tips for glasses:

  1. Adapt to the shape of the glasses
  2. Are the arches light or dark?
  3. Balance in the face
  4. Get the basic make-up to hold
  5. Eyebrows
  6. Make-up for glasses

5 makeup tips for glasses

1. Adjust to the shape of the glasses

Put on your glasses and look straight into the mirror. Which parts of the eyes are hidden by the arches, and which are clearly visible? In the areas where the spectacle frame takes up less space so that it is a more "open surface" where you can apply a little more powder with color and stronger eye shadows.

If you e.g. has dark brows, a dark arc that lies below the brow and then makes a dark sweep that goes very high up, then everything melts together. There is absolutely nothing wrong with doing so, but many can experience that it gets a little "heavy" when everything melts together. Then you can instead put a more "neutral" eye shadow under the frame (what is neutral depends on what color you have on the frames, eyebrows and skin) and then put the dark / colorful on an area that is not covered as much by the frame: )

2. Are the arches light or dark?

A strong eye makeup becomes much milder when you wear glasses, no matter what frames you have. But I usually think that if you want your eyes to "pop" behind the frames, you should choose an eye makeup that is the opposite of your frames. For example. eye shadows in light, shimmer, metallic to black arcs. And vice versa to light frames - then the eyes pop more of a dark eye makeup!

A safe card if you want your eyes to be visible is always a colorful color! :)

3. Balance on the face

There is a lot to talk about when it comes to eye makeup and glasses, but you easily forget the rest of the face. There are some who do not think that they "should" use lipstick if you have both eye makeup and glasses because there will be so much of everything then. But that is definitely not a rule I follow! For a nice make-up, it can actually create more balance in the face if not all the focus is on the eyes, without you supplementing with a color on the lips as well :)

4. Get the basic make-up to hold

The basic make-up can often get dirty on the glasses during the day, which destroys both your good-looking foundation and soils the frames. Apply powder around the eyes when applying make-up! And improve during the day even if you are prone to getting oily. Then your basic make-up is more "fixed" and will not slip around and get stuck on the frames.

And as for the round spectacle spots on the sides of the nose that you get from almost all glasses, there is my best tip to also apply as thin with base make-up as possible. Often you do not have much to cover right there anyway and if you have a thick layer of makeup, it is more visible when it is rubbed off.

5. Eyebrows

Filling in the eyebrows is great to get them highlighted behind the frames! Regardless of whether you have arches where the eyebrows protrude a lot or if you have arches that cover a large part of the eyebrows. On some people it makes a huge difference to pick a little higher below the highest point of the brow to lift them a little, then you get more space between the arch and the brow which lifts the gaze and it is nice to be able to show their nice brows too :)

Can tips on my post that pick different eyebrow shapes also, read it! 

5 makeup tips for glasses before and after

Back to top ⤴

Then we have gone through my 5 makeup tips for glasses, below you see examples of a makeup with the principles in my tips.

Make-up where you see the principle with the above tips:

1. I have put a lot of make-up under the eye because there is so much space without the frame lying over. On the top I have laid dark but not so high up, so there is still a large piece without eye makeup between the brow and the arch. In addition, the eyelid is light golden (which is not visible in the picture above) so every blink becomes a nice contrast to the frame :)

2. I have added a marking lipstick also so that not all focus is on just the eyes.

3. You also see how big a difference there is in eye makeup when you wear glasses. In the picture without glasses, the make-up feels very strong and party party, but immediately becomes more discreet when you put on glasses.

4. Color! For the eyes to pop, choose the opposite of what the frames are. I do have dark to dark, but as I said, color is a safe bet too! :)

5. My eyebrows are very visible over the arch!

5 makeup tips for glasses

I want to emphasize that everything about glasses is just a helpful tip for you who are unsure or may feel that you do not really get it. There are absolutely no rules or the like that you have to follow.

Hope you felt that the post with 5 makeup tips for glasses was helpful! I have blogged a lot about glasses before but it was so long ago and I often get questions about it so felt it was time again :)

Hugs are!

Back to top ⤴

Winter blue eye shadow

In this beautiful snowy weather, you can not help but be inspired by cold, crispy make-up!

We went to work earlier than usual so I had very little time to put on make-up, so smack on with a blue shadow on the eyelid, got the feeling and put a little green in the inner edge, then a little mascara on it just so it was ready then.

After I added the green detail, I have a hard time deciding if it suddenly became a spring make-up or if it is still considered wintery haha, but I like it very much anyway! All make-up does not have to be so complicated to be nice :)

Foundation - gloMinerals Pressed Base Foundation (Honey fair)
Concealer -
Pixi Pat Away Concealing Base (1 Cream)
Contouring & highlighter - Contouring Palette (2)
Powder - Paese Bamboo Silk Powder
Rouge - Blush (35)
Fixing Mist - Pixi Makeup Fixing Mist

Brynpenna - glo Skin Beauty Micro Brow Liner (Light brown)

Lipstick - Paese Matt Liquid Lipstick in the shade (706) on the entire lips and a tiny bit of the shade (707) in the contours to get a little more marked shape.

Blue and green are so heavenly nice together, imagine this make-up in our firm with a little yellow in the corner of the eye too, NICE!

  1. Eyeshadow primer, Pixi eye bright primer
    Blue eye shadow on the entire eyelid, Paese opal eyeshadow trio (Frost bite)
  2. Fade the edges
  3. Green eye shadow on the inside of the eyelid, Paese opal eyeshadow trio (Atacama)
  4. Black mascara on the upper lashes and the outer lower lashes, Magnetic lash mascara

Clear!

Hope you liked the makeup too! :)

Hug!

Pink eyes & lips (Pink eyeliner with pink lips)

Usually when I put on my make-up, I usually just quickly get my base "cleared" so that I can start with the fun - the eyes. But this morning I was in a really busy mood and dabbled for a long time with each product and did everything in a very skewed order too haha, starting with the eyebrows, then all the coverage, then lips, then contouring and blush and finally the eyes :)

So the whole make-up felt very well done when I finished! But I think it's mostly my own feeling anyway;) Then I did not have much time left for the eyes but I mixed to a nice pink eyeliner that matched crazy well to my lips! Fast and effective!

Hope you like the makeup!

Foundation - gloMinerals Pressed Base Foundation (Honey fair)
Concealer -
Pixi Pat Away Concealing Base (1 Cream)
Contouring & highlighter - Contouring Palette (2)
Powder - Paese Bamboo Silk Powder
Rouge - Blush (35)
Fixing Mist - Pixi Makeup Fixing Mist

Brynpenna - glo Skin Beauty Micro Brow Liner (Blonde & Raven)

Lipsticks - gloMinerals Suede Matte Crayon (Sorbet) on the entire lips and a little (Demure) in the contours.

The eyeliner is actually an eye shadow that I mixed with the liquid Kryolan Cake Liner Sealer.

  1. Eyeshadow primer, Pixi eye bright primer
    Light, beige-brown eye shadow on the entire eyelid, Paese cashmere eyeshadow
  2. Brown eyeshadow at the end of the eyelid, Paese cashmere eyeshadow
  3. Pink eyeliner with wing, Paese neo eyeshadow mixed with Kryolan Cake liner
  4. Light eyeliner along the waterline, gloMinerals eye pencil (Peach)
    A little white eye shadow dabbed on the lower lash line to brighten up more, Paese cashmere eyeshadow (601)
    Black mascara on the upper lashes, Magnetic lash mascara

Hugs to you all ♥

en_USEnglish