Take care of permanent hair

I get a lot of questions about how to take care of permanent hair. When I blogged about my new curly hair (the post permanent hair before & after) then it was completely new.

Therefore, I promised you an update later when I "got to know" my hair more. I recommend that you read the first post too! There I write more about the treatment itself, choosing a hairdresser and how the hair turned out immediately afterwards.

Now it has been 10 weeks so now comes a more detailed review! As well as info about my new hair care routine, both how I care and how I style my hair :)

Hair care permanent hair

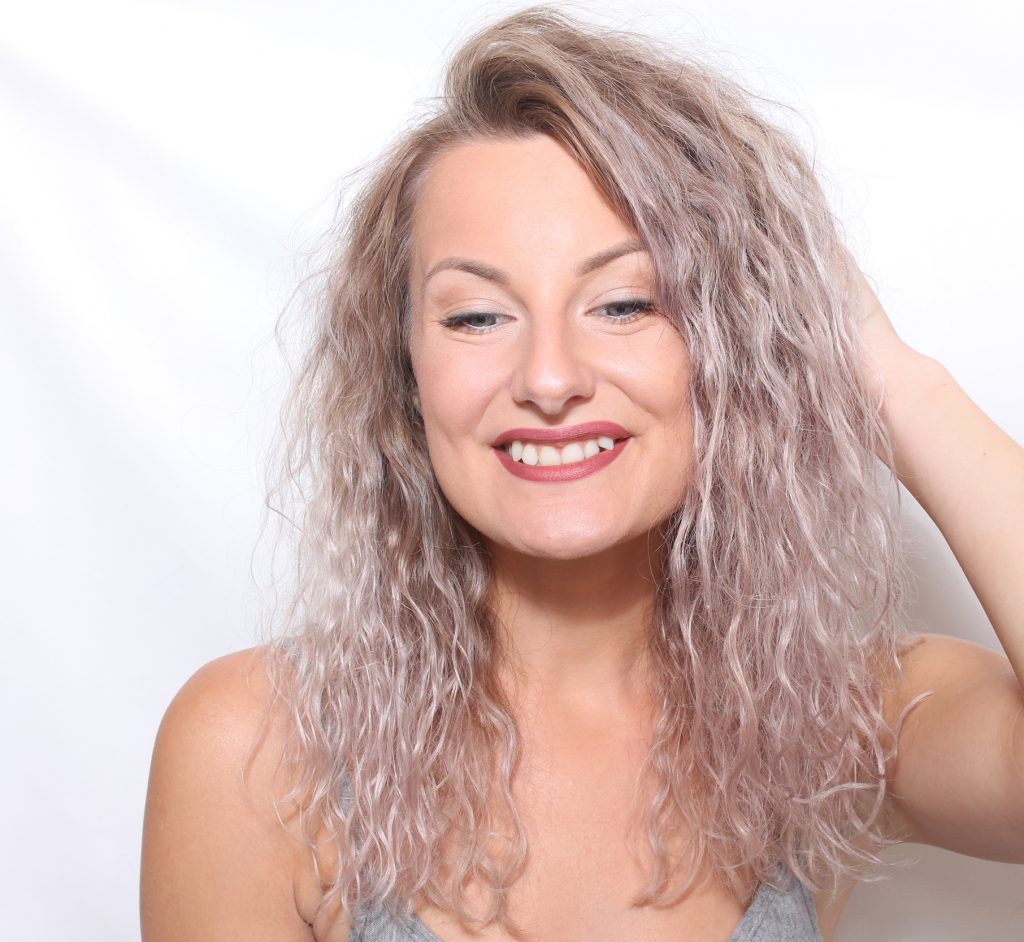
Am I still happy with my permanent hair?

If you compare the pictures from the first post, I'm very much more happy now actually! The deep cleaning in connection with the hairdresser's visit washed away all the silver tint. As a result, I was not completely happy with the tone of the hair color, I want a very cool tone on the hair. In addition, it was completely unstyled in the pictures.

Now it's more like the result I was looking for! I did not perpetuate my hair primarily for the curls, but for the volume and liveliness. It is very nice with a big and preferably a little sloppy hair, I think. Like Carrie Bradshaw or Shakira! :) In addition, I wanted a more easily fixed hairstyle, because the hair without styling is flat like a wet cat and I love volume.

Both wishes turned out as I had hoped! :) There is natural volume and fullness in the hair in a nice sloppy way, and my morning routine goes fast as seventeen!

Evening routine for permanent hair

The only thing I do in the evening is that I sleep in a nightcap! :) Annika has sewn it for me and embroidered flowers with her embroidery machine, awesome! My hair gets more tangles during the day now than before, so I sort it out with my fingers before I put on my hat.

I do not like to sleep with released hair because it wears so much, for example when Miska happens to lie down on it haha. Before I slept in braids, which I do not want now with the permanent caps, but now I just put everything in the hat!

sleep with permanent hair

Morning routine for permanent hair

3 quick steps!
When I have slept, I often look like a troll haha. But the curls themselves are then quite flat after I lay on them. In addition, I get frizzy hair after just one day, so when I have pulled my fingers through the hair, it does not look so fun.

But it takes a maximum of one minute to cure!

products permanent hair

This is what my hair looks like when I pull my fingers through it. I do not brush it with a brush anymore because then it will be fresh! Curly on the scalp and without curls in the lengths.

best dry shampoo

Step 1 - Spray dry shampoo on the scalp and massage in.

My favorite dry shampoo for volume is Lernberget Stafsing Dry Shampoo (adlink) and if you want a lighter and fresher feeling, I like it Löwengrip Good to Go (adlink). If you want a perfume-free alternative, I actually like ICA's own dry shampoo :)

moisture for permanent hair

Step 2 - Spray any type of moisture in the lengths!

I first used a self-mixed bottle with water + conditioner. However, discovered that when I moisten my hair with water every day, it starts to smell a little musty after a few days. It kind of smells like a little wet dog. I do not know why.

But that problem disappeared after I switched to different leave-in conditioners and curl sprays instead. Have tested several different things and realized that the product / brand itself is not so important, as long as it is moist it gives the right effect :)

DS Leave-in Conditioner (adlink) is good! My hairdresser uses that brand and I also have their volume spray at home which is great, DS Texturizing Spray (adlink). Like that the brand is fragrance free.

permanent hair

Step 3 - Squeeze the curls (which are now a little damp, not wet) and fluff up the hair on the scalp so you get the volume.

Clear! :)

permanent hair aftercare

Wash permanent hair

Many people are shocked when I say that I have hair wrapping every wash. Especially when I add info that I let it work for at least an hour, often more haha.

But I only wash my hair once a week and I'd rather do it properly once I do! If you include the total time, I think I spend less time on hair washing compared to people who wash their hair every / every other day.

Here's how I do it:

  1. Silver shampoo x2, the second time I let it ache for a few minutes.
  2. The hair wrap I vary a bit, sometimes I have one with only moisture and sometimes one with both moisture and proteins. I take a click in my hand and mix (directly in my hand) in a color cream in the wrap to keep the blonde tone cool and nice.
  3. Then I go out of the shower and walk around the house with the hair wrap any time. Before, I used to wrap my hair in it because when the wrap dries, it stops hurting. But then I discovered that the color cream will be more effective if it is allowed to dry into the hair, so now I have stopped using it = can have less color cream in the mixture = more economical!
  4. Conditioner! Before I permed my hair, it became silky smooth already after wrapping, but now a good conditioner is required that closes the scalp layer for the hair to feel so well-groomed and wonderful! No action time, have in and rinse out immediately

After the shower, I take a small dollop of conditioner and put it in my hair (like a leave-in cream, although it is my usual conditioner). Then volume mousse in the scalp and a regular hair mousse in the lengths and hugs the curls.

I then only blow-dry the scalp, because the volume mousse does not become as effective if the hair dries itself. The lengths, on the other hand, can dry themselves, which is very fast when the bottom is already dry.

Products for permanent hair

Silver shampoo, hair wrap (the one called FIL and sometimes the one called MIX), conditioner and hair mousse are from the brand Hårologi, which is only available at the salon.

Other products I use are:

  • The color cream: Milk_Shake Direct Color (adlink) in the shade Powder. It should actually be used as a toning, mixing it in the hair wrap is my own invention. If I do not have it in the hair wrap, I have it as leave in after the hair wash. So a little conditioner and a little color cream mixed.
  • Volume mousse: Maria Nila Pure Volume (adlink) I think is the best!

I'm getting a lot of questions about my hair color right now and it's thanks to that color cream. It is SUPER GOOD! It contains silicones but it is so good so I still use it even though I advocate silicone-free hair products. Much better than regular paint packaging.

Sometimes the tone of my hair differs a bit, sometimes it is more gray, sometimes more rosé and sometimes just a nice cool blonde. It depends on whether I have used the shade Powder or Beige Blonde and how much and how long I have had the effect.

Hair quality after permanent

Immediately after the treatment, the hair quality felt just as usual! The difference I noticed, however, was that when I washed my hair it felt rough / worn. But as soon as I had had in conditioner and then after drying it was as usual again, so no disaster! :)

Now 10 weeks later it is not the same feeling at all, so I guess it was a bit worn and that my careful wrapping has now done the trick.

In other words, the quality was a bit affected (but barely noticeable) by the treatment, but it could be restored with good hair care products!

Permanent hair pictures

As I said, I'm really happy, it's so easy to maintain and still nice! Even when I have set it up, it is nicer than before because the tassel becomes fluffy and nicely sloppy right away.

If I have released hair, I often have one fringe behind the ear and then that hair loop can be a little straight, but as I said, it is the volume I am looking for and not the curls so it does not matter to me.

If you have any questions, you know that it's just a matter of shouting! :)

Also read: Permanent hair before & after

Hugs are! ♥

Fast everyday make-up step by step

I received this email the other day:

"I just want to say that I like all the neutral and down-to-earth make-up you have done in recent weeks, although colorful is inspiring and I of course want to see that from time to time, it is at least for me very useful with all the simple step by step make-up! The kind of make-up I do on myself the day after your posts. Feel free to continue like this! ”

I was very happy with these words and immediately did an everyday make-up that is super easy to do! It is made with the three eye shadows from the trio palette Paese Matte Trio Eyeshadow (101) who is one of our best sellers :)

Hope you all like the make-up too!

BASE:

Face primer - Paese Makeup Base (Correcting)
Powder - Paese Bamboo Silk Powder
Concealer - Pixi Pat Away Concealing Base (1 Cream)
Foundation -
 glo Pressed Base Mineral Foundation (Golden medium)
Powder that neutralizes redness - glo Redness relief powder
Contouring - Contouring Palette (2)
Rouge - Paese Powder Blush (55)
Fixing Mist - Pixi Makeup Fixing Mist

Eyebrows - glo Micro Brow Pencil (Light brown)

Lipstick - glo Suede Matte Crayon (Rumor)

The trio palette with these colors (light beige, light gray brown and dark brown) is really the most useful shade I own!

EYES:

All eye shadows are from the same trio palette Paese Matte Trio (101).

Prime with eye primer before you start! I use Pixi Eye Bright Primer.

  1. Light gray-brown shadow on the entire eyelid
  2. Fade out in the globe line
  3. The same shade along the lower lash line
  4. Dark brown shadow dipped at the end of the lower and upper lash line, and swept thinly at the end of the eyelid.
  5. Light shadow in the corner of the eye and under the brow
    Black mascara on all lashes, Magnetic lash mascara

Clear!

I have tattooed the waterline light + black lashliner (lash marking) between the upper lashes. So for exactly the same result you can supplement with a light eyeliner (e.g. glo Precision Eye Pencil in the shade Peach) along the waterline and a black eyeliner or shadow between the eyelashes, I usually do lash marking with the cream eyeliner Ebony from Kryolan.

Hugs are! ♥

Novelty! Paese Artist Blush

Paese (which I sell in my web shop) has two different blushes in the range! Partly Paese Powder Blush which I showed swatch pictures on last week (in this post) and now also the news Paese Artist Blush!

Here is more info and swatch pictures of these:

So what's the difference between these Artist Blush and the regular Powder Blush blushes?

The answer is the pigment! Powder blush has a lot of pigment and is very easy to use, but Artist blush has even more pigment and suits people who love a stronger blush color. Also good on darker skin tones as blushes with less pigment have a tendency to not look so good.

A blush is not like an eye shadow where the rule "the more pigment the better" applies because the blush should not be full coverage. But when you apply the blush, you want it to go quickly and easily in a few swipes with the brush, so it is very easy to choose blush not only by color but also by the amount of pigment.

In other words: If you want more color on the cheeks, it will take longer if you have a blush with less pigment because then you have to "build up" the desired color and dip the brush in the blush several times. Then it is better to choose a blush that is already more colorful so it still goes in one go!

And the same on the contrary, if you want a discreet / appropriate color on the cheeks but have a blush with a lot of pigment, then you need to be more careful so that you do not get too much, which also takes longer. But if you have a perfectly pigmented blush, you can also do it in one go!

And misunderstand me right, I will add here :) Artist Blush are extra strong colors and even more pigment, but it is not Easter cut blush either but gives an even and nice color to the cheeks and is incredibly smooth and easy to apply!

Shades:
60 is a deep coral color that is completely matte.
61 is a cooler and brighter pink tone. Also completely matte.
62 is a peach color with gold shimmer that gives the cheeks a radiant glow! I did not manage to get this golden glow at all in the pictures though, the flash knocks out the glitter grains almost completely.

As you can see, they become a little softer on the skin. They can look almost scary colorful in the packaging :)

My favorite is without a doubt the shade 60 which is a hugely nice coral color! Especially now that it's summer and I'm a little tan on my face, it highlights it very nicely.

They have nice packaging too, a luxurious box with a mirror inside!

If you have any questions, just shout :) They are available to buy HERE!

Hugs are ♥


Yellow gold

Here comes a yellow gold eye makeup made with shadows 425 and 427 from Paese Sparkle Eyeshadow which is a novelty in my webshop :)

A make-up with eyeliner that is suitable both for everyday because it is quick to make and is light, as well as for more festive occasions because it is so shimmery and nice!

Hope you like the make-up you too :)

BASE:

All products are in my web shop Creativemakeup.se!

Face primer - Paese Makeup Base (Correcting)
Powder - Paese Bamboo Silk Powder
Concealer - Pixi Pat Away Concealing Base (1 Cream)
Foundation -
 glo Pressed Base Mineral Foundation (Golden medium)
Powder that neutralizes redness - glo Redness relief powder
Contouring - Contouring Palette (2)
Rouge - Paese Powder Blush (45)
Fixing Mist - Pixi Makeup Fixing Mist

Eyebrows - glo Micro Brow Pencil (Light brown)

Lipstick - glo Suede Matte Crayon (Demure)
Lip pencil -
glo Lip Liner (soulmate)

The yellow-golden eye shadow was so nice together with the copper color that I dabbed on around the eye, so heavenly nice!

EYES:

All products are in my web shop Creativemakeup.se!

Prime with eye primer before you start! I use Pixi Eye Bright Primer.

  1. Yellowish eye shadow on the entire eyelid, Paese Sparkle Eyeshadow (425)
  2. Fade out in the globe line
  3. Light eye shadow in the corner of the eye and in the middle of the eyelid, Paese Sparkle Eyeshadow (405)
  4. Black eyeliner with wing, Paese Penliner
  5. Yellowish eye shadow along the lower lash line
  6. Light eye shadow under the eyeliner
  7. Copper-eye shadow dipped in the middle of the lower lash line, innermost and outermost on the eyelid and swept along the globe line, Paese Sparkle Eyeshadow (427)
  8. Black mascara on all lashes, Magnetic lash mascara

Clear!

Hugs are ♥

New shades! Paese Powder Blush

All the products we have in the range in my webshop are really good (of course), but above all, Paese delivers on its powder products, even though it is such an affordable brand! Both face powder, eye shadows and what I will show you today - these blushes :)

We have new shades of these powder blushes and here are swatch pictures of them all!

These are pigment-rich and easy-to-apply powder blushes with caring argan oil.

The pigments are perfect for giving a nice color to the cheeks in one sweep without the need to have a lot of powder on the brush. In addition, the formula is smooth and very pleasant to work with, you easily get an even and nice result.

Shades:

  • 38 is a warm apricot color with gold shimmer.
  • 45 is a peach color (more pink than 38) with gold shimmer.
  • 50 is a pink color that is a little brighter but still soft in tone. Is not glittery but gives a little glow.
  • 55 is a deep peach color with a darker tone than 45 and is completely matte.
  • 57 is a cooler soft dark pink tone. Matt.

Which is my favorite commutes a lot but at the moment it is definitely the darker peach tone 55!

The shades that are new are 55 and 57, while 38, 45 and 50 have been in our range before. Then the 45 has always been the customers' favorite!

Here you see the shade 55 on the cheeks :)

Hope you liked the post and that the pictures are helpful for you who are looking for a new blush!

You will find these blushes in my webshop Creativemakeup.se!

Hugs are ♥

en_USEnglish