Use glow highlighter on oily skin?

I have written a post about this before, but I was not happy with the pictures (they became too vague) so now I have done this again!

Just because I have oily skin does not mean that I strive for a completely matte result - the whole glow trend is so heavenly nice!

But what is the problem with a luminous highlighter on oily skin? And what should you do to get it right? I will explain that in this post :)

You can easily believe that if you want radiance in the skin and have oily skin, the problem is solved - enjoy your natural glow! But it is not that simple due to these two problems:

1. If I consciously let my natural glow come out properly, the base make-up will not last all day, the make-up melts / runs off. The natural shine is oil and nothing washes away makeup (even waterproof makeup) as good as oil! So I must have debilitating products on my skin to get a lasting result, and then the end result is quite dull on the purchase.

2. If I have a glow highlighter on my skin and it becomes the least shiny naturally, it is highlighted enormously and suddenly I feel like a disco ball! So, it's too little natural glow for me to be happy without highlighter, but oil plus shimmer gets crazy too much.

In addition, I think that makeup glow is much nicer than an oily and oily skin. On others it can be nice when the skin becomes oily naturally but there is a difference between a fresh glow and that you do not want to touch your face because you smear your hands :)

Problem solving is a trick I came up with myself! Skip the highlighter in the T-zone, the apple cheeks, the back of the nose and the chin. Like this:

The high areas of the face are partly the ones that become most oily, but it is also these that the light hits the most = the gloss is emphasized even more.

Apply highlighter on the cheekbones but not all the way down to the "apple cheeks". At the tip of the nose. On the sides of the chin and forehead but not in the middle. If you want more glow, you can also apply to small areas that do not tend to be so oily, e.g. on the cupid's arch of the lips, under the eyebrow and in the corner of the eye.

Keep matte on the apple cheeks, the middle of the chin, the middle of the forehead and along the entire back of the nose.

Here you see before and after where I applied in this way!

The result is a make-up that 1. lasts all day 2. has a nice glow immediately when I finish makeup and 3. when I start to get naturally shiny, I still do not see a disco ball when I look in the mirror.

The highlighter that I use in this post is in my web shop and is called Pixi Glow-Y-Powder and it is very effective so you need very little and even if you powder during the day, the luster still shines through.

Satisfied! :)

Hope you liked the post and that the tips were helpful!

Hug ♥

Summer party make-up

Here is make-up inspiration for midsummer evening tomorrow :) A midsummer make-up in green, yellow and coral-colored lipstick!

Doing an eye makeup that matches the clothes is so much fun I think! Today's look is in the same colors as my floral top and to be completely honest, I do not think that the eye makeup was at all special until I put on the lipstick and the floral outfit - it was the combo that did everything!

Hope you get inspired ♥

BASE:

All products are in my web shop Creativemakeup.se!

Face primer - Paese Makeup Base (Matte)
Powder - Paese Bamboo Silk Powder
Concealer - glo Under Eye Concealer (Golden)
Foundation - glo Pressed Base Foundation (Golden medium)
Powder that neutralizes redness - glo Redness relief powder
Contouring - Contouring Palette (2)
Rouge - glo Blush (Papaya)
Fixing Mist - Pixi Makeup Fixing Mist

Eyebrows - glo Micro Brow Pencil (Light brown)

Lip pencil - glo Lip Liner (Coral crush)
Lipstick - glo Lipstick (Knockout)

This green shade is easy to feel comfortable in even if you usually do not usually use that much color!

EYES:

All products are in my web shop Creativemakeup.se!

  1. Eyeshadow primer, Pixi eye bright primer
    Dark green shadow at the end of the eye, Paese Opal Eyeshadow Trio (Atacama)
  2. And along the globe line, fade out
  3. Light gray-green shadow on the inner part of the eyelid, Paese Opal Eyeshadow Trio (Atacama)
  4. Dark green shadow under the eye as well
  5. Black eyeliner along the upper lash line and the bottom waterline, Pixi Endless Silky Eye Pen (Black noir)
    Black shadow sooted at the end of the eyelid, Paese Kashmir Eyeshadow (602)
  6. Yellow eye shadow in the corner of the eye, Paese Neo Eyeshadow (662)
  7. Black mascara on all lashes, Magnetic lash mascara

Clear!

Nice party make-up this summer, I think! :)

Hugs are ♥

My business week v. 24

The Sunday post is a few days late on purpose :) On the one hand, I needed to work on other things during the weekend, but in addition I only work two days this week, so I thought of merging these weeks into the same post.

Because from tomorrow (Wednesday) to Monday I am on Gotland and celebrate Midsummer! Gonna be SO much fun! My best friend Frida moves there to a big farm so there will be a big housewarming party and midsummer celebration at the same time :)

But first, Miska and I stay in a hotel in Fårösund for two nights ♥

Work on Åland!
Now it was time for Annika to work on Åland again :) She works at a salon there sometimes (with permanent makeup) and since it includes return visits, we were there again this week and had more new customers and return visits from the previous trip.

We were there for two days and Miska and I went along as baby managers :) So we did not get much work done, but thanks to us Annika was able to work long days!

Miska & Mileya who are waiting for mother Annika to finish with her customer :)

Marketing of the webshop + bridal makeup
We will market the webshop more in the autumn, in the summer there is almost money in the lake because people do not shop very much in the summer and at the salon we are already basically fully booked.

But we did a test now with a beauty guide on how to do your own bridal makeup!

We want to promote the unique with our web shop more :) So all the guides I make with swatch pictures, step by step etc. that both help people buy the right products and then help them use them at home as well.

Here I am sitting with a lace sweater at the back and front and a cut curtain on my head :)

It was great fun to do actually !! I had a lot of fun when I sat and wrote all the tips and then fixed - time consuming but great fun!

I published this here in the blog as well, but the post on the website is even more well-crafted with links to the products in the form of pictures in the middle of the text, such as this:

And at the end, I also linked to more useful beauty guides who can be helpful before their bridal makeup. For example. these:

Then we paid a penny on Instagram and Facebook and made the post into an ad:

It has only been up for 24 hours but 160 people have clicked on the website and 13 people have shared it! It will be exciting to see the result, we run the ad until the end of June.

The linked beauty guides in the post have also received more visits during this day so it shows that the ad also works - that people read the post to the end :)

You can read it here if you want to see how the difference was between the blog post and the post in the webshop!

Work all weekend
This weekend, Miska was away for two nights so I took the opportunity to embrace my workaholism and worked at the computer all Saturday and Sunday. You want to be a nice girlfriend otherwise haha, but now I sat undisturbed from morning to night!

In part, I was a little behind with work because we were on Åland for two days, but also I needed to catch up in the future also because we are free for six days now.

It was so nice to work all weekend instead! Sometimes you need to cave in and just get things done :)

Here I sit and finish the post about doing your own bridal makeup haha. Finished on Sunday night, pjuh!

Many customers before Midsummer's Eve
At the salon we always have a full roll before Midsummer's Eve and this year is no exception! Last Monday (yesterday) I had fully booked with customers and had to double book a quarter to squeeze in an extra as well. So fun!

Annika also had customers then and Miska was out walking with the pram :)

This week's schedule looks like this:

Time goes by so fast when you have customers on a conveyor belt like this, vips, several hours have passed!

Distruptive Materials
As you can see from the schedule, I was on a freelance job today and made up 8 people at the company Disruptive Materials! They would photograph more new images for website and marketing.

Before, I did not like to freelance because when you do not do it often, you do not have a finished freelance bag that is always ready, but pack it every time and should remember everything important and have a set of brushes, foundation shades and colors for all people. It is a slightly larger process than you might think then.

But now I have worked at Disruptive Materials so many times that I am starting to get used to the whole packing part haha :) It goes pretty smoothly anyway.

Presented with make-up!

They are so heavenly good there, they showed a person around the premises and when I stood there and put on make-up, they presented me as "our makeup artist, consultant and friend!" :)

Afterwards I had a meeting with them too, which was also very interesting !! Can't say much more for you unfortunately.

New salon baby!
On May 28, our second salon baby arrived, our makeup artist Lisa gave birth to little Elliot !! Last week, Miska and Annika and I went there with presents and baby cuddles! We had printed baby clothes with the Creative Makeup logo on haha :) So cute!

In September, I have had employees for 4 years, but Lisa is the first person who came into the office and "told the boss that she was expecting a child" - and that boss was me! Feels a little adult points somehow, do not know why haha! Maybe because I'm not such a classic boss who just sits in the office, but sees me more as one of the colleagues only :)

Now I have to stop writing because I have time to shower, paint my nails (just mixed my own nail polish of three colors that I just must test now haha) and pack ready because we leave early with the Gotland boat tomorrow morning.

But in addition to this, this week I have also worked with Peragenda's website and SEO words so that they can get higher up on Google searches, tricked with schedule changes, solved mistakes at checkout, done research on fluorescent lamps for even better light in the makeup studio, ordered slippers for customers (many get barefoot when they take off their summer sandals).

And wrote a long "to-do-after-Gotland-list" with things I did not have time for now haha.

So now I deserve a little vacation :)

Kraaam on is everyone! ♥

Wedding special! Make your own bridal makeup

Here is a BIG post with all my tips and tricks for you who are going to do your own bridal makeup! Everything from preparations to base make-up, lips and eyes.

Here you go! :)

do your own bridal makeup step by step

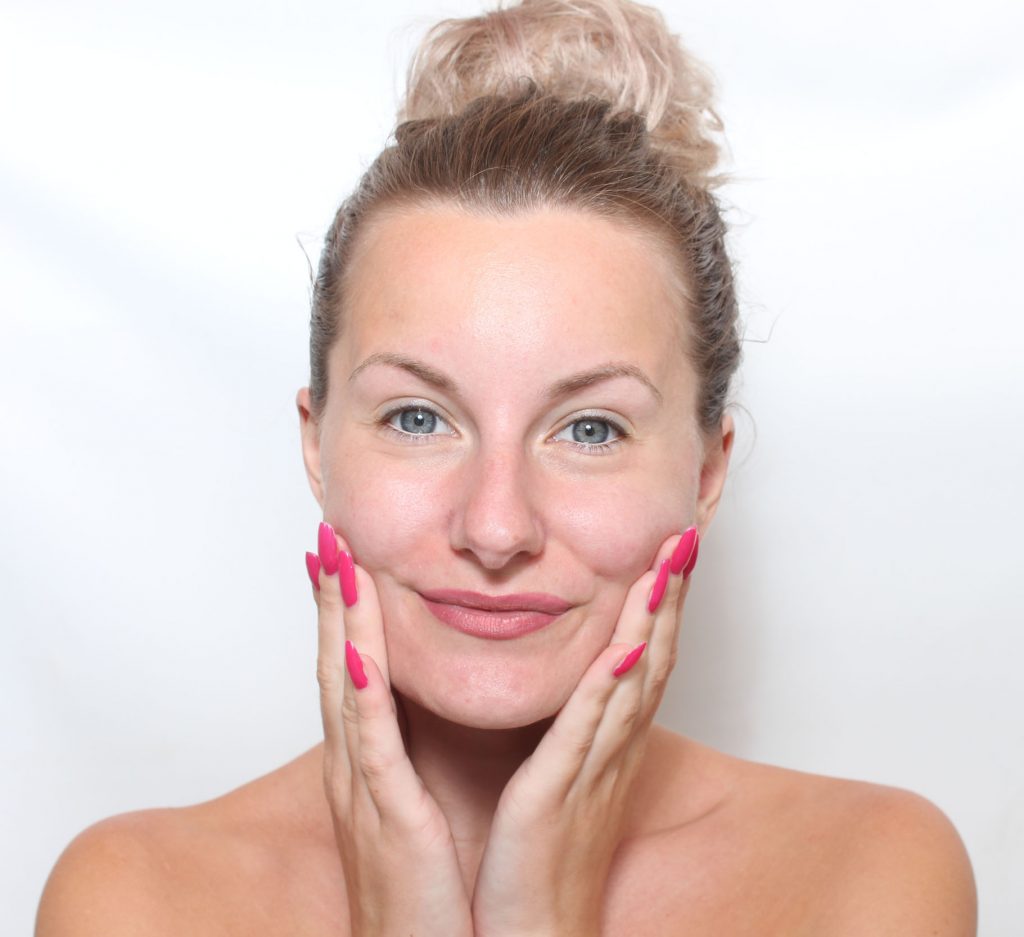
This post is written based on my experience of what most customers want when they book bridal makeup at the salon. A make-up that is:

Sustainable
2. An opaque but natural base
3. Earthy eye makeup that is marked and "more than everyday" but still invigorating and suitable for both day and evening. And that you still look like yourself.

Then there are lots of details that I as a makeup artist should also think about before a bridal makeup, but more about that further down in the post!


Preparations for her bridal makeup

3 important things to keep in mind with skin care:

The skin care routine is different from person to person, but there are some points that I recommend to everyone:

1. Do not make a big change just before the wedding. It is easy to indulge in new, fine skin care and plan a fun night a few days before, but regardless of products and quality, so can the skin traces out a bit of just the change. If you are going to do this, start with the products a month before.

2. Deep cleanses the skin before your bridal makeup - I usually steam my face over a saucepan of boiling water and then apply a clay face mask that pulls out impurities. Moisturize the skin thoroughly afterwards. A cleansed skin without impurities or small dry areas has more radiance and the make-up looks better and fits much better. I had done the deep cleansing the night before and then just washed with my usual cleansing in the morning before starting to put on make-up.

Skip sunscreen (if you can avoid the sun so that you do not burn yourself) so if you have a day cream with spf, choose another one this day. Sun protection means that the light is reflected differently, so when people take pictures with flash, you can look a little greyish.

prepare the skin for bridal makeup


Bass makeup for bridal makeup

Exact application can differ greatly depending on which products you use, what you want for results and what type of skin you have and any problem areas.

My guide is suitable for all skin types and is adapted to products that are available for purchase in our store / web shop.

Here are my top tips step by step!

Face primer

När vi pratar hållbarhet så är ansiktsprimer guld värt! Det handlar dels om att skapa en slätare arbetsyta att lägga makeupen på sen, som att slipa innan man målar. Dessutom väljer man en primer som är anpassad för just din hudtyp, så om du är torr så hålls din hud återfuktad och lysterfull längre och om du är oljig så hålls din hy matt längre och din bas kommer inte lösas upp och glida av.

Work the primer firmly into the skin so that it enters all irregularities, it should not just lie as a layer on the surface.

wash the skin

Uniset® Oil-Absorbing Primer från Minolei får din brudmakeup att hålla riktigt länge! Du måste inte ha en oljig hy för att använda den då den är återfuktande och inte heller framhäver torrhet. Önskar man mindre glans (t.ex. om man blir svettig) så är den också jättebra!

Long-lasting foundation

Jag älskar Uniset® Lightweight Foundation från Minolei, den sjunker in fint i huden och blir väldigt naturlig, huden ser fortfarande ut som hud liksom. Den innehåller inte SPF (vilket är bra vid fotografering) och framför allt otroligt hållbar på huden tillsammans med primer och puder. Den passar alla hudtyper och är återfuktande.

A perfect foundation for a bridal makeup!

bass makeup bridal makeup

It can be applied with the fingers, it does not need to be worked in but sinks in by itself. I prefer the brush Conceal Perfector (syntetiskt hår) från Nanshy för den funkar på hela ansiktet och har precision kring ögonen och sådana småområden.

Tip! Feel free to apply down to the neck as well, the neck is almost always lighter than the face and décolleté.

Concealer

You do not need to panic if you have any stress pimples (or as I always have acne and bumps) because if you have a good concealer, it is not a great art to conjure away.

Pixi Pat Away Concealing Base is super opaque, becomes smooth on the skin, incredibly durable and fits both pimples and under the eyes! Because it is so opaque, you need very little product to get good coverage = more natural results, easier application and also more durable because thick layers of makeup do not sit as well as thin.

cover dark rings bridal makeup

Jag har nyansen 1. Cream i detta inlägg, den är lite ljusare än foundationen för jag tycker det är trevligt med en uppljusande effekt också!

Det jag måste slå ett extra slag för är glo Skin Beauty Redness Relief Powder för alla oss som lätt blir röda. Jag använder den på utvalda områden (inte hela ansiktet). Jag är ganska röd runt näsan och sådant naturligt men lägg till nervös, generad, varm, och något glas bubbel på det. Vi snackar rödhet som lyser igenom betong haha.

Red is such an intense color, so if you want a natural make-up, it is not possible to remove it through opaque products, it shines through! Redness Relief Powder neutralizes the red so incredibly effectively that it is almost magic. You will need it!
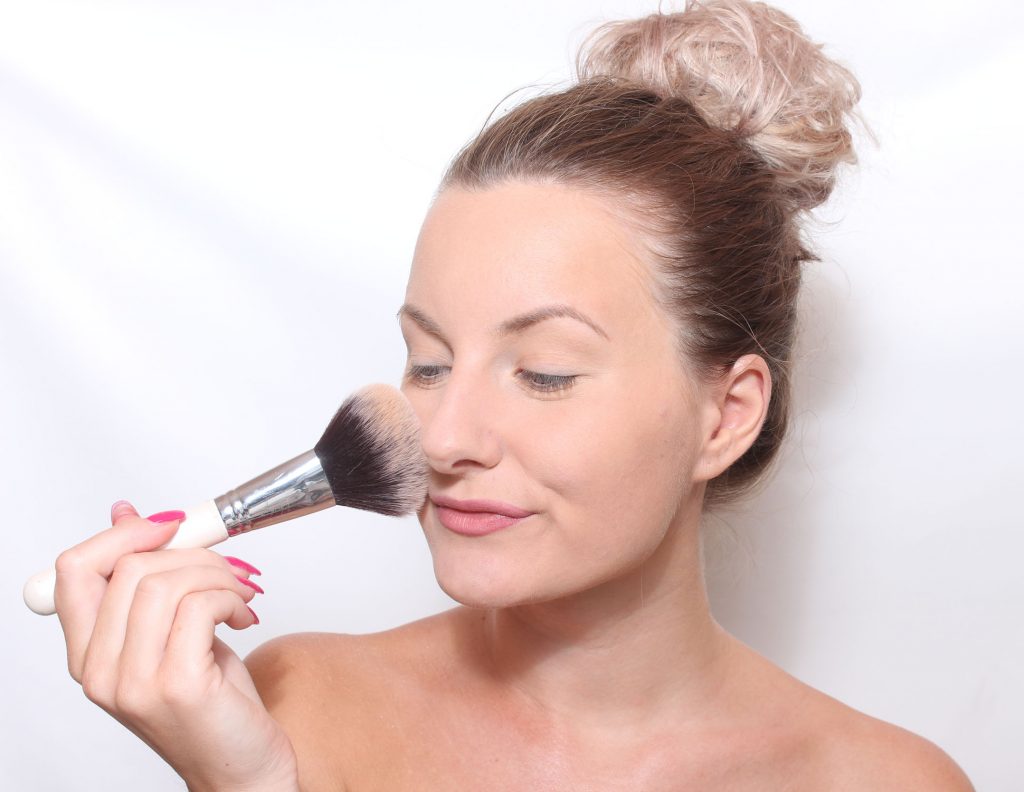
Powder

Pricken över i är att avsluta med Uniset® Oil-Absorbing Powder från Minolei. Ett settingpuder som blurrar huden och får sminket att hålla ännu längre tack vare att den kapslar in olja och svett. För hållbarhetens skull så rekommenderar jag alla att använda puder efter foundation och concealer när man ska gifta sig, även för personer som till vardags inte brukar använda puder. Sminket håller mycket bättre med puder :)

powder brushes

Shape, color & luster
When you have removed all the bumps and powdered on, you can look a little flat. Then it's time for contouring, blush and luster! :)

Contouring - The light and the dark shadow that shapes the face both come from the flexible palette Contouring Palette nyansen nr 2.

Rouge - Are you going to take black and white photos? In such cases, do not put the blush too high on the cheekbones! Color becomes a gray shadow in a picture, and you do not want cheeks pressed in. In this post I have the blush glo Skin Beauty Blush in the shade Papaya which suits both warm, cold, light and medium dark skin tones.

Glow - You almost want to bathe in a luminous highlighter at a wedding! How nice! Pixi Glow-Y-Powder are magical! Swipe on in the high parts of the face, or just on the cheekbones. Great on the tip of the nose, forehead, chin, collarbone, décolleté and shoulders too!

glow in the face bridal makeup

After this I finish with the spray Pixi Makeup Fixing Mist som får alla produkter att smälta ihop och blir som ett skyddande lager för yttre påfrestningar (regn, svett, tårar) och förlänger hållbarheten.

Eyebrows

Not everyone fills in their eyebrows but I really recommend it for a bridal makeup, book a brow pick in advance if you need help with the shape. Shaped eyebrows are the cheapest facelift! Even if you have a nice shape naturally, there will be a big difference in the pictures if you emphasize the brows a little extra.

Fill with a durable eyebrow product so that the eyebrows are just as nice from morning to evening. I use glo Skin Beauty Micro Brow Liner (i detta inlägg har jag nyansen Light brown) men det är lite smaksak vad man föredrar att använda.

eyebrow bridal makeup

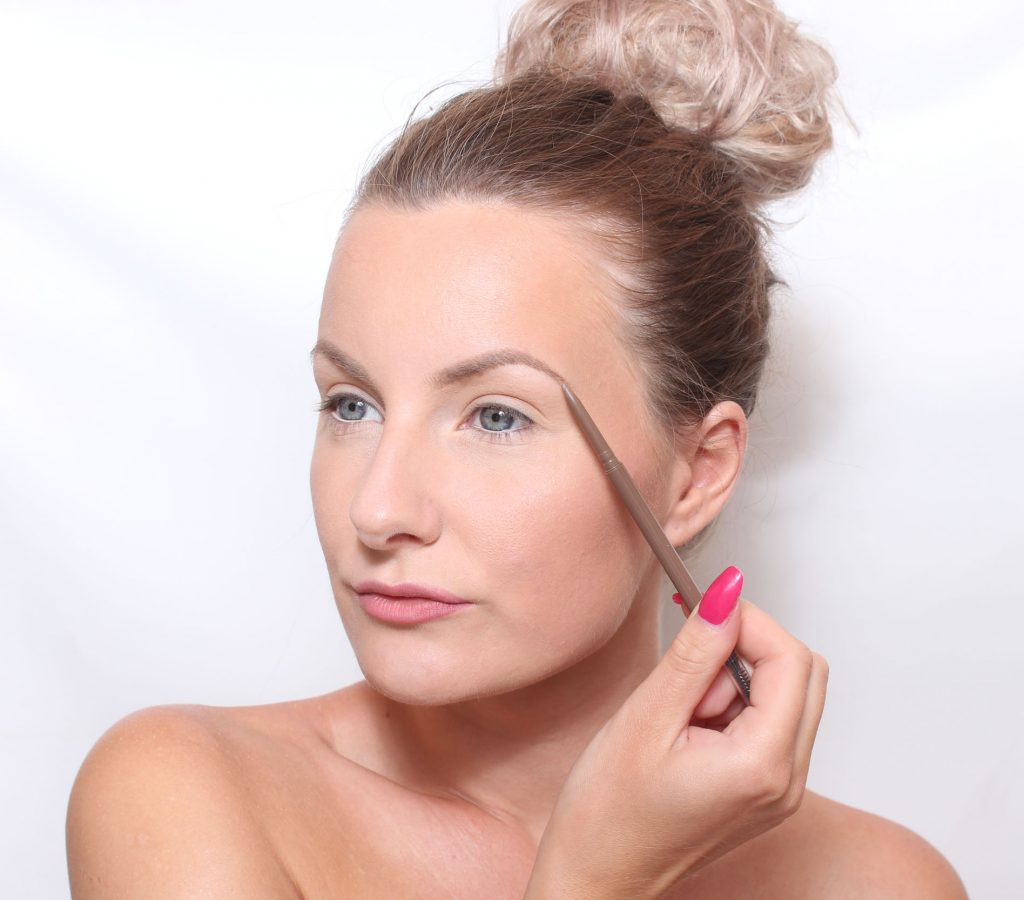
Well-shaped eyebrows do not have to mean dark eyebrows, there are many light colors to choose from!


Lips on a bridal makeup

Välj med fördel en nyans som inte är jätteolik din egen läppfärg, om du inte vill behöva bättra på din brudmakeup. För även om det är hållbart så kommer det försvinna litegrann när du äter och dricker och det kan vara skönt att inte få ”borde bättra på sitt läppstift-looken” under tiden man äter. Men en liknande färg försvinner på ett mer diskret sätt och du behöver inte bättra på hela tiden.

Light pencil in the contours
För personer som har ljus hudton så kan jag verkligen rekommendera pennan glo Skin Beauty Precision Eye Pencil in the light shade Peach and paint it around the lip contour and fade out in the skin tone. The lip contour is highlighted very nicely!

lips bridal makeup

Lipstick

Keep in mind that you will probably kiss a lot! This is another reason to choose a more discreet lip color, but I usually also think about this when I decide on the choice of formula. A thick layer of lip gloss may not be so fun to kiss with.

A common lipstick on our bridal makeup is glo Skin Beaut Lipstick which is creamy in a soft and "firm" way, so it is not dull but also not so creamy or glossy that it slides around on the lips. Super good really !!

I have the shade Bella in the pictures here and it feels very nice in many, it is soft pink without being too bright, too light or too dark.
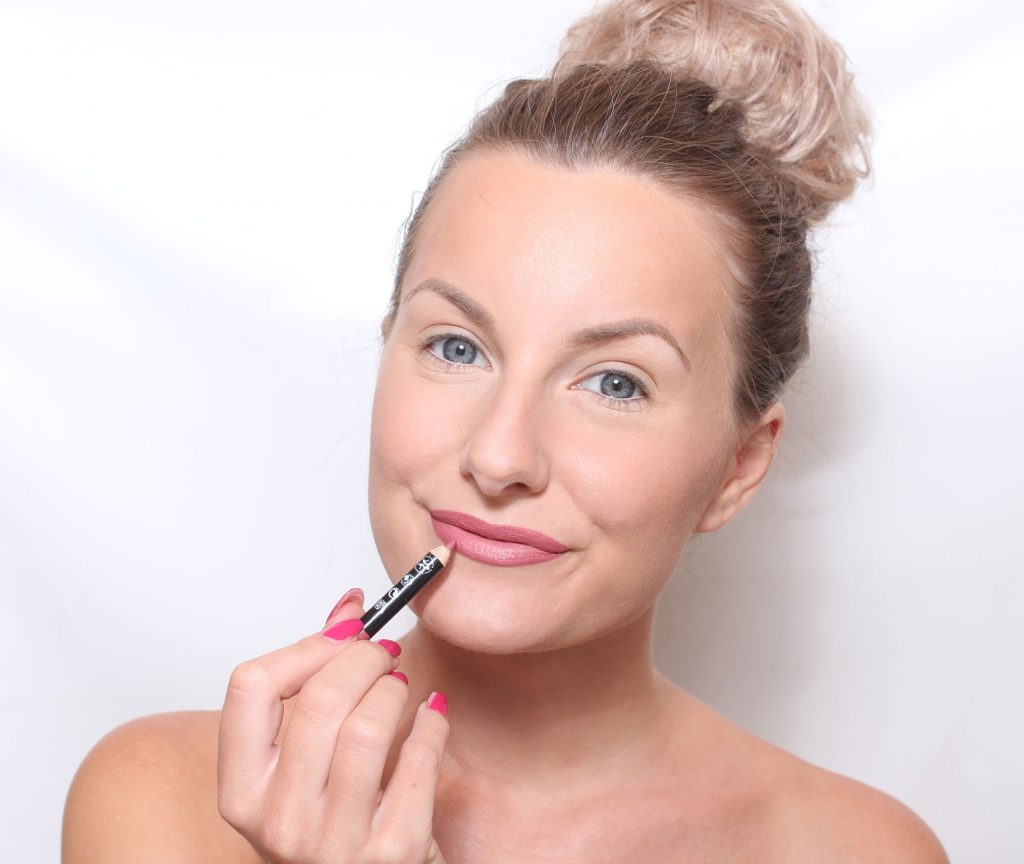
lipstick at wedding

Lip pencil

In this post I put the lip pencil after the lipstick but just to show you what the Bella lipstick looks like alone before the lip pencil, otherwise I always put the lip pencil first.

Lip pencil is a great complement to your lipstick! I like to choose a slightly darker color than the lipstick and tint them softly in each other (no sharp edges). The lip pencil holds up so well that when you improve on the lipstick, you do not need a mirror because you do not need to improve the sole at the edges.

For the Bella shade, I use the organic lip pencil Benecos Natural Lipliner in the shade Brown. The shade is called Brown but it is not brown but more rust brown, like my lips but better.

lip pencil or lipstick bridal makeup

And then the whole base was ready! Brilliant!


Eye makeup for bridal makeup

There is no definite eye makeup that is a bridal makeup, you can of course use less makeup, colorful eye shadows or make a glittery smokey eye. There are no rules! :)

This make-up is soft but also has quite a big contrast between the light and the dark, which opens up the gaze and becomes very nice in the picture, even black and white pictures!

Always prime with eye primer before you start! I use Pixi Eye Bright Primer. It will be much easier to apply the shadows because they adhere better to the eyelid and also it is very important that your eye makeup lasts from morning to evening now.

1. Dab dark brown eye shadow at the end of the eyelid and up into the crease line. I made a v-shape (not rounded at the edge but a little more elongated cat eye) which lifts the gaze a little extra.

Are you unsure how high up you should put the shadow? Read my guide about it in this post.

The shade is one of three colors from the trio palette Paese Matte Trio Eyeshadow shade 101.

2. Fade the edges

In the same trio palette there is a light eye shadow, dab it in the corner of the eye, on the inside of the eyelid and under the eyebrow.

4. In the same trio palette there is also a light brown color that I dabble in the middle of the eyelid.

5. Place the dark brown eye shadow under the eye as well. Wider at the outer edge (tie together with the shadow on the eyelid in the outer corner of the eye) and narrower inwards.

6. Black eyeliner with wing, Kryolan HD Cream Liner (Ebony) a waterproof eyeliner that is easy to work with because you use a separate brush. Many people find it harder with a liquid eyeliner but this is a cream!

You do not have to wear eyeliner with a wing if you do not want to or if you think it is too difficult. But some kind of eyeliner (maybe just a lashliner that I show in this guide) is recommended to highlight your eyes in all the pictures.

7. Light eyeliner along the waterline, brightens the gaze and above all it reduces redness in the eyes if you are touched! This is the same pencil I have around the lip contour,  glo Skin Beauty Precision Eye Pencil (Peach).

eye makeup step by step before wedding

8. I dabbled in some bright glitter on the inside of the eyelids as well, SO nice! Hard to get the bling in the picture only. This is Pixi Liquid Fairy Lights in the shade Crystalline.

Finish with waterproof mascara, Magnetic lash mascara. Before that, I bent up the lashes with pliers, then I do not need false eyelashes, I think my own are enough.

Klaaaart! :)

wedding makeup step by step

bridal makeup tips

get married makeup tips


Bring it in the make-up bag

  • Redness relief powder (if you have not applied enough, if you are not red when you put on make-up, it is difficult to know how much you need)
  • The lipstick
  • Light eyeliner in case you need to improve your eyes after a crying party. The eyeliner and mascara are still there, but the red eyes may need a touch up.

I don't think more is needed than that! :)

Är du jätteoljig i huden och vill matta ner i slutet av dagen så kan du ta med det vanliga pudret också.

makeup tips for weddings

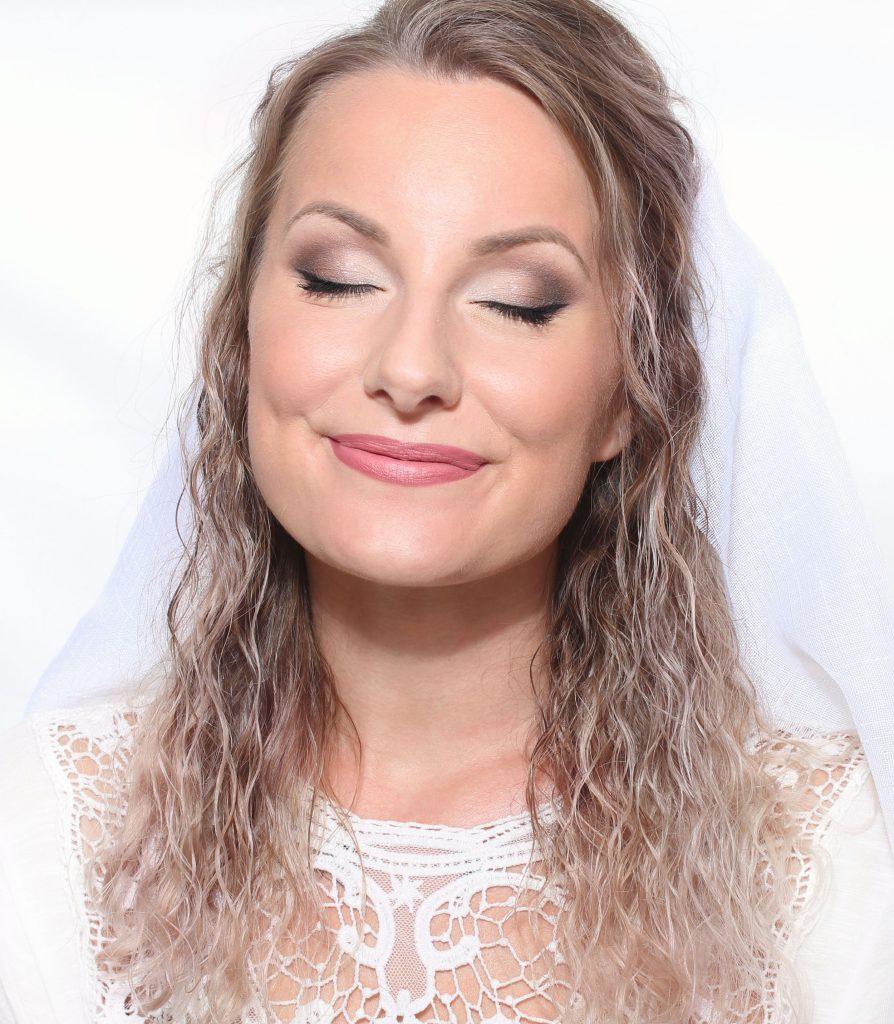
Ready to get married! ♥

I have never married and have no such thing at home, but of course I got the wedding feeling quite good anyway? :) My "bridal veil" is a cut-out curtain that I use to dress ventilation openings at home so that spiders do not crawl in there haha. And my "wedding dress" is a regular sweater with a lace in the back that I turned back and forth. It works well!

Really hope you liked the post about bridal makeup / bridal makeup and that the tips were helpful! ♥

Also read: Natural bridal makeup

How high is the eye shadow applied?

When I hold make-up consultations, I barely have time to start with the eye shadow before I get the question "how high should you put it? ”

There is no right or wrong answer really, but a big reason why many feel that they do not get the makeup very well is because they do not put the shadow high enough.

In this post, I thought I would explain why! :)

How to apply eye shadow nicely?

Many people know that you usually do the fading in the globe line, ie the "elongated pit" between the eye itself and the brow bone.

But on most eye shapes it is not really that simple, because you usually sit like this when you apply the eye shadow:

And then you lift the eyebrows and stretch the skin on the eyelids very much, so where the skin on the globe line is when you look ahead and when you half-close your eyes in this way is completely different.

How high should you tone the eye shadow?

Before I do the fading, I usually mark how high up I want to put the shadow by looking straight ahead into the mirror (note without raising the eyebrows, so most do when they reflect, relax in the forehead) and dab lightly with the shadow so high up I need to make the fade for it to come over the globe line when I look ahead:

Over this skin fold I want the fade :)

And so high, it feels quite scary to put the shadow when you half-close and stretch your eyebrows, because it looks so heavenly high then, which means that many put the shadow too far down, as in the left eye in this picture:

Why do you want the fade so high up then?

Well, to get a softer make-up, you have faded out the eyeshadow for a reason, but if that fading is too far down, it will end up inside the crease line fold when you look straight ahead, which results in the skin fold above "cutting off" the eyeshadow and instead of a soft fade gives you a sharp edge.

Like this:

There is nothing wrong with the left eye, but if you want a soft make-up with a visible fade, you will not get the desired result.

Then I also want to emphasize that there are lots of different eye shapes and not everyone has a globe line in the same way, some eyes do not get this skin fold at all and then you have to think differently :)

The eyeshadow in this post comes from the palette Glo Skin Beauty Shadow palette (Mixed Metals) which is in my webshop ♥

Hope you like the post and that the tips were helpful!

Hug!


en_USEnglish