Turquoise make-up - step by step

I can not have turquoise hair without to do a super-turquoise makeup, so nice! :)

Hope you like the look!

Bassmink:
Face primer - Pixi Flawless & poreless primer
Foundation - gloMinerals pressed base foundation (Golden medium)
Concealer - Pixi Pat Away Concealer (2 Nude)
Powders for redness - gloMinerals Redness Relief Powder
Contouring & highlighter - Pixi Contour Creator
Rouge - gloMinerals Blush (Papaya)
Fixing mist - Pixi makeup fixing mist
Net matting powder - Paese Bamboo Silk Powder

Brynpenna - gloMinerals Micro Brow Liner (Ash and Dark brown)

Lip Pencil (New!) - glo Skin Beauty Lip Liner the shade Java in the edges and Natural in the middle of the lips

What do you think? :)

  1. Eyeshadow primer, Pixi eye bright primer
    Turquoise eye shadow on the entire eyelid, Paese Neo Eyeshadow (687)
  2. White eye shadow in the middle of the eyelid, Paese cashmere eyeshadow (601)
  3. Black eyeshadow on the outside of the eyelid, Paese cashmere eyeshadow (602)
  4. Green eye shadow over the globe line, Paese opal eyeshadow (Atacama)
  5. Brown, shimmery eye shadow along the globe line, glo Skin Beauty Eyeshadow Squad (Rebel Angel)
  6. Brown, matte (which draws a little to burgundy) along the globe line, glo Skin Beauty Eyeshadow Squad (Rebel Angel)
  7. Black shadow along the globe line for a more smoky look, Paese cashmere eyeshadow (602)
  8. Black eyeliner with wing, Paese liquid liner
  9. White eye shadow in the corner of the eye, Paese cashmere eyeshadow (601)
    Peach / gold eye shadow at the bottom of the lower lash line, a little in the globe line and over the white in the corner of the eye, glo Skin Beauty Eyeshadow Squad (Rebel Angel)
  10. Brown, matte eye shadow at the end of the lower lash line, same as before
    White eye shadow over the eyeliner, same as in the corner of the eye
  11. Black mascara on all lashes, Magnetic lash mascara

Clear!

Hugs are!

#Turquoise - Turquoise Makeup & Hair (Step by Step)

As I showed you earlier this week, I have gone and become turquoise with L'Oréal Paris Colorista Washout! (Adlink) which you can see review and before and after pictures of in this post! :)

But now for the most fun with a new hair color - make up! I was actually going to do something crazy bananas for the new hair but then I got the urge to see how good I can feel in turquoise hair, so it became more easy to wear makeup. Hope you like the look!

Do you see that my lips are painted a little bigger than usual? Do you think I fit in? :) They are not really directly larger than I usually paint but I have painted higher up right in the cupid's bow which makes them look much fuller :)

Bassmink:
Face primer - Pixi Flawless & poreless primer
Foundation - gloMinerals pressed base foundation (Golden light)
Concealer - Pixi Pat Away Concealer (1 Cream)
Powders for redness - gloMinerals Redness Relief Powder
Contouring & highlighter - Pixi Contour Creator
Rouge - gloMinerals Blush (Papaya)
Fixing mist - Pixi makeup fixing mist
Net matting powder - Paese Bamboo Silk Powder

Brynpenna - gloMinerals Micro Brow Liner (Ash and Dark brown)

Lip Pencil (New!) - glo Skin Beauty Lip Liner (Soulmate in the middle and Vino in the edges)

Gold and turquoise are so heavenly beautiful together! I just had to have some gold on my eyelids! And of course I could not help but have some turquoise details as well, that's a given;)

  1. Eyeshadow primer, Pixi eye bright primer
    Light gold shadow on the inside of the eyelid, glo Skin Beauty Shadow Palette (Mixed Metals)
  2. Gold eye shadow on the rest of the eyelid, glo Skin Beauty Shadow Palette (Mixed Metals)
  3. Brown eyeshadow at the end of the eyelid and along the globe line,  glo Skin Beauty Shadow Palette (Mixed Metals)
  4. Fade the edges
  5. Gray-brown eye shadow in the fade, glo Skin Beauty Shadow Palette (Mixed Metals)
    Black eyeshadow a little at the outer edge for a slightly more smoky look, Paese cashmere eyeshadow (602)
  6. Turquoise eyeliner with wing, Paese Neo Eyeshadow (687) mixed with Kryolan Cake Liner Sealer to make the eyeshadow liquid and waterproof
  7. Black eyeliner with wing at the bottom of the turquoise, Paese liquid Liner
  8. White eye shadow in the corner of the eye and under the eyeliner, Paese cashmere eyeshadow (601)
    Golden eye shadow in the middle of the lower lash line, same as on the top
  9. Brown eyeshadow at the end of the lower lash line, the same as at the top
    Turquoise eyeshadow under the golden in the middle of the lower lash line, the same as eyeliner
    Light eye shadow at the bottom of the lower lash line, glo Skin Beauty Shadow Palette (Mixed Metals)
  10. Black mascara on all lashes, Magnetic lash mascara

Clear!

What do you think of my turquoise hair then? I feel comfortable! It still feels a bit unusual but I think it's super nice :)

Hugs are ♥

Makeup tips - Hooded eyes (9 best tips!)

In this post I will share lots of makeup tips for the eye shape hooded eyes / hanging eyelids!

The most difficult thing about hooded eyes is that you often do not know that you have it, but when you follow step-by-step make-up made by people with a different eye shape, it does not become the same in your own eyes.

I want to emphasize that this not are tips on how to change the eye shape, as hooded eyes are nice and nothing you need to change, but just tips on how to get such a nice make-up for your eye shape :)

makeup tips hooded eyes

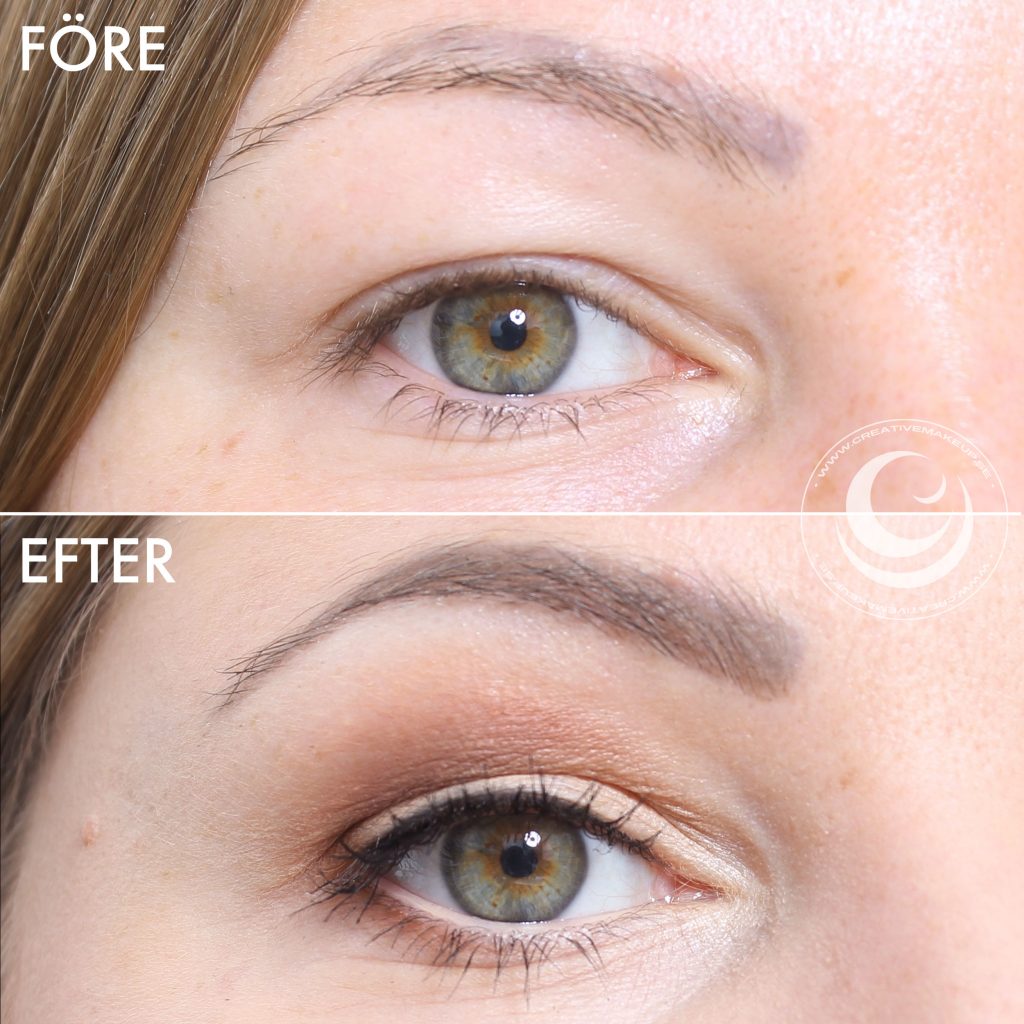
Here you see the make-up before and after! My model was going to have a christening and surprise wedding in honor of the day as well so she also got her hair styled by Mia.

What are hooded eyes?

Hooded eyes are when the eye is completely or largely hidden by the skin over the eyelid, ie. droopy eyelids. It can either be of age, that the skin over the eyelid hangs down, but it is also a very common eye shape that many have.

Hooded eyes are not just one eye shape, there are lots of different types of hooded eyes. In short, I usually divide it into two different - one is where the overhang goes down only to the eyelashes so that you do not see anything at all of the eyelid when you look straight ahead, the other is as my model has today - that a small part of the eyelid still visible.

I will do a tutorial on how to make up completely hooded eyes later on, the tips I show you today are mainly adapted for people who have eyelids that are still slightly visible but can of course be used even if you have more hooded eyes.

make up hooded eyes

This is a fairly simple makeup, I wanted to do a make-up that shows all the tips without it becoming too advanced if you are a beginner.

But to understand why today's tips make a difference for just hooded eyes, I thought I would start by explaining what makeup details are common to do and what effects these have on hooded eyes:

makeup hooded eyes

On the edited side of the image with hooded eyes:

1. Eyeshadow that does not go far enough up = the eyeshadow is less visible + the whole make-up becomes quite sharp because the soft fading you have worked with ends up completely under the skin that is over.

2. Wide eyeliner = nice but the only thing you see when you look straight ahead is black and nothing at all of the eye shadow on the eyelid.

3. Highlighter on a large part under the brow = the skin that hangs over (which in many eyes is even more sagging and baggy) is emphasized more.

In other words, there is nothing wrong with the make-up on the edited image, it is also very nice! But when you do not have as many eyelids to work with, it can be good to be aware of the effects :)

makeup tips hooded eyes

By placing the highlighter just below the brow, darken the overhang itself and then make a thin eyeliner or just lashliner, you get the eye shadow visible over the globe line and also the other color you have on the eyelid :)

Makeup inspiration hooded eyes

If you want to look for makeup inspiration, there are many famous people with hooded eyes, here are some examples:

  • Kate Moss
  • Emma Stone
  • Lucy Liu
  • Blake Lively
  • Malin Åkerman
  • Rachel Bilson
  • Jennifer Lawrence

primer hooded eyes

Before you begin - Eyeshadow primer

Eyeshadow primer is important for everyone to make the eyeshadows more intense and the eye makeup more durable, but it is actually a little extra important for people with hooded eyes.

Because when the overhang lies against the eyelid and "rubs", many people get the eyeliner and eye shadows to discolour over the crease line and the whole make-up looks sticky when you have blinked for a few hours. So extra important for this eye shape to primer with a primer and use products that last.

Note that waterproof does not mean smudge-free if it is not just water such as tears, rain, etc. that is the problem. Oily eyelids dissolve waterproof makeup, then the primer underneath that keeps the eyelid matte is really worth its weight in gold.

I use the primer Pixi Eye Bright Primer in this post.

Application of eye makeup for hooded eyes

All eye shadows are from the palette glo Skin Beauty Shadow Palette (Mixed Metals) which contains both matte and shimmery eye shadows.

Apply a medium dark color over the crease line crease - it is important that you relax your forehead and look straight into the mirror when doing this step. Feel free to put a little higher up than what "feels comfortable" it will blend in much better then when all the other details are in place!

For this I use Nanshy Tapered Crease Brush which is compact enough to print solid pigment while being round at the top and giving a soft fade instantly. This can be toned out more afterwards if you want even softer.

2. Create a little more depth in the eye shadow by applying an even darker color just over the skin fold. Here I used a smaller brush with more precision, Nanshy pencil brush.

On this overhang you often have some structure in the skin (not all, but it is common) then I recommend matte shadows if you do not want the structure in the skin to be emphasized.

Light eye shadow on the rest of the eyelid, this color is also matte.

4. Apply the dark shadow to the outer edge of the eyelid. If you have droopy eyes (eyes that go down in the outer edge) which is a common combo to hooded eyes, remember not to follow the eye shape down in the same downward sloping slope - then you get the outer edges to go even more down which can give a slightly sad look.

I usually do a lifting make-up in two different ways, these two shapes are difficult to describe in just text so I made two pictures where you see:

The left image is the way I did not do today - lay the eye shadow as a straight line over the crease line crease and out to the edge, and then meet up from the lower lash line and out in a cat eye shape.

The right image is as I made up in the model in this post, like a dome type. It goes great with hooded eyes!

5. Place the shimmery highlighter just below the brow, no further down.

6. And in the corner of the eye too, cheers up nicely!

8. Place the brown eyeshadow at the end of the lower lash line, tie together with the top in the outer corner of the eye, then a little of the dark brown closest to the lash line also for a little more framing. If you want a lifting make-up, do not go so far down with the eye shadow under the eye, then you lower your gaze again.

9. Lashliner / thin eyeliner - The little that is visible by the eyelid I want to emphasize in this makeup, therefore I made a lashliner / thin eyeliner for a clear marking that does not take up much space from the eyelid. Read more about how to make lashliner here!

The eyeliner I have used is Kryolan HD Cream Liner, when I had made lashliner, I smoked a little more this very thin from the top also for a little more selection.

Finish with mascara as usual, Magnetic lash mascara.

Then it's ready! :)

Products in this make-up:

Face primer - Pixi Flawless & Poreless Primer
Foundation - Pixi H2O Skintint (Nude) and a little gloMinerals Pressed Base Foundation (Golden medium) over when she later wanted a little more coverage :)
Concealer - Pixi Pat Away Concealer (Nude)
Powder that neutralizes redness - glo Skin Beauty Redness relief powder
Contouring & highlighter - Pixi Contour Creator
Rouge - Paese Powder blush (35)

Brynpenna - glo Skin Beauty Micro Brow Liner (Dark brown)

Lip pencil - Benecos natural lip liner (brown)
Lip Gloss - glo Skin Beauty Lip Gloss (Desert Bloom)

Eyeshadow Primer - Pixi Eye Bright Primer
Eyeshadow Palette - glo Skin Beauty Shadow Palette (Mixed Metals)

makeup tips hooded eyes

When you close your eyes, the shape is a little different because the eyes change very much when you look / close your eyes if you have a lot of skin over the eyelid. Hence, the shape does not really look like a dome when she closes her eyes. Therefore, it is important to make the shape while relaxing in the forehead and looking straight into the mirror, as I wrote in point no. 1.

Hope all the tips were helpful and that you liked my post about hooded eyes! Just shout if you have any questions or concerns, or requests for more makeup tips areas you need help with :)

Can also tip about my post about that pick different eyebrow shapes, check it out!

Hug! ♥


L'Oréal Paris Colorista Washout (before and after)

Sooo, this happened :) I dyed my hair with L'Oréal Paris Colorista Washout #TurquoiseHair !!!

Here you can see the result and before and after:

L'Oréal Paris Colorista Washout #TurquoiseHair

Last weekend I tested the color spray L'Oréal Paris Colorista Spray in light blue (which you can see in this post).

This weekend I went on the heavier artillery with L'Oréal Paris Colorista Washout. Is on  Lyko.se (Adlink) and it got so cool!

L'Oréal Paris Colorista Washout turquoise

I have received all these colors as a press release and tested as you can see the turquoise color #TurquoiseHair.L'Oréal Paris Colorista Washout step by step

What is L'Oréal Paris Colorista Washout?

This is a color that can be washed out completely but that lasts 4-10 washes, unlike the spray which is washed out completely already the next wash.

I used to think it would be like a very colorful colored hair wrap, but it is more reminiscent of a regular home hair color.

To think about before

The color attaches more to light and treated hair, so if you want a vibrant color, you should bleach your hair first.

L'Oréal Paris Colorista Washout on bleached hair

Results of Colorista Washout

I am very impressed with the result!

Intense turquoise and above all very even. Many colored wraps can become flaming on my hair but this color is not flaming anywhere :)

turquoise hair before after

Looks really good I think!

Packaging

The paint comes in a tube and it is ready-mixed, so unlike home paints, you do not have to mix anything yourself.

review L'Oréal Paris Colorista Washout

It is therefore excellent to close again and use several times if you do not use the whole at once.

review L'Oréal Paris Colorista Washout

How to use L'Oréal Paris Colorista Washout

  1. Wash your hair with shampoo
  2. Dry hair completely dry (Assumes that it should be applied to dry hair to just lay on the outside of the hair strands because it should be possible to wash off completely, wet hair = open scalp layer. And that you should shampoo before so that it adheres better without caring substances from conditioners and styling products)
  3. Preparations - Gloves (included), hair tie / clip if you have long hair, and an ugly towel you are not afraid of so as not to get a lot of color on the shoulders and back.

before and after L'Oréal Paris Colorista Washout

4. Apply to hair. I put in the whole hair but not only up in the scalp. But you can apply how you want, loops etc :)

It takes quite a lot, I actually ran out of the whole bottle. Had I skimped, it would have been a bit left for a few loops but I was so scared that it would be flammable so drove in everything.

use L'Oréal Paris Colorista Washout

5. The duration of action varies depending on how intense the color you want, up to 5-20 minutes. I had the entire duration of action and a little more.

6. Rinse thoroughly. It says that it is moisturizing and that no conditioner is needed. I think it sounds weird because conditioner is also there to close the hair, but I obeyed and would afterwards recommend conditioner because I think my hair feels quite dry.

7. Then it's ready! Just to blow dry and inspect the result :)

Sustainability L'Oréal Paris Colorista Washout

I still have not washed my hair the first time so I can not give my own review on this. But in any case, it should be washed out more and more each time.

I hope it releases quite easily on my hair because I only wash once a week so 10 washes is several months for me haha.

dye your hair green

Summary

I think it was a bit hard to wash the hair with shampoo first and then dry it before coloring. Then I do not like that it contains silicones either. Besides, I'm very impressed! Did not think the color would be like this good indeed! :)

Now it only remains to be seen if it goes away completely as promised, keep your fingers crossed!

These are available in many more colors, different shades of pink and red, peach, purple, blue, light blue and lots more. You will find them all Lyko.se (Adlink)

Update, also read:

It did not let go of my hair completely until I bleached it off at the hairdresser. But I tested L'Oréal Paris Colorista Washout in the pink and yellow color of my nephews and those colors were completely washed out.

Hugs are!

My business week

This week has been a superb catch-up week! I was a little stressed last Sunday about how much I had to do, but now I have checked off the world's longest to do list and feel relaxed and satisfied :)

Makeup tips for hooded eyes
I have preciiis finished with the photography of a makeup customer who came to my little home studio this quiet Sunday. I showed makeup tips for hooded eyes and took photos step by step and it turned out so well! Great fun! She is going to have a baptism for her baby today and surprise wedding (!) and my sister Mia also helped fix her hair as well.

The post will probably be of great help to many, I think, will publish it next week, there is quite a lot of text I will get down in an educational way as well. Love to write detailed tip posts, it's the most fun :)

Interview about stress and prioritizing sleep
My friend is studying to be a company nurse and interviewing me about stress before an essay. She compares stress in employees with stress in managers / entrepreneurs, very interesting!

We then talked a lot about sleep. I wrote a few weeks ago (in this post) that sometimes, even though I have worked effectively from morning to night, I think that I do not work hard enough when I hear all the successful people who talk about panic disorder and mental illness after all the stress, and then I feel just fine haha!

I think sleep is an important key in the whole thing. That and that I am a good enjoyer of life in everyday life hehe. I can work so much and cope with so much stress because I am careful to get my 8 hours of sleep. That is what is recommended type (?) But when I listen to company podcasts, 5-6 hours seems to be completely normal.

Last week was quite stressful for me, partly physically but above all mentally, which together becomes a tough combination. And this week I have slept extra long, probably 9 hours a night! And I am absolutely convinced that it is very helpful for stress-related symptoms.

If you have a lot to do and wish that the day had more hours, it is an easy way to turn a few hours from sleep. But I personally get the same amount done if I'm tired and work 14 hours than if I'm alert and work 10 hours! You become so extremely much more efficient and then you feel much better :)

I thought this was a slightly appropriate picture for the subject of stress and enjoyment of life - when I started taking on all the financial work on Monday and the to-do list was overwhelming and at the same time we get a power outage because we use too much electricity at once because it is so cold at the salon and we need heat lamps and coffee at the same time type (sigh).

But while Miska called fastighets-Kalle and kept the scaffolding out in the shop, I sat here in the office in the dark and thought it was extremely cozy haha. Listened to love songs on Spotify, drank coffee and worked in the dark and thought "this will be a good week";)

More will be threading on Creative Makeup!
When we opened the salon 2 years ago, we were lucky that our makeup artist Zahra was already really good at threading and now she is teaching all other makeup artists to thread as well!

It takes some practice to get the technique in, and then a little more training to be effective and be able to do all areas of the face, but Zahra is a really good teacher and has several years of experience as soon as the others will be just as good.

I was a practitioner and it's like going to the spa, so cozy! The heat lamp was on, you lie down so nicely and get pampered. I do not think it hurts at all in fact it is just cozy :) Great that I get to be a little spoiled sometimes also hihi.

Here Ida threads for full mugs! Total relaxation mixed with ash tanning could sum up my situation in the threading chair haha.

Hair analyzes x30
We sell Hairology and are trained hair pathologists, which in short means the study of hair, how it is structured and the products' impact on the hair. actually. You can read more on our website Creativemakeup.se if you are curious!

And this week I had a different job. I was contacted by another brand who wanted to test if their product, which is already on the market, has a clear effect on the hair that can be measured. After a bit of consulting, I now received an envelope with lots of hairs in the mail haha, Olga helped me measure all the values and then I did the compilation.

So this was so much fun haha! I love to get nerdy and write down all the conclusions. For example. The protein value has increased, which indicates that the treatment gives the desired result. For this person, however, this has not been an advantage because the value was optimal before the treatment. The protein value is now higher than recommended, which gives a hair that can be experienced as hard, dry and brittle ”.

That is why it is so good when you can test the hair before recommending products / treatments. Some hair does not need more moisture and some does not need more protein, and if you add it without the hair needing it, it can be much worse!

This is what it looks like on the display when we do hair tests - here you see my hair, optimal value! It is best when the strength is one step higher than the elasticity. It is about balance between moisture and proteins, too much protein makes the hair fall out easily because it is hard and too little protein makes the hair fall out easily because it is brittle.

Work from home for two days
On Tuesday, I worked from home and wore admin jobs such as salaries, schedules, budgets, statistics and everything that was actually supposed to be done last week when October ended but which I did not have time for then.

Last Friday I worked at home for a little more creative reasons! :) I have taken swatch pictures, step by step and before and after pictures of all our news that I will blog about and make beauty guides for the webshop. I spent exactly the whole day in my product room / photo studio, my happy place!

When I work from home, I constantly think about how things go at the salon. I always keep an eye on the clock and think "now that customer should have come" "now Olga has lunch" "now it's soon time for closing" "I wonder how it has gone" haha.

When I moved home the photo studio, I was afraid that I would think it was so nice to work from home again that I would not want to be at the salon as much, but it is quite the opposite! I would not want to work from home two days in a row, then I miss the salon too much! :)

Then Zahra wrote on the evening twig that it had gone so well today, it had been such a cozy atmosphere and all customers were so satisfied and happy. Oh what it warmed in me then! ♥ It warmed my mother's heart, I almost thought I would write, the corporate heart, I must say :)

Best end to the best job week!

Have a great Sunday everyone :)

en_USEnglish