My business week

This week has been productive and good, the only thing that has swayed a bit is that I have not had time to make as many blog posts as I usually do. There have been more early mornings and late evenings than usual, which has meant less time in the photo studio because I have it at home.

But now I'm going to talk about what I am done, and not focus on what I am not has made! :) And then I get to improve on the blog front next week simply!

Makeup job at Disruptive Materials
The company Disruptive Materials, which works with the material Upsalite (which I wrote a lot about before), will update the pictures of their staff on the website and when it was time for photography, they called me in as a backup!

There were 14 people who were made up and I finished all make-up with upsalite powder, partly to reduce glitter in the picture of course but also because it is a fun thing that everyone was made up with the material they work with :)

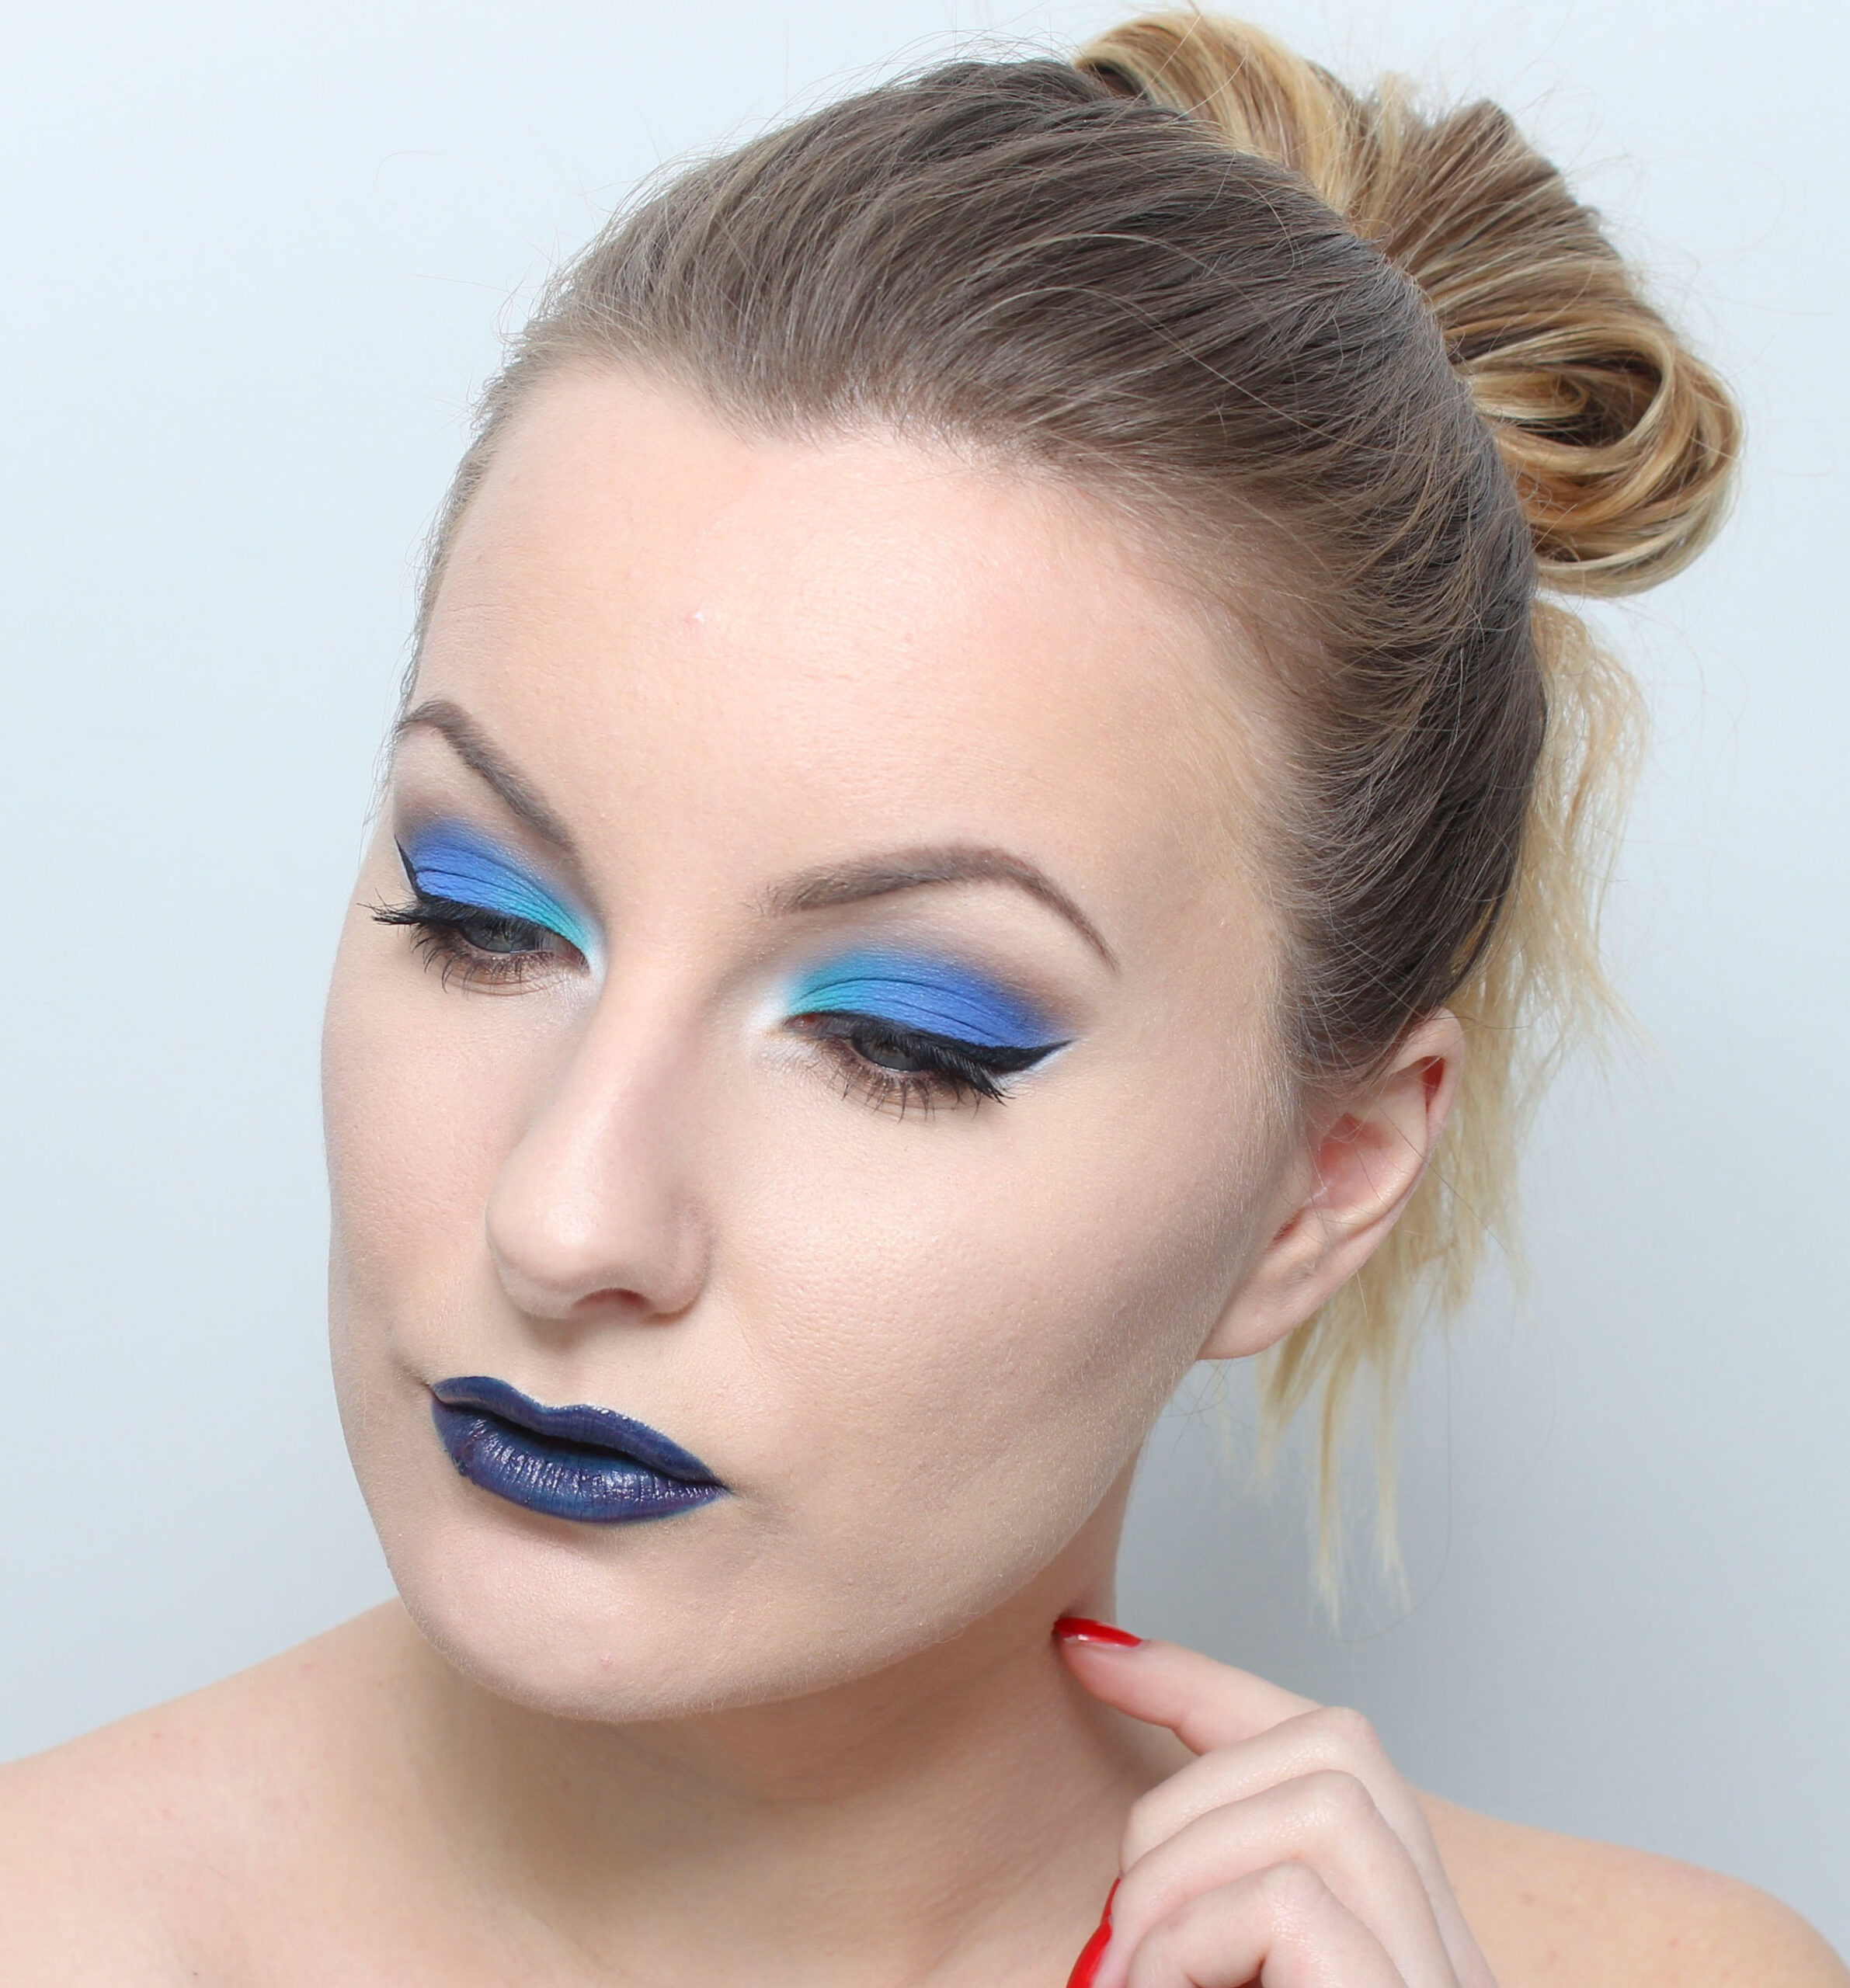
Here is Mattias who is the CEO of Disruptive Materials. He got a little smoother skin, sharper cheekbones and also a little extra fullness in the eyebrows.

He said before I left "it almost feels like it's a celebrity here today, because I've been sitting with your movies so much!" Lol. So the movies I made for the material I blogged about in this business week post :)

I posted this picture on Insta Story and got a pretty quick comment from Petra who founded Pixi by Petra who liked all the Pixi products in the picture haha. As you can see, the contouring palette in the picture is very well used!

They took the opportunity to celebrate their success while everyone was gathered for photography, fun! Here is a part of the gang that sits and cuddles together.

The most fun thing about this job was getting some time to talk to everyone in the whole company! I have been to their office many times but do not have time to talk to everyone because they are busy with work. Now it feels like I know everyone a little :)

Our barber Niclas starts November 8th!
Niclas has now opened his schedule for beard treatments, shaving and cutting, woop, woop! You can read more and book an appointment here :)

This week he was here and settled into the new barber corner! Picked up product news, among other things, we have a lot of new for sale but it is very fixed with utility products, machine, razor blade, towels, some blue liquid that the tools should be in after each customer, etc.

This feels really good! He will be at the salon every Thursday and it starts to fill up with bookings and already because he was only here at the salon, he got a drop-in customer who he did beard trim and edging :) So fun!

Here he stands and arranges in one product shelf :)

Product news and image fix
Very, very soon we will publish news in the webshop! Partly all beard products but both Pixi and gloMinerals (or glo Skin Beauty as the brand is now called) come with news that we put to the test all fall :)

This is an element I love the most, new products, love!

I have photographed the products for make-up, swatch pictures and blog posts and it is a lot of work to put everything in the checkout, price tags, reorganization on shelves, put in the webshop, product pictures, etc. All the latter stuff I have luckily been staff who help, otherwise I probably would not have had time for anything else.

One thing I have been working on a lot is product images for the webshop. I am very careful with the shades and will work on taking more good swatch pictures as well so that it will be even easier to see. But that the first product images match is the least you can ask for, but on gloMinerals news there were many shades that did not match at all with how they look in reality, I think and it does not hold.

So I have sat and edited it in photoshop and now I am very happy! :)

Here are the 6 shades we will have in the range! Loves all! There are new packaging and updated shades but some have been there before, Pink Blossom has been our best seller in the store before and Beloved was my favorite lip gloss 5-6 years ago, although then it was in their tube lip gloss Liquid Lips. I had it with me as a reference when I actually tattooed my lips :)

The lip gloss click behind each lip gloss I have fixed myself in photoshop as well, I think it turned out very nice!

It is a lot of work with this kind of thing, but I also think it is very important, and as I said, I will work more and more on the pictures in the webshop in the future.

Here is the front page picture, I chose Pink Blossom as the front page :) Will blog more about these next week!

The week has been quite mixed in other words, I am a little behind in both blogging + everything that should be done before 1 Nov so on Monday and Tuesday it is hard work that counts! I have set a deadline for all news to be published then, all November campaigns must be ready and on the 1st we have the autumn event and it is a bit of a last minute fix that must be done before that as well.

With everything is fun stuff so it's nemas problemas! :)

Throws in a small picture of what I look like at the time of writing too haha. My cat Madde in my arms in front of the fire and musk clothes and rag socks on :) Cozy blogs!

Now I'll bake some gingerbread with the kids, then clean the house because we ground all day yesterday! Got a request for an update on how things are going with our renovation, so maybe thought of taking a photo for such a post as well :)

Wish you a wonderful Sunday! ♥

Light pink autumn make-up (Step by Step)

Today's make-up is a quick and neutral make-up at the same time as it is a little extra neat and goes discreetly in the pink-purple direction, which enlivens nicely :)

I have used the eyeshadow trio Paese Kashmir Trio in shade 686, it is so nice! It is color but still quite neutral and discreet tones.

Bassmink:
Face primer - Pixi Flawless & poreless primer
Foundation - gloMinerals pressed base foundation (Golden medium)
Concealer - gloMinerals under eye concealer (beige)
Powders for redness - gloMinerals Redness Relief Powder
Contouring & highlighter - Pixi Contour Creator
Rouge - gloMinerals Blush (Papaya)
Fixing mist - Pixi makeup fixing mist
Net matting powder - Paese Bamboo Silk Powder

Brynpenna - gloMinerals Micro Brow Liner (Ash and Dark brown)

The lips are two news that will enter the webshop very soon! The lip liner is glo Skin Beauty Lip Liner in the shade Pronto, and the lip gloss above is the shade Plumberry.

I like how the eyeliner is sharp at the edges and then almost toned into the make-up. Became a nice effect!

All eye shadows are from Paese Kashmir Trio in shade 686, unless otherwise stated:

  1. Eyeshadow primer, Pixi eye bright primer
    Dark purple eyeshadow as eyeliner wing
  2. Light pink eye shadow on the entire eyelid
  3. Brown eye shadow at the end of the eyelid
  4. Light pink eye shadow in the corner of the eye
    Brown eyeshadow along the lower lash line
  5. White eye shadow in the corner of the eye, in the middle of the eyelid and under the eyeliner, Paese cashmere eyeshadow (601)
  6. Black mascara on all lashes, Magnetic lash mascara

Hope you liked the look as much as I did! :)

Hug!

10 tips when applying eye shadow!

One of the most fun things about makeup & makeup is to be able to teach, I think! In this video I share my 10 best tips when applying eye shadow!

For those of you who are already good at eye makeup, this movie may be a little too basic, but I think most of you will get help from my tips! :) I have also summarized all the tips with text and pictures for those of you who prefer to read.

When you apply eye shadow, you can do it either easily for yourself or very, very difficult - which you easily do if you do not have good products and know how to work with them. Had I used a sponge applicator, skipped eyeshadow primer and had pigmentless eyeshadows, it would have been incredibly difficult for me as well.

But basic make-up does not have to be that difficult! And after my post, I hope you will not like it either!

And I must probably add that the film together with this text contains so many more small tips so really maybe it is like 20 tips if you were to divide everything properly haha.

Hope you like the post!

Table of Contents:

  1. These 3 makeup brushes are perfect combo
  2. Use eye shadow primer
  3. Pillows at the edge of the primer
  4. Palette with three eye shadows makes it easier
  5. Dab on the eye shadows on the eyelid
  6. How high up should you apply the eye shadow?
  7. How to quickly fade out the eye shadows
  8. Tie together the eye shadows on the top and bottom in the outer corner of the eye
  9. Light eye shadow in the corner of the eye and under the eyebrow
  10. Where you lay dark, where you "draw" in the eye shape

10 tips to add eye shadow + video

It was really fun to make this video! Hope it is helpful!

1. Three makeup brushes

I use three eyeshadow brushes for all my eyeshadows. It may sound more advanced the more brushes you use "do I really need all these?" but it is not more advanced - on the contrary! It is difficult to fade the eyeshadow softly along the crease line with the same brush you use under the eye, and vice versa.

nanshy makeup brushes eye shadow

This sample image is brushes from Nanshy. They do not have to look exactly like this, but the principle small, medium, large is what I really recommend to make it easy for themselves :)

Can recommend the kit Real Techniques Eye Shade + Blend Brushes (adlink) with a small, a medium and a large brush in the same kit!

Medium-sized brush for application
The brush you apply the eye shadow on the eyelid should preferably be quite compact. A brush that is too soft and fluffy will not get as much pigment as required and it will also be difficult to "press" the eye shadow.

I personally also recommend a more rounded brush for this. A flat brush gives a sharper edge, which means you have to work even harder with the fade to get it even. But with a rounded soft and compact brush, you get a lot of pigment, good precision and at the same time a fairly soft edge straight away!

Soft brush to fade
I use the largest brush to fade out the eye shadow. It is fluffy and soft but at the same time compact enough to move the pigments. One for soft brush will not fade the shadow effectively enough, and a too hard brush will make the shadow uneven. Something in between is perfect!

Small brush under the eye
Using a large brush under the eye is quite difficult. You can either use a small rounded or a slanted plate. It's a matter of taste. I like both varieties!

10 tips when applying eye shadow! beginner

Use eyeshadow primer!

I could make a whole post about just primer under the eye shadows, if you have not tested, you do not understand how much it simplifies! Many people think that this is an unnecessary "good to have product" but believe me this makes a huge difference :)

The primer briefly acts as an adhesive for the eye shadows. The eye shadow adheres much better, which makes it much easier to apply, you do not have to work much at all to get a pigment-rich result and it is easy to put several colors next to each other without dusting together and becoming a single mess both on the eyelid and under the eye where they fell down;)

In addition, the durability of the eye shadows becomes unbeatable! Even if you get a nice make-up without primer, it settles easily as two dashes on the eyelid when you have blinked for a few hours. But with primer, you can have the same eye makeup from morning to night and it still fits perfectly!

Note It is not possible to use a face primer instead of an eye shadow primer. Both are called primers because they are used as a base before another product, but primer before foundation and primer before eye shadow are two completely different products with different properties.

makeup tips eye shadow primer eye shadow

Here you see the difference in the pigment with and without primer. The primer in the picture (Pixi) has expired but I can warmly recommend NYX High Definition Eye Shadow Base (adlink) it's great!

3. Pillows at the edge of the primer

As I said with primer, the pigments adhere very well, which can make it difficult to get a soft fade because the more you work with the brush, the more pigment it adheres to.

So after you have applied the primer, take some powder and sweep on the edge - not on the whole eyelid but only where the fading should be. Then it will be much faster to get an even fade!

4. Palette with three eye shadows facilitates

Many people think that the more eye shadows you use the more difficult it is. But often it is the other way around! If you want light on the inside of the eyelid and dark on the outside, it is much more difficult to get a smooth transition between a light and a dark shadow, than if you put a medium dark color in between.

The palette I have used in this post is the Paese Opal Eyeshadow Trio in the shade Colorado. Can also strike a blow for the palette Pixi Effect Shadow Palette in the shade Hazelnut Haze (adlink). Really good eye shadows and useful colors!

10 tips when applying eyeshadow beginners

5. Dab on the eye shadows on the eyelid!

When I apply the eye shadows, I dab / press them onto the eyelid. Because the primer is creamy underneath, it can be uneven if you pull a lot with the brush. In addition, it is important that you apply properly with pigment so that the primer is fixed and stops being creamy, which is faster if you press the shadows than if you "sweep on" them.

I also usually apply a little eye shadow from the brush before I apply, if you have too much on the brush it will fall down under the eye and on the cheekbones. Feel free to turn the shadows down towards the eyeshadow packaging and not into the air, then the shadow ends up back in the packaging and you do not waste a lot of product unnecessarily :)

In the film you see how easily these colors are toned into each other.

add eyeshadow beginners

6. How high up should you apply the eye shadow?

You often raise your eyebrows a lot and half-close your eyes when you apply the eye shadow, and then it is difficult to see how high you should apply the color. You often make a nice fade and then you look straight ahead and then the whole fade ends up right in the crease line fold, which makes the make-up look quite sharp when you look straight ahead and the color of the eye shadow is not as visible.

Instead, I usually do this: Relax my forehead and look straight ahead in the mirror. Place the eyeshadow just above the crease line crease. Then it ends up so high that it is visible even when you look and the make-up becomes much softer when the fading does not end up inside the crease.

The makeup in this post is pretty basic. The eyeshadow at the end of the eyelid I put at the same level as the eyelashes end. So no prolonged cat eye makeup or the like but stopped right where the eyelid ends. This makes it easy to know how far out you are pulling the eyeshadow in the crease line - because you can easily just tie it together with the color you have already put on the end of the eyelid (recommend watching the movie if you do not understand exactly what I am describing now) .

So look straight into the mirror, relax your forehead, place the eyeshadow just above the crease line crease and down into the eyeshadow you have already placed at the far end of the eyelid. Then you get an eye makeup that follows your own eye shape!

7. How to quickly fade out the eye shadow

If you have followed the above tips, the edge of the eye shadow is already quite soft, because you applied with a rounded brush and fixed the primer with powder in the edges before you applied the eye shadow. Then the last finishing touches on the fade are very fast!

Place the brush right on the edge of the eye shadow, so that the brush is a little on the eye shadow and a little on the skin tone outside. Then swipe back and forth with the brush. So do not work upwards with the brush then the shadow gets closer and closer to the edge and it eventually becomes too much and too sticky. Just pull back and forth back and forth right on the edge of the eyeshadow and let the brush do the job :)

8. Connect the eye shadows on the top and bottom in the outer corner of the eye

I apply the eye shadows on the underside of the eye with a small brush. What I usually think of is to tie together the eyeshadow on the top and bottom in the outer corner of the eye, then you get a "natural finish" on the eyeshadow on the top and it also opens up the gaze nicely. The whole make-up seems to be more cohesive.

9. Light eye shadow in the corner of the eye and under the eyebrows

Light eye shadow in the corner of the eye and under the eyebrow really adds the finishing touch to the make-up!

When you lay under the brow, keep in mind not to lay so wide if you have a lot of sagging skin that lies over the eye. Then you emphasize it. That part you prefer to have dark to lift the gaze, and then you can put the light just below the brow only.

put eye shadow in the corner of the eye

10. Where you lay dark, where you "draw" in the eye shape

Where you put dark there, the focus is on the eye, so if you want an enlarged look, you can put the shadows as I did in this make-up - with dark in the outer edges and + above and below the eye to open up the look.

But do you want e.g. lift your gaze so you can skip dark on the underside of the eyes completely and just lay on the top, then you raise your gaze more.

apply dark makeup

Hope my 10 tips when applying eye shadow were helpful and you liked the video! Shout out if you have any questions or leave a comment below! :)

Also read my other posts on makeup tips for beginners:

Hug!

Bye, Felicia - Blue Lipstick & Makeup

Today's make-up is an all-blue look! ♥ I put the lipstick L'Oréal Paris Infallible Lip Paint Laquer in the shade Bye, Felicia (adlink) on trial and will write a review on it shortly.

I might have really wanted these lips for a black eyeliner only or a smokey eye, but then I felt like doing a blue eye makeup as well so that's how it turned out :)

What do you think of these dark blue, glossy lips? I think it was really cool!

Bassmink:
Face primer - Pixi Flawless & poreless primer
Foundation - gloMinerals pressed base foundation (Golden medium)
Concealer - gloMinerals under eye concealer (beige)
Powders for redness - gloMinerals Redness Relief Powder
Contouring & highlighter - Pixi Contour Creator
Rouge - gloMinerals Blush (Papaya)
Fixing mist - Pixi makeup fixing mist
Net matting powder - Paese Bamboo Silk Powder

Brynpenna - gloMinerals Micro Brow Liner (Ash and Dark brown)

Lips - L'Oréal Paris Infallible Lip Paint Laquer in the shade L'Oréal Paris Infallible Lip Paint Laquer (Bye, Felicia) (adlink)

These eyes without the lips suddenly feel very summery! :)

  1. Eyeshadow primer, Pixi eye bright primer
    Brown-colored eyeliner along the waterline and the lower lash line, Paese Linea Automatic Liner (Brown glam)
  2. Blue eye shadow on the eyelid, Paese Neo Eyeshadow (660)
  3. Turquoise eyeshadow on the inside of the eyelid, Paese Neo Eyeshadow (687)
  4. White eye shadow in the corner of the eye, Paese cashmere eyeshadow (601)
  5. Golden brown eye shadow in the globe line and lower lash line, Paese opal eyeshadow trio (Golden brown)
  6. Black eyeliner, Kryolan HD Cream Liner
  7. Black mascara on all lashes, Magnetic lash mascara

Clear!


Hugs are!

My business week

Then it was Sunday again! The weeks just run away :)

Makeup tips in the webshop & focus on what you are best at!
I have started filming more and more, which I think is super fun! Last Thursday I worked from home and filmed 10 tips (and lots of little tips baked in) when applying eye shadow. I thought it was so fun to do this!

I love to make up but what I love most are products and teaching, I often hear that I am very good at it too :) Sometimes you get the urge to do more "cool looks" and things you see a lot on instagram but I think a lot about that with focusing on what you are best at, and in my case it is to educate and create materials that are a little more useful for food. And it's so much fun too!

This will be up on youtube and in the blog soon but also in the webshop, partly among all beauty guides but also directly on related products. For example. if you go for an eyeshadow primer or eyeshadow brush in the webshop, there is also a movie there with 10 tips on applying eyeshadow. Good, is not it? :)

The idea is that the webshop will more and more contain lots of makeup tips, both pictures and movies. Most fun project ♥

Here is a picture from when I edit the film at home in front of the wood burning stove :)

Balance & performance
I heard Günter Mårder talk about "balance in life" in Företagarpodden quite a long time ago, he said that it is not possible to have it as an entrepreneur. I have thought a lot about that…

There is so much talk about stress, burnout and how careful one must be. Talk about mental health, exercise, diet, well-being in every corner.

At the same time, you listen to successful people who talk about how hard you have to work to reach the time you want. You have to get up extra early, become more efficient, work long days and preferably extra a lot when competitors have a weekend / holiday because that is when you "run for them".

I often find that I have a pretty good balance in this. I work a lot but I am also a real enjoyer of life. Miska and I pull in the mattresses and sleep in the living room just to fall asleep in front of the fire. Last Friday I ended the day by lying in the bathtub and watching movies for 3 hours. We often have "cozy breakfasts" in the morning before work. When I do the dishes I do it with headphones in my ears and sing loud and happy. When I work at home in the evening after already working a whole day at the salon, I do it with a cat in my arms, a cup of tea next to me and light candles on the table. I also have the luxury of working with my boyfriend so I never have to "long for home" at work because he is with me all the time.

So I am very happy with my life and not the least bit close to being burned out or feeling bad.

But that's exactly what's gnawing at me somewhere, sick enough. On Monday, I started working at 7 in the morning in my photo studio and as if for breakfast, dinner and a turn at the Bauhaus, I worked constantly until half past nine in the evening. Then I listened to Businesspodden with Therese Lindgren and she talked about how hard she works - and I thought I wish I worked as hard as she did. I could not at all define myself as being in the same league. I'm not stressed out, I've never had a panic attack and I feel very good.

So sometimes I'm so happy with my life that I guess I do not work hard enough because I am not exhausted and feel piss when I go to bed - but I do not want that either - but I want to work hard.

Can any of you recognize myself in my thoughts? Or do you even understand what I mean :)

At the same time, I think like this - there may be a difference in working hard and to work very. Is it important to work hard if you still get shit done and at the end of the day have gotten lots of things done? No, then I would rather be a person who does not work hard but feels very good!

Speaking of balance, I thought this skateboard-Helena fit in well haha!

Planning of internal training
Being a really sharp makeup artist requires that you are passionate about the profession and make sure to keep your creative vein and knowledge fresh! We at Creative Makeup are already really sharp, but there is never a level when you are "done" and can stop, because this industry is constantly evolving.

As it looks today when you work in a salon, it does not often become very creative looks, but most people want a natural base and smoky eyes for a party, and all makeup consultations are at such a level that the person should be able to do it themselves at home .

In addition, new replenishment with knowledge, new trends and trend words, ingredients and hyped news from other brands etc. are constantly required.

That's why I'm now planning regular in-house training with all makeup artists and they are so excited for this! We call it "Helena's make-up school" :) The purpose is partly fun team building together but also to continue to develop as makeup artists. I will first have a small lesson, then they make up models and then we will give feedback to each other and play loose!

As for the makeup part in the company, I feel that it is my job that everyone should be as experienced as me. Previously, I just assumed that because our makeup artists are just as passionate about the profession, they are just as experienced, but it's also about time. Some have children and such to take care of in their free time and obviously do not have as much time to scroll through social media to stay up to date or do the worst creative make-up on themselves every morning. I put on make-up during working hours for the blog posts and have 2 hours of travel time to work to scroll on instagram and blogs.

So on closer inspection, I fully understand that not everyone can keep up with the fluctuations that e.g. highlighter has suddenly become a trend now called "strobing", that magnetic false eyelashes are on the way, that NARS has started selling in China and suddenly becomes an animal-tested brand, that cyclic silicones are suspected to be harmful to health in large quantities or that eyelash permanent (which we also perform ) nowadays is called "lash lift" "lash lamination" and all sorts of different terms depending on the brands and what is used for care products in connection with the treatment. Yes, it's not easy to keep up with the turns for everyone - but this kind of update I also intend to bake into the educations :)

All makeup artists at Creative Makeup are so forward and ambitious and interested and these are qualities we were really looking for when we hired! Here you see Ida on our Instagram who suggests her favorite mascara :) You follow us there, right? @ creativemakeup.se ♥

November pictures
Which I wrote a little fast in business week post at the end of september, we started with a campaign structure where we make 4 campaign pictures every month (which will be done in different formats) so that we have a common thread with the same pictures rolled on the website, social media, in the store and in our shop window.

In October it has been 1. Get the look before Halloween 2. Pink ribbon & backyard tattoo 3. Autumn event 1 Nov 4. Product tips - Kryolan HD Cream Liner.

Now I am in full swing with the pictures for November! Since there are 4 pictures in 4 different formats, there are a total of 16 pictures to be made. A real puzzle!

One of the pictures is that our barber Niclas starts November 8 woop woop! In connection with this, we will also have an expanded range of beard and shaving products (as Niclas recommended) and they will of course also be included in the webshop.

Here I sit in bed and cut together pictures with my cat Carl-Philip in my arms, talking about life-lovers;)

I worked at the computer type all day yesterday but now I will probably be free all Sunday and just enjoy the day - without pressure that I do not run over my competitors haha.

Hugs are! ♥

en_USEnglish