Pixi Palette Bronzette Swatch

I am completely in love with the multiplet Palette Bronzette from Pixi, it's so wonderful!

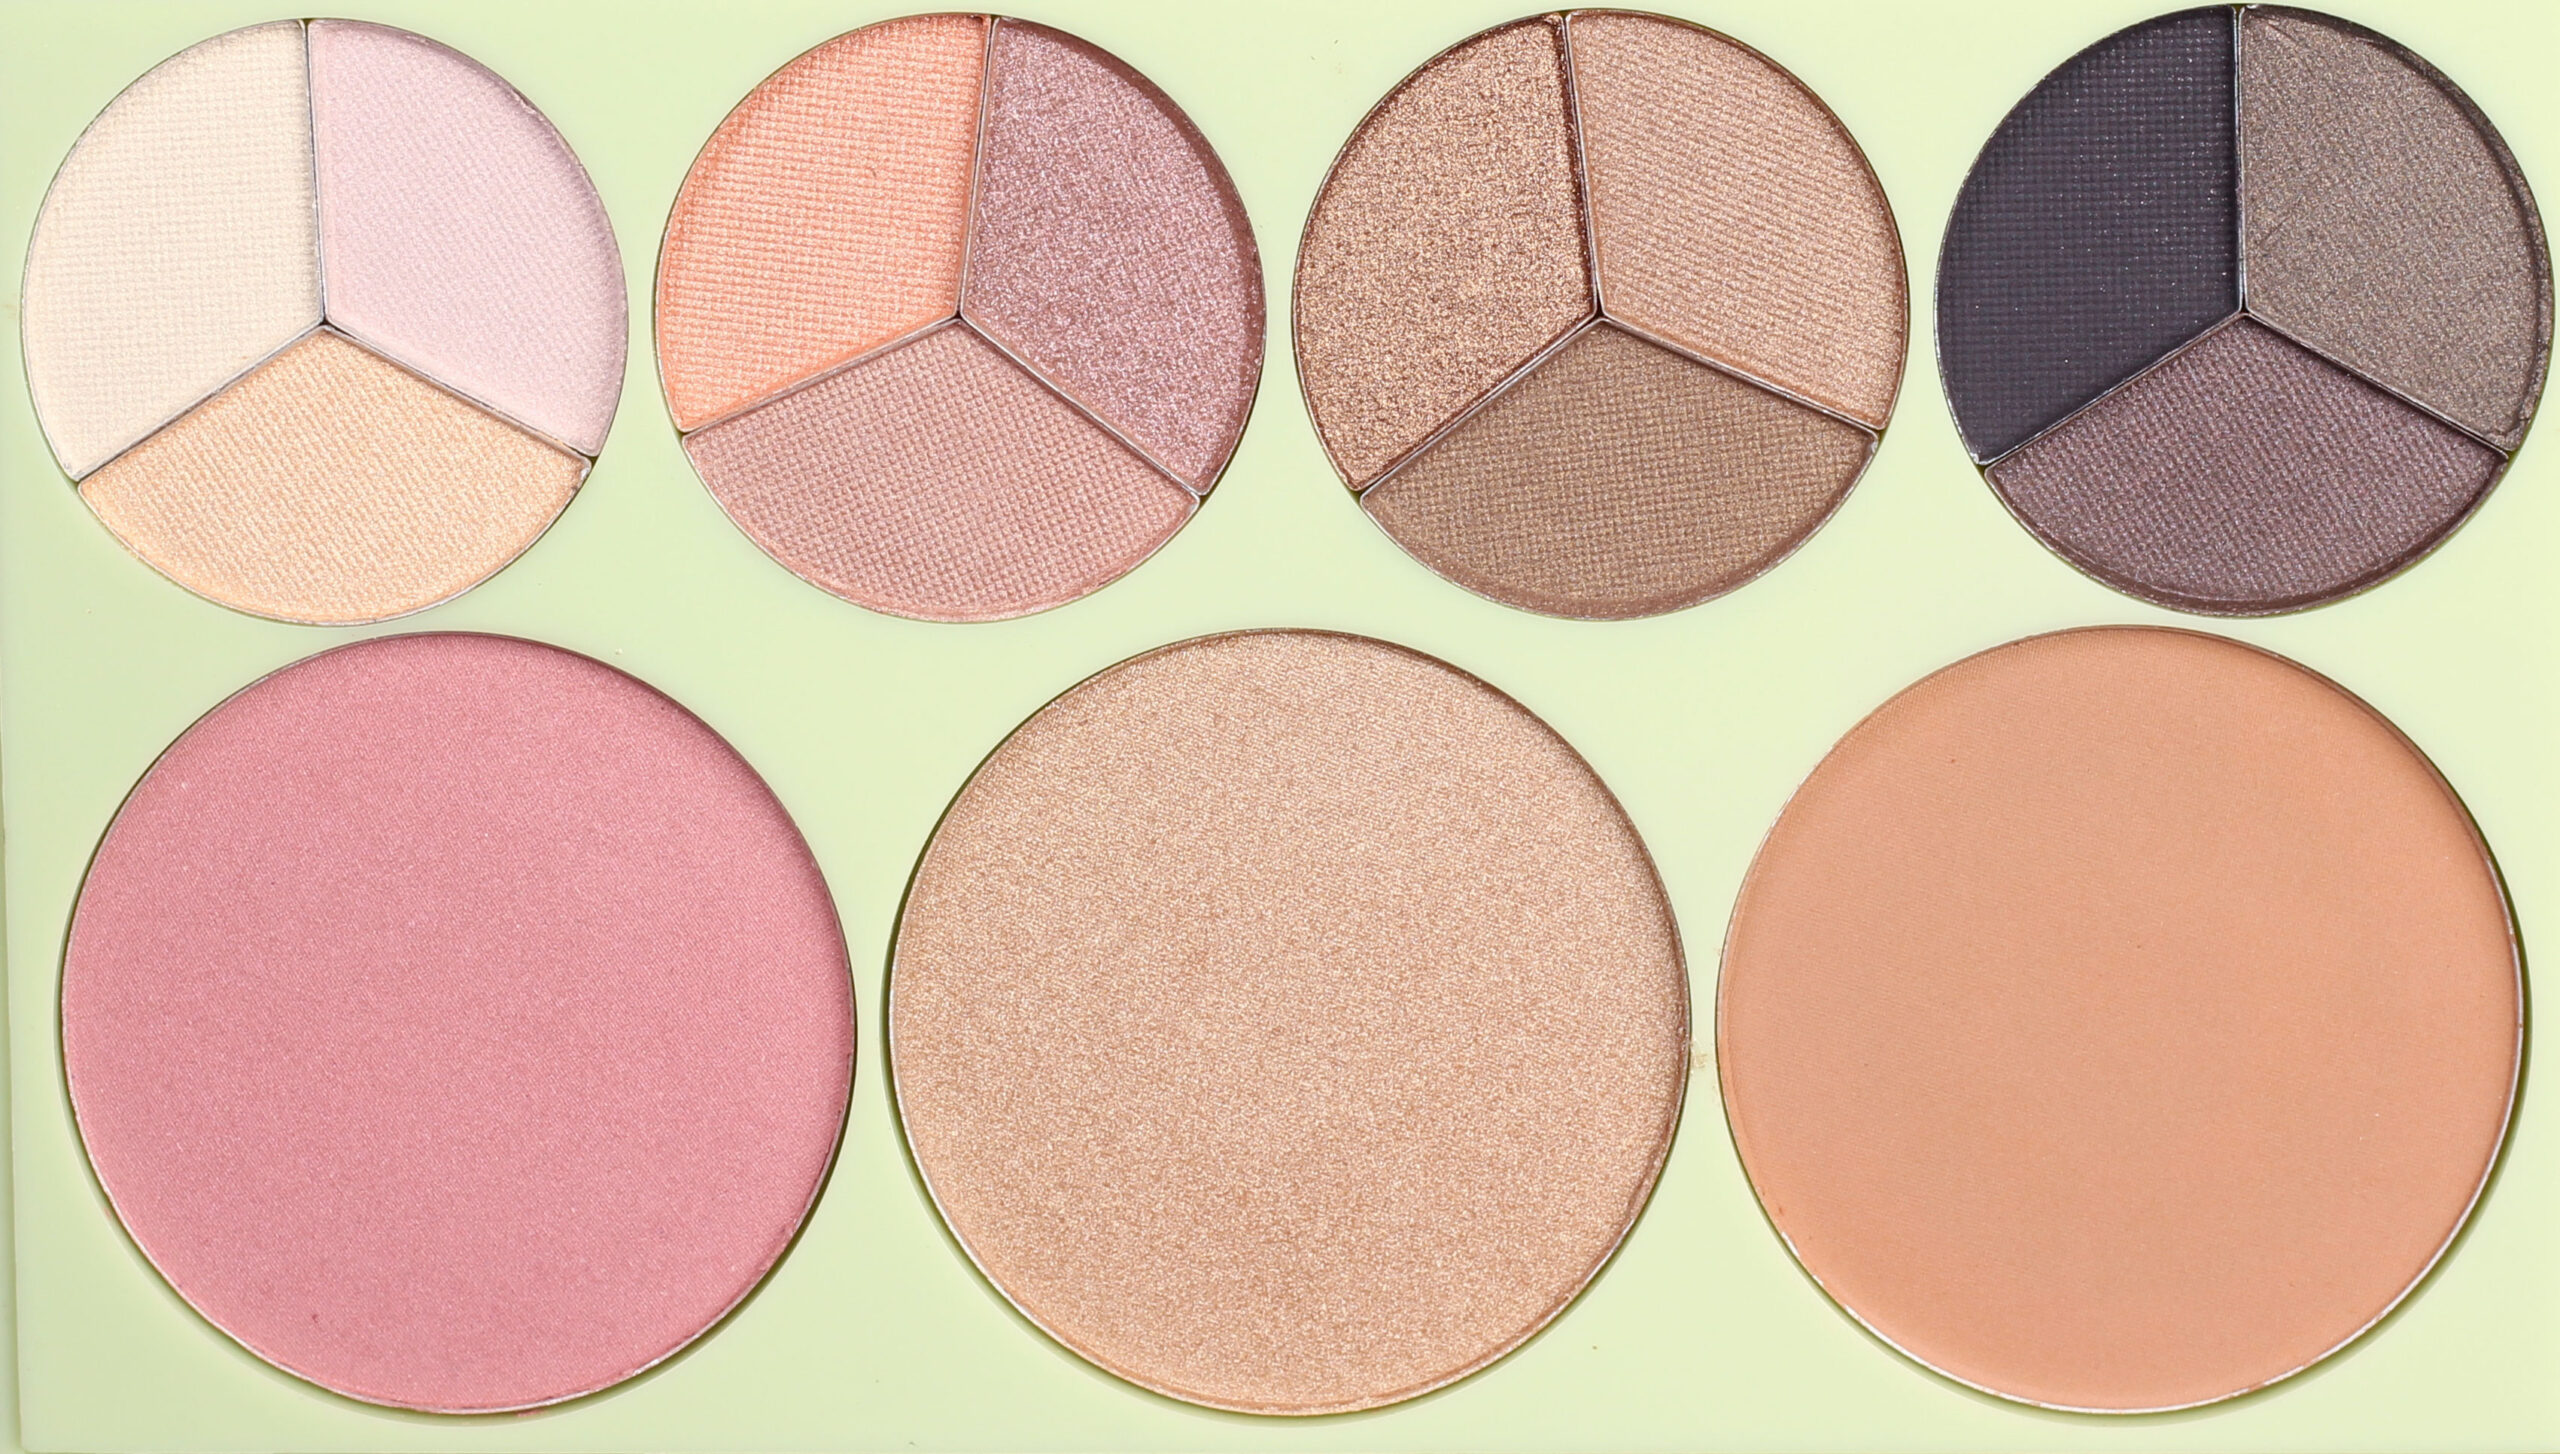
The palette contains four trio palettes with eye shadows from light to dark, ie a total of 12 eye shadows, and all shades are incredibly useful and super duper fine. In addition, the palette contains three shadows for the face - a blush, a gold shimmering highlighter (which works for the eyes as well) and a bronzer.

Now I thought I would show you a little swatch on all the shades, so that you can more easily see what the colors look like on the skin :)

pixi-multi-palette

Shades that suit all people at all times! You can do everything from bright and discreet everyday make-up to sooty party make-up.

IMG_4415_111

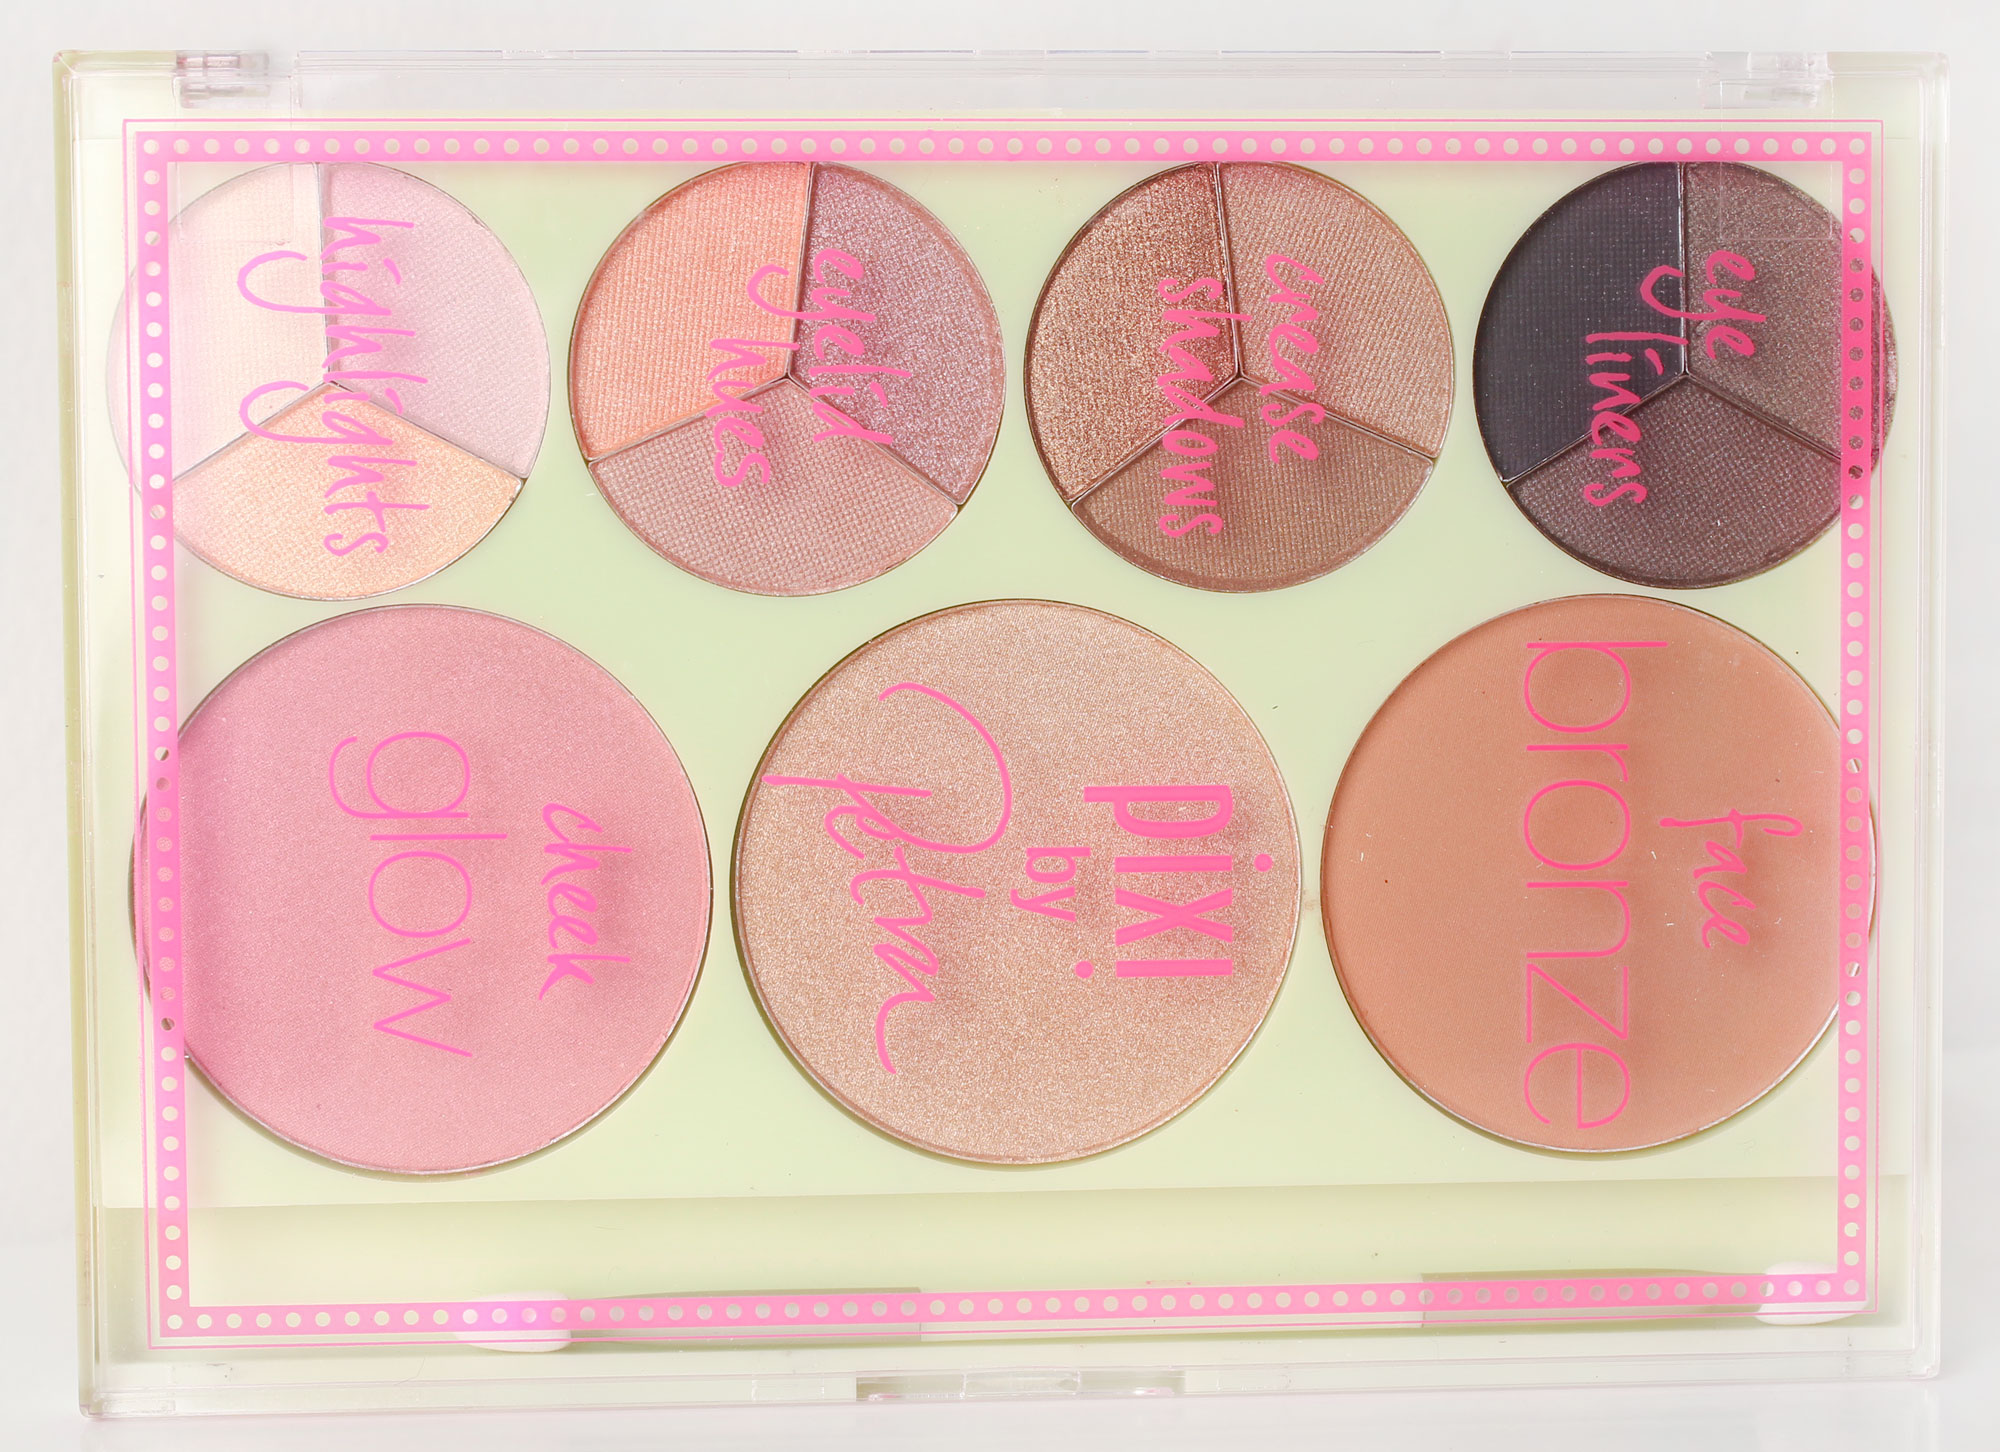
The lid shows examples of how to use the eye shadows:
The brightest trio shade are great highlighters that light up and give a nice glow, partly on the eyes but also on smaller areas of the face.
The medium light trio shadow are shadows that are great to have on the eyelid, either alone to give a nice color or together with other shades.
The darker trio shade has slightly darker shades that are perfect for the globe line to darken the make-up and make the eyes bigger.
The darkest trio shadow has dark tones that are perfect along the lash line to frame the look.

But this is of course just a tip, you can mix the shades anyway or just have one shade on the whole eyelid :)

pixi-palette-bronzette-swatch-

Here you see all the shades on the skin!

My favorites are a bit untipped the highlighter shadows, you should see them in real life, wow! The lightest only looks white-beige in the packaging, but it has such a nice glow that goes a bit in the golden direction on the skin. And the light shade that goes a little to pink purple, yummy!

The large shadows for the face are of course not so pigment-rich and strong when you apply with a fluffy brush, have painted so sharply just so you can see the shades :)

IMG_4426_111

The palette itself is so heavenly nice I think, love green and pink ♥ Surely it is absolutely wonderful?

It is available for purchase Byher.se for SEK 369, which is only SEK 24.60 per shade!

Hugs are :)

Shooting with Glossybox

4

Hi on are fine nine!

Now I'm sitting on the bus on the way to a photographer in Uppsala, I'm going to put on make-up for a photo shoot for Glossy MAG, you know the magazine that comes with the Glossy Box boxes :)

It's going to be so much fun! It was a long time since I put on make-up for a photo shoot now and I have started to get a little abstinence, it is completely different to put on make-up for photos if you compare with private individuals, weddings and the like. I do not really have time today when we open the store next week and I have had a total of seven make-ups already the last three days, but I could not say no to this, it itches in the fingers!

On Thursday and Friday we will do a lot of work at the salon, we will run my entire warehouse, photo studio and my private make-up (will blog and put on make-up at the salon now) and it will be so much fun to pick everything up and put it in order: )

But tomorrow I have a full day at home and will put on make-up and fix a lot of blog material for you, so today when I'm in Uppsala it will be a bit empty here in the blog but I have not forgotten you ♥

As a small compensation, I now offer a make-up from this spring that feels like good inspiration now for the autumn and winter :) Hope you like it!

Anonymous-11111

makeup-tutorial_1111

1. Green eyeliner along the waterline, Paese Linea Automatic Eyeliner (Olive Glam)
2. Green eye shadow along the lower lash line, Paese Kashmir Eyeshadow (668) - Applied with Nanshy pencil Brush.
3. Turquoise green eye shadow at the bottom of the lower lash line, Paese Neo Eyeshadow (687) - Applied with Nanshy Angled Detailer Brush.
4. Green glitter at the bottom of the lower lash line, Make Up Store Glitter (Peacock) attached with Make Up Store Mixing Liquid.
5. White, gray and black eye shadow next to each other on the eyelid, Paese Kashmir Eyeshadow (601) & Paese Kashmir Trio Eyeshadow (685) - Applied with Nanshy Tapered Crease Brush.
6. Fade the edges with Nanshy Crease Brush.

7. "Lace up" the make-up and more turquoise eye shadow in the corner of the eye as a small tip, and green eyeliner which gives a straight edge to the green shadow in the outer corner of the eye, Pure Minerals Double Ego Eyeliner (Queensland)
…And black eyeliner with wing, Paese Penliner.
…And white eye shadow as two dashes between the black and green eyeliner in the outer corner of the eye.

8. Black mascara on the upper lashes, Oriflame Wonderlash Mascara.*
Green mascara on the lower lashes, Zuii Organic (Emerald)

IMG_3850_111

LipstickPaese Lipstick with Argan Oil (25)
FoundationZuii Organic Powder Foundation (Cream)
Bronzer, Paese Bronzing Powder (1M)
Nail polishPaese Nail Polish (102)

IMG_3859

IMG_3873_111

Hugs are!

Microneedling - At home with Swiss Body Roller

I have tested microneedling at home, have you heard of it? Even if it does not ring a bell immediately, I still think that many of you have seen the famous roller Swiss Skin Roller which has been very much described recently, and has among other things won "Innovation of the Year" at the Swedish Beauty & Cosmetics Awards 2015.

In addition to reading thousands of blogs, I have also heard my sister talk a lot about the results after rolling her face regularly. So I became extremely curious when I got home a press sample of Swiss Body Roller that is to be used on the body!

The other day I tried to roll myself for the first time and now I thought I would offer a post with both info, and my first impression of the product :)

Microneedling - At home with Swiss Body Roller

What is microneedling?

The roller has small, small needles on it, and when you roll it against the skin, you "trick" the skin into healing itself, as you stimulate the growth of new connective tissue and skin cells, which in turn smoothes out irregularities and gives you a healthier complexion. This is a treatment that you can either do at a salon, or with this home treatment from Swiss!

I have the Body Roller which is larger than the one for the face + has longer needles, and it is mainly developed to treat cellulite.

Cellulite, stretch marks and enlarged pores are conditions that occur on the skin due to a lack of collagen and / or elastin in the skin, and what the role does is to primarily accelerate skin rejuvenation and form collagen, and thanks to the small holes in the skin, the cream you apply afterwards is absorbed more easily and becomes much more effective.

Therefore, cellulite creams are also included in the kit with the Body Roller, which you must apply after use. Thanks to the roller, the gel is absorbed 400 times more (!) And you should preferably roll in the evening so that the gel works during the night when you sleep.

My first impression of the Swiss Body Roller

My feeling after the first use was very positive! The needles do not hurt at all, I just have a little hard to roll the thighs because I think it tickles a little hard haha, but you probably get used to it very quickly I think. But very nice to use actually, and afterwards it did not feel at all, no irritation in the skin or the like.

I do not have much cellulite to show before and after pictures of, but when I have landed after all the stress with the new store, I will start using this more regularly and see what I notice for difference. Because in addition to cellulite, it should give very smooth, soft and tightened skin. Also, I have some scars that would be fun to see if you see a difference :)

But as I said - If you are afraid that it will hurt, I can say that there is no danger! And the creams afterwards sink really well into the skin and have a very mild scent. Really great to use in other words, which is important as you have to do it regularly for a few weeks.

Microneedling At home with Swiss Body Roller

Here you see the whole kit that I got home! One roller, two creams and a Sanitizing Spray that disinfects the roller after use.

How to do microneedling at home?

1. Clean the area to be treated.
Roll with the roller over the area (preferably in the evening) and roll in different directions for best effect. Roll 3-4 times in the same direction before changing direction.
3. Lubricate the skin with Swiss Eraser GEL.
4. Spray Swiss Sanitizing Spray on the roller to clean it.
5. Let the cream work overnight, and the next morning lubricate the area with Swiss Eraser CREAM that works for the rest of the day. Then you do not have to roll.

If the skin becomes irritated by the roller, you can take a break from the roller for a few days, but you can still use the creams :) It is individual how fast you see results, but the most common is when you have rolled for 6-8 weeks.

Microneedling At home with Swiss Body Roller

Swiss Clinic is available for purchase Nordicfeel.se.

Have any of you tested microneedling for the skin? :) ♥

The world's smartest pillows!

Pixi then, what a brand! They have such clever products that I get completely speechless sometimes :)

If you have oily skin, powder in loose form is the very best to improve with during the day, but it is a bit messy on the go and this is what it usually looks like when I sit on the bus:

1. I dig in the bag for several minutes to find powder, brush and mirror in the chaos.
2. The mirror and brush are allowed to lie in my lap while I open the powder jar, gently, gently.
3. It dusts and I spill a little, and brush it off quickly, hoping no one watches.
4. I hold the jar tightly with one hand, and try to gently dip the brush in the powder without getting up too much, but it always becomes too much.
5. I close the lid on the powder, and instead pick up the mirror that I look at when I sweep the powder over my face, at the same time as a cloud of dust forms around my head because I have too much powder in the brush.
6. I pray to god that the result was even and nice, and then quickly down with everything in the bag again before I attract more attention.

And hopefully you can end everything like that, without any major disasters happening on the road - which is not too unusual, sudden decelerations for example;)

But Pixi has a powder that solves all these problems!

IMG_4311_111

My new routine:
I just need to look in the bag for a single product.
2. I open the lid of the jar.
3. I dab on the skin with the built-in powder puff that gives a fair amount of powder without the risk of spillage or dust clouds, while I look in the mirror on the top of the lid.

So easy!

The jar of loose powder has, as I said, a puff that is stuck, with a hole in the middle on the underside that releases a fair amount of powder when you dab it against the skin. So.himla.fiffigt :)

It is transparent and extremely light, and you can improve on it as many times as you like without the result being uneven or cakey.

The powder consists mostly of minerals and cornmeal, but also contains:
Aloe vera & cucumber extract that have soothing effects
Powder from real pearls that protect the skin
Grape extract that acts as an antioxidant

IMG_4660_111Just pick up, open, hold the lid (mirror) in front of you and matte your face. In this picture you see me last night after the birthday celebration, from super oily to a completely smooth and matte complexion with only this product.

Pixi Quick Fix Powder is available for purchase at Byher.se :)

Now I'm going to go to Uppsala, have four make-up bookings like this on the morning twig so it's full roll. Hope you get a great start to the new week!

Hugs are ♥

Wedding make-up

Yesterday I put on make-up for a wedding that seemed so fun, I almost wished I had been tied up with the bride on the test make-up to get my own invitation haha.

The bride comes from Bosnia and the groom from Turkey, and they have about the same food culture (I got to learn) so in the middle of it all I was invited to Turkish food and baklava before I continued makeup :) And there were several hundred guests who traveled to Sweden for the wedding - which was in a big castle and they had fixed both the smoke machine and the confetti cannon for the first dance, so much fun!

I made up the bride and her two sisters for the big day, and did everything except one of the sisters' eyebrows, which she really wanted to make up herself.

I received an email from a makeup artist before who wonders how I do if a customer wants to make up a detail myself, but I have absolutely no problem with that. Is it a model on a shoot or similar, it is different, because then it is more my responsibility, but private individuals who put on make-up before an event there, the most important thing is that they are satisfied :)

Here are pictures of all the make-up!

bridal makeup-uppsala

Super nice bride who had a bridal make-up in pink tones, which was the color theme of the wedding. Here she had not fixed her hair yet, she must have become so nice with set, veil and dress then!

ternminkning-uppsala

Here is the tern makeup on one sister who wanted a matte brown sweep and intense eyes. We put a brown eyeliner along the waterline instead of black, so that it would not feel like a "party" in comparison with the bride and the other bridesmaid. Fint va? :)

tern makeupAnd here is the other sister, where I have made up everything except the eyebrows. She wanted a lighter make-up and a little more neutral, so we drove on light tones and more discreet false eyelashes that actually only sit on the outer edge of the eyes, and not all the way to the corner of the eye, turned out really nice on her :)

Surely they all turned out super nice? ♥

I photographed the bridal make-up from last weekend as well, but noticed afterwards that the pictures were so blurred so they are not so fun to show: /

Now I'm going to jump in the shower and then go off and celebrate my sister and her boyfriend who has turned one year old and offer sandwich cake, you don 't say no to that!

Hugs are ♥

en_USEnglish