Dyeing on green hair

I am very happy now because I have done a successful bleaching of green hair, very nice!

As I mentioned in the blog post my natural hair color so I have discolored the turquoise remnants of the L'Oréal Colorista Washout paints that I wrote about in this post.

Now I was going to show you the result and give my review on L'Oréal Colorista Hair Color Remover (update: this product seems to have been discontinued) which is a decolorization specifically made to remove the last of the Colorista colors.
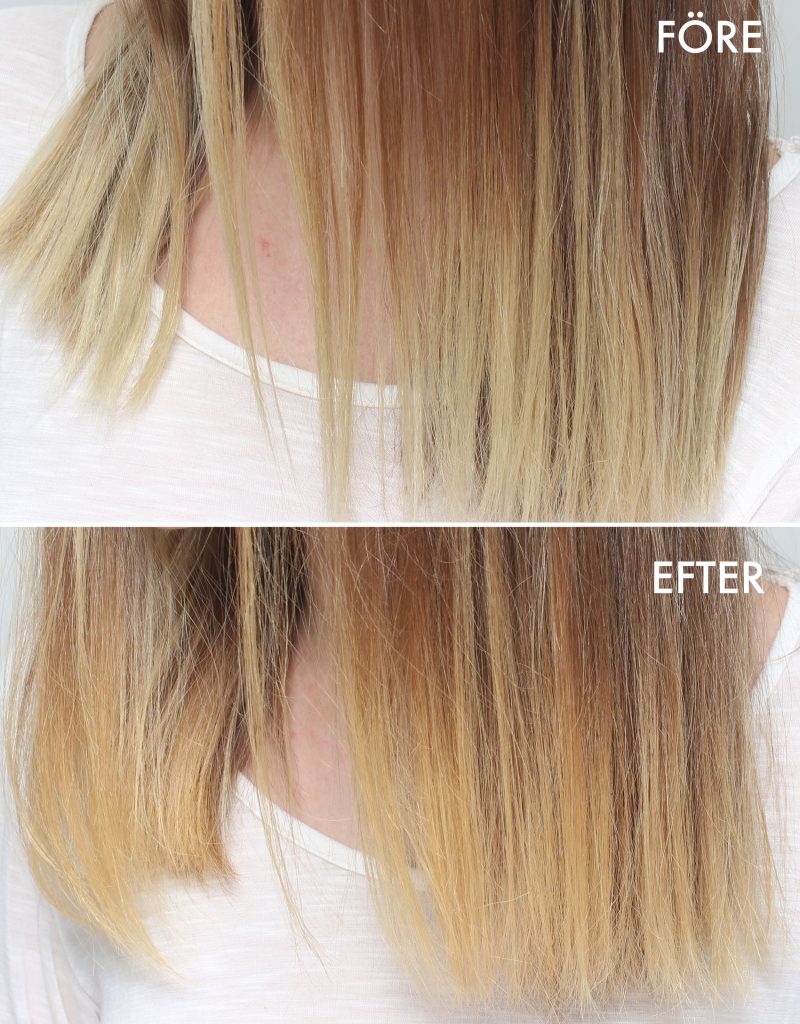
Here is the result:

Finally no green residue left in the hair !! I must add that the green shifts were even more visible in reality, but you can still see the difference.

Then it's not the prettiest blonde tone now afterwards either haha. It's not so strange because it's been a year since I bleached my hair, I have not freshened it at all since then. But that's another thing :) The product works in any case!

Background

You who follow me have full control of my hair history, but for you as possible. google this discoloration and I can quickly tell you that I dyed with L'Oréal Colorista Washout in the turquoise shade 5 months ago.

The paint should last for only 2 weeks but for me it was rock hard. I have struggled, haha! Ascorbic acid, dandruff shampoo (which I read should dissolve hair colors more than usual) and then L'Oréal Colorista Fader Shampoo (update: this product has also been discontinued) which gradually helps to get rid of the Colorista colors.

Smart by L'Oréal anyway, first you buy one product and then you buy two more products just to get rid of the first product haha!

Before you begin

As much as possible of the Colorista paint should have been washed off before doing this decolorization. The bleaching should only be done on hair that is basically bleached, I guess it is because the bleaching can have a bleaching effect. The decolorization should not be used just before or after a bleaching or hair permanent, and you should not do it twice in a row either.

How to use:

The package includes two small bags of powder and a bottle of cream. These are mixed together, I did it in a plastic bowl. It mixes like bleach, it looks like bleach and it smells like bleach.

On with plastic gloves and in with everything in the hair that is to be bleached! If only parts of the hair are to be bleached, apply only to those parts, not the whole hair.

Part of my under hair is the 100% natural hair color (because it has grown so long + that I cut the tops a few times since I bleached it) so I made a quick rope braid out of it and let it hang in the neck.

The decolorization wears on the hair and it is completely unnecessary to wear on the completely untreated hair unnecessarily!

I had in super-much in the lengths though! I used almost everything. If you want to have it in the whole hair, you probably need two packages if you do not have very thin or short hair.

Let work for 30 minutes. Rinse out.

It was very carefully stated on the packaging that it should not be done in connection with other strong treatments such as bleaching and permanent and because it smelled so strong that my nose almost burned up on the inside, I can state that it is not a mild thing. So I shampooed properly and then I had a constructive hair wrap that I walked around with for 4-5 hours all afternoon.

Results and feeling on the hair afterwards:

All green tones disappeared and the quality of the hair feels as good as before! I do not know how much the hair had taken a beating without me being so careful with hair wrapping both before and after, however, but my advice is to always take the safe before the unsafe.

I want to add that I have not bleached my hair any other time before so I have absolutely zero experience and no other brand to compare with.

Now the warm, yellow tones came out as well, which I am not so fond of haha!

In the post Milk_Shake Direct Color Review can you read about a product that could look good on this dark yellow blonde tone as well :)

Also read:

Now I have mostly talked about getting the green one out of my hair, but I enjoyed the turquoise in the beginning and was impressed with the result! I have also tested the bright yellow shade and the pastel pink on my siblings, with the milder shades, it was washed out in the shower as it should.

If you want to color with these, they are available for purchase at e.g. Lyko.se (Adlink)

Shout out if you have any questions :)

Hug!

Make-up before & after

Here are before and after pictures of one of my make-up customers this Saturday! She wanted a natural make-up but with a lot of eyeliner and a very natural base.

She also has glasses so I lit up a little extra around the eyes for a greater contrast to the eyeliner, because otherwise it would not have "popped" a little behind her dark spectacle frames.

I talked to her on the phone the following week (because she was going to make an appointment for lashes and eyebrows) and she said that the make-up had been so good all evening! :)

BASE:
Face primer - Pixi Flawless & poreless primer
Foundation - Pixi H2O Skintint (2 Nude)
Contouring & matt highlighter - Contouring Palette (No. 2)
Rouge - glo Skin Beauty Blush (Papaya)
Fixing mist - Pixi makeup fixing mist

EYEBROW:
Brynpenna - glo Skin Beauty Miro brow liner (Ash & Dark Brown)

EYES:
Eyeshadow Primer - Pixi eye bright primer
Eyeshadows - Same as the contouring palette
Light eyeliner along the waterline - gloMinerals Eye Pencil (Peach)
Eyeliner - Kryolan HD Cream Liner (Ebony)
Mascara - Magnetic lash mascara

LIPS:
Lipstick - glo Skin Beauty Suede Matte Crayon (Demure)

Hope you all have a great day today!

If you also want to book makeup with us at Creative Makeup in Uppsala, you can easily do it online here, or call us (between 10-18) on 018 10 50 13.

Hug ♥

Swatch - glo Skin Beauty Micro Browliner (Eyebrow Pencil)

My absolute favorite eyebrow pencil right now is glo Skin Beauty Micro Browliner which we sell in my webshop Creativemakeup.se!

This brow pencil quickly became a bestseller in the salon and many regular customers buy it again and again.

Here are swatch pictures of all the shades :)

What is glo Skin Beauty Micro Browliner?

simple eyebrow pencil

When I was first introduced to this type of pen, I was a little skeptical "it must be super sharp with such a narrow pen" I thought. But oh how wrong I was! The texture of these pencils is a bit waxy and glides on the skin in a completely different way than a regular brow pencil.

So it's the other way around - very easy to get natural brows with this one! If you are light on the hand, it becomes a very soft and discreet color, if you work a little more, you can get a sharp and defined brow shape as well.

I myself usually do quite sharp in the lower edge and outer edge and the rest of the eyebrows quite soft.

Narrow eyebrow pencil best

At one end, the pen has a narrow point that is unscrewed. You get superb precision! And in others, the pen also has a spiral brush that I both use to comb the straws but also you can brush through the eyebrows a bit if you think it has become sharp somewhere.

The durability of glo Skin Beauty Micro Browliner is also superb, as soon as it dries it sits super well! You do not have to be afraid of accidentally accessing the brows and blurring the shape if you say so :)

Swatch images

swatch glo skin beauty micro browliner

Here you see all the shades next to each other!

Blonde: A light shade that has a little warmth in it.
Ash: An equally light shade as Blonde but colder in tone.
Light brown: A light brown cool shade that is a little darker than Blonde and Ash.
Auburn: A light red shade.
Dark brown: A dark brown cool shade
Raven: A dark brown shade that is even darker and colder than Dark Brown.

swatch bryn glo skin beauty

Here you see all shades of glo Skin Beauty Micro Browliner. Sometimes it is easier to choose a shade when you see them on an eyebrow.

If you press harder with the pen, it will be darker than if you are light on the hand. So you can do some ombre effect that way.

I personally very often use two shades, a lighter in the inner edge and a darker in the outer edge, e.g. Ash and Dark brown are a favorite combo! But it's a bit of a premium maybe, I only do it because it's fun :)

Narrow eyebrows

SO good that the pencils are available in 6 shades!

Before, I did a video tutorial with two different ways on how to fill in the brows with just glo Skin Beauty Micro Browliner which you can watch as well :)

Note that glo Skin Beauty was previously called gloMinerals. So if you've heard of these from gloMinerals before, they've exactly the same pens. Only the name has changed.

Buy the eyebrow pencils in here!

Also read:

Hugs are!


Blue & gold - (Makeup with blue & yellow tones!)

When I did this make-up, I did not actually have such high expectations, I would do something quite fast and "soft" and thought "a little gold and a little blue is nice!". Then when I was done, I think that the transition between just the golden and the blue was so extremely nice! It was a nice and simple effect to dab the gold shade a little over the blue. So I was very happy!

Hope you also like the look :)

Face primer - Paese Makeup Base (Matte)
Foundation -
gloMinerals Pressed Base Foundation (Golden Medium)
Concealer -
Pixi Pat Away Concealing Base (1 Cream)
Contouring - Contouring Palette (2)
Glowy highlighter - Pixi Glow-Y-Powder (London Luster)
Powder - Paese Bamboo Silk Powder
Rouge - Blush (35)
Fixing Mist - Pixi Makeup Fixing Mist

Brynpenna - glo Skin Beauty Micro Brow Liner (Dark brown)

Pink lip liner on the entire lips - Benecos Natural Lip Liner (pink)
Bright lipstick over - Paese Liquid Lipstick (700)
I have a little lip balm before the make-up, which is why the lips look a little glossy even though the products are matte.

What do you think? :)

All eye shadows except the blue and the black come from the palette glo Skin Beauty Shadow Palette (Mixed Metals)

  1. Eyeshadow primer, Pixi eye bright primer
    Gold shadow on the inside of the eyelid
    Light gold / beige eye shadow in the corner of the eye
  2. Blue eye shadow on the rest of the eyelid, Paese Neo Eyeshadow (660)
    Dab the gold shade a little over the blue as well
  3. Brown eyeshadow at the end of the eyelid and along the globe line
  4. Black eye shadow at the end of the eyelid, Paese cashmere eyeshadow (602)
  5. Brown eyeliner at the end of the waterline and the lower and upper lash line, Paese Linea Automatic Liner (Brown glam)
    Light eye shadow with shimmer in the corner of the eye and under the brow
  6. Mascara on all lashes, Magnetic lash mascara

Hugs are!


3 tips with the Peach pen from glo!

This makeup tip only applies to you with light / medium skin tone.

The eyeliner pens from glo Skin Beauty (which I sell in webshop) has, among other things, the shade Peach which is a creamy white shade that I use almost all the time!

Now I thought I would show you three make-up tips with this pen that are super easy to make and that give great effect and the "little extra" for a more well-made make-up.

glo Skin Beauy Precision Eye Pencil contains mineral pigments and is very supple on the skin, it is not too creamy nor too dry. It also has a small blur on the other end if you want to fade out sharp lines.

1. Light pencil around the lip contours
I love to highlight the lip contour not only with the lip makeup but with the base all around! Just applying your foundation with a flat brush so that it is sharp around the lips makes a big difference, but for extra effect I use a light pencil which I then fade out.

This makes the lip shape more pronounced and the contours look sharper. The fact that the pen is a little lighter than the skin tone also makes the lips look a little more fluffy.

First I paint sharply around the lips, as you see above, and then I tone out as you see below:

Either I tone with a brush or I gently erase with the pen. Both ways work.

I do not have lip makeup in these pictures, but they are tattooed, so they are already quite sharp. This tip makes a huge difference on people more diffuse lip lines.

2. Under the eyebrows
The same thing can be done to get the brow shape sharper and well-shaped without having to paint harder / sharper with the brow makeup. Then I paint sharply with the pen on the underside of the brow (can be done on the top also if you want a sharper edge there) and then I fade out downwards.

This is how it will be then:

Here too I want to add that the difference can be huge if you have a more diffuse shape from the beginning, my eyebrows are already quite defined :)

3. Light up along the waterline
What this pen is used for the most is to light up along the waterline. The whole eye gets a clearer and more "clean" look, especially if you are a little red-pink in the eyes. In addition, it opens up the eye.

Either you can just lay right on the waterline like this:

But you can also put the pen down a little on the lower lash line as well, like this:

This gives an even more open view, and you can e.g. apply a little light brown shadow just below the light (I usually use my contouring shadow) and then do not put the mascara only into the lash root on the lower lashes but start a little further out on the straws - then you get a very enlarging effect on the eyes!

Really happy with this one! Perfect formula to work for lots of uses. Sometimes I use it on pimples too.

And you can see in the picture how well used it is, a little stump left only haha, but I have had it for as long as I can, it lasts a very long time!

Hope you liked the post and that the tips were helpful :)

Hug!

en_USEnglish