Fet hy: Bästa Produkter – Oljig & flottig hy i ansikte (2024)

It is easy to find matte products, but difficult to find good products for extremely oily skin. Why? The problem is not to get a matte base, but to get a durable base that stays oil-free for a long time. Read on if you want to get control of oily and frizzy complexion with makeup!

Förstår ni skillnaden på matt bas och hållbar bas? :) En matt finish betyder inte nödvändigtvis att produkten absorberar olja under dagen. I detta inlägg kommer jag visa skillnaden med Minolei som är bassmink nischat på oljig och blandad hy. Minolei’s bassmink sitter kvar länge på huden eftersom det absorberar och kapslar in oljan under dagen :)

smink och produkter för extremt fet hy, minolei recension

Table of Contents:

  1. Introduction oily skin
  2. Primer for oily skin
  3. Foundation for oily skin
  4. Powder for oily skin
  5. Smink för oljig hy 

Matte and oil-free are not the same thing

Det viktiga är inte att få till en matt bas, glow är ju bara fint! Utan målet är helt enkelt att slippa överflödig olja och att man vill att sminket ska sitta kvar på huden utan att smälta bort eller glida av under dagen.

There is a lot, really a lot, to think about when it comes to oily skin and makeup. I am a self-proclaimed professional at this, haha, as I am a makeup artist with very oily skin myself.

Today's post is about the very fact that matte makeup and makeup like keeps the skin oil-free is not necessarily the same thing.

Olika matta produkter – efter 11 timmar:

Good products for oily skin, oily skin

Båda sidorna var alltså helt matta när jag var nysminkad. Jag är inte helt snusmatt på Minolei-sidan heller, men väldigt stor skillnad!

Och har man jätteoljig hy och vill pudra sig under dagen för att vara 100% matt så kommer det räcka med någon enstaka gång, för pudret är så otroligt absorberande. Innan Minolei så var jag van att pudra mig en gång i timmen – the är skönt att slippa! :)

Det coola med Minolei-sidan är att man verkligen känner att sminket fortfarande är intakt. Jag kan liksom röra sminket utan att det glider runt. Oljan ligger på insidan av sminket och inte som ett oljigt lager på hudytan.

minolei recension, minolei uniset, smink oljig hy, smink fet hy, foundation, puder, primer

Man ser bättre från sidan! Tyvärr råkade alla bilder på Minolei-sidan fotas ur fokus.. Men ni ser skillnaden tydligt ändå :)

On the left side of the picture:

  • Products for oily / oily skin with the descriptive words "super long-lasting" "oil free" "matte" and "mattifying"

Resultatet blir också jättefint! Blurrade porer, jättefin täckning och en matt finish. Problemet är att huden inte håller sig så längre än typ en timme och att oljan löser upp sminket. Om jag hade kommit åt med handen på den superglansiga sidan, så hade det glidit av direkt!

On the right side of the picture:

Här kommer mer info om produkterna från Minolei och steg för steg:

Back to top ⤴

Primer for oily skin

primer för oljig hy, minolei uniset oil-absorbing primer recension review, minolei primer

Denna primer Minolei Uniset® Oil-Absorbing Primer (Mattifying) absorberar oljan och kapslar in den, samtidigt som den är återfuktande för huden. Så bra!

Why use face primer? Oljan löser upp sminket inifrån och primern absorberar oljan direkt när den kommer ut ur huden, vilket därför gör att sminket håller längre. För personer med mycket oljig hy så räcker det sällan med enbart en produkt (t.ex. bara puder) som håller oljan i schack, utan hela bassminket har betydelse.

primer för fet hy, stora porer, blurrande, slätar ut, utslätande, minolei uniset oil-absorbing primer recension review, minolei primer

Minolei Uniset® Oil-Absorbing Primer har en viss blurrande effekt på huden direkt efter applicering, som ni ser på bilden ovan. Men längre ner visar jag närbild på huden med även foundation och puder – och hela trion tillsammans har verkligen en utslätande och blurrande effekt på porer!

Use: Jag smörjer in med rena fingrar. Ta inte för mycket men snåla verkligen inte, det är viktigt att inte ta för lite primer på de mest glansiga partierna (t.ex. i T-zonen).

Back to top ⤴

Foundation for oily skin

foundation oljig hy, glansig hud, minolei foundation, minolei uniset lightweight foundation recension, review, swatch

Många foundations anpassade för oljig hy är heltäckande, helt matta och ger en ganska onaturlig finish. I en foundation för flottig/oljig hy så önskar jag:

  1. Fint pigment och finish. Det viktigaste är att den lägger sig fint och det gäller även torra partier. Man vill ju ha en fin bas :)
  2. Den får inte vara för tung, för vad händer då? Jo, jag har insett att många primers slutar vara effektiva bara av den anledningen att man lägger på en foundation över som inte passar. Då har du lagt primern helt i onödan.. Med rätt foundation så gör primern större skillnad!

With these two aspects in mind, I have learned that the best thing for the result, both in terms of appearance (finish) and durability (oiliness) is to have a foundation that is not necessarily for oily skin. However, it is important that it is light in formula and does not make the skin more oily than it needs.

Förstår ni skillnaden? Foundationen behöver inte vara nedmattande, men den ska inte göra huden mer oljig heller utan sitta kvar länge utan att lösas upp av oljan.

foundation för glansig hud, minolei foundation, minolei uniset lightweight foundation recension, review, swatch

I use Minolei Uniset® Lightweight Foundation som sitter kvar länge på huden och är ett lätt och återfuktande lager mellan min väldigt absorberande primer och puder.

Täckningsgraden är medium och byggbar. Man kan enkelt applicera ett tunnare lager så ger den mindre täckning, eller lite tjockare lager för mer täckning. Jag brukar lägga två lager under ögonen.

foundation oljig hy, glansig hud, minolei foundation, minolei uniset lightweight foundation recension, review, swatch

Use: Jag applicerar med en ganska kompakt borste, men det fungerar också med fingrarna eller makeupsvamp. Det är en smaksak :)

Back to top ⤴

Powder for oily skin

puder glansig hy, minolei recension, minolei uniset oil-absorbing puder, löspuder, setting puder

Jag avslutar sminkningen med Minolei Uniset® Oil-Absorbing Powder. Enligt mig är det bästa att ha ett löspuder till flottig/fet hy, eftersom löspuder i regel kan innehålla större mängd absorberande ingredienser eftersom inga bindemedel eller liknande behövs för att det inte ska gå sönder.

Nu gäller det att få på så mycket puder på huden som möjligt på ett så fint sätt som möjligt, utan att det ser pudrigt eller torrt ut :)

Application – Jag använder en kompakt borste och buffrar in i huden och jobba in pudret ordentligt. Då får du på större mängd puder utan att det ser pudrigt ut. Om du hade svept på samma mängd med en fluffig borste så hade pudret legat mer synligt på huden. Tips! :)

minolei recension, före efter, porblurrande smink, stora porer, utslätande, smink för flottig hy i ansiktet

Nejmen titta nu! När man använder Minolei’s Uniset® Trio tillsammans och buffrar in pudret så blir det otroligt utslätande på huden.

Och såhär ser slutresultatet ut, med Minoleis Uniset® primer, foundation och puder! Jag har kompletterat med lite highlighter, rouge, bronzer, ögonbryn och mascara.

The end result does not have to be dull

Bara för att du gör denna matta bas så behöver inte slutresultatet blir matt. Svep på en highlighter med glow och/eller spraya på en bra setting spray/fixing mist, så får huden en fin lyster men sitter kvar bra på huden ändå :)

Back to top ⤴

Smink för oljig & fet hy

minolei recension

Links:

If you do not have the strength to find the product links in the text, they will come here again:

Och om ni vill köpa hela Uniset® Trion från Minolei så finns den i paketpris here also!

Also read these posts:

Hope the post was helpful and that you get control of oily, oily and oily skin! 

12 simple make-up tips for beginners + Make-up (step by step)

There are very simple make-up tips for beginners that make your make-up look well-made and nice - without it being particularly difficult technically. One sentence I repeat I do not know how many times to my clients is “makeup must not be so difficult ”:)

It does not have to be at all complicated to put on make-up yourself, at least not after you have seen this make-up step by step for beginners;) You can make it very difficult for yourself, but it can also be easy!

In today's post, I therefore thought I would share 12 simple makeup tips for beginners that are quick to make and easy, provided you have good products and tools.

Make-up & Make-up tips for beginners

The post is divided into these 12 simple makeup tips for beginners:

  1. Mineral Foundation
  2. Rouge in neutral tone
  3. Simple eyebrow pencil
  4. Do not skip eye primer
  5. The same eye shadow around the whole eye
  6. Brighten up around the eyes
  7. Light eyeliner along the waterline
  8. Lighten up around the lips
  9. Black eye shadow instead of eyeliner
  10. A good mascara that does not smudge or crumble
  11. Colored lip balm
  12. The importance of good products

Mineral Foundation:

Before I go into all the makeup tips, I first want to strike a blow for good makeup brushes! By "good" I mean not only high quality, but also that they are suitable for the area of use.

One of the most common mistakes is that e.g. use an oversized makeup brush for the eyelid or one that is too fluffy when toning out the eye shadow. Which makes everything much harder!

I therefore want to start by recommending the kit Real Techniques Eyeryday Eye Essentials (adlink) with brushes for eye makeup. And Real Techniques Flawless Base Set (adlink) for basic makeup. Then you have good brushes all the steps I show in this post :)

foundation for beginners

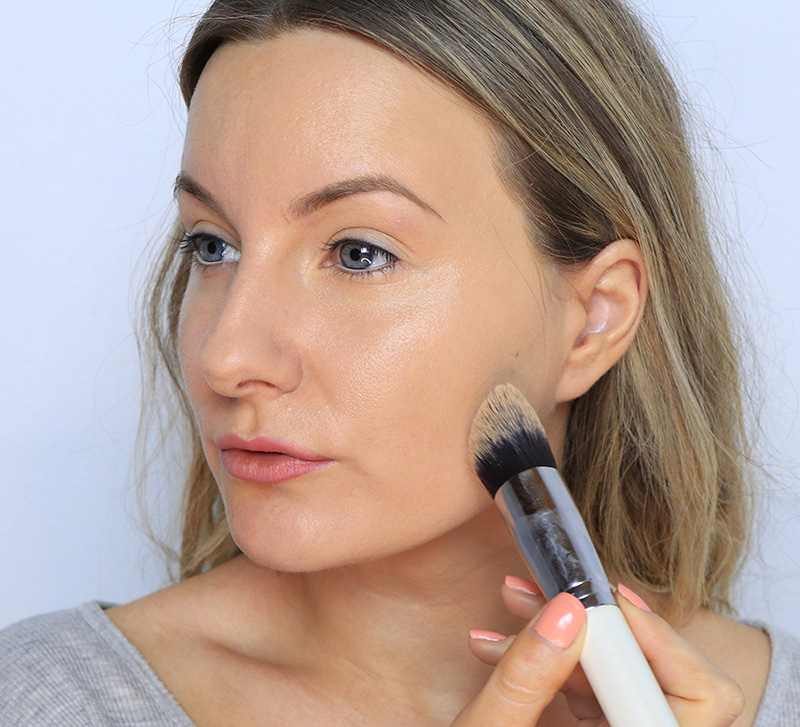
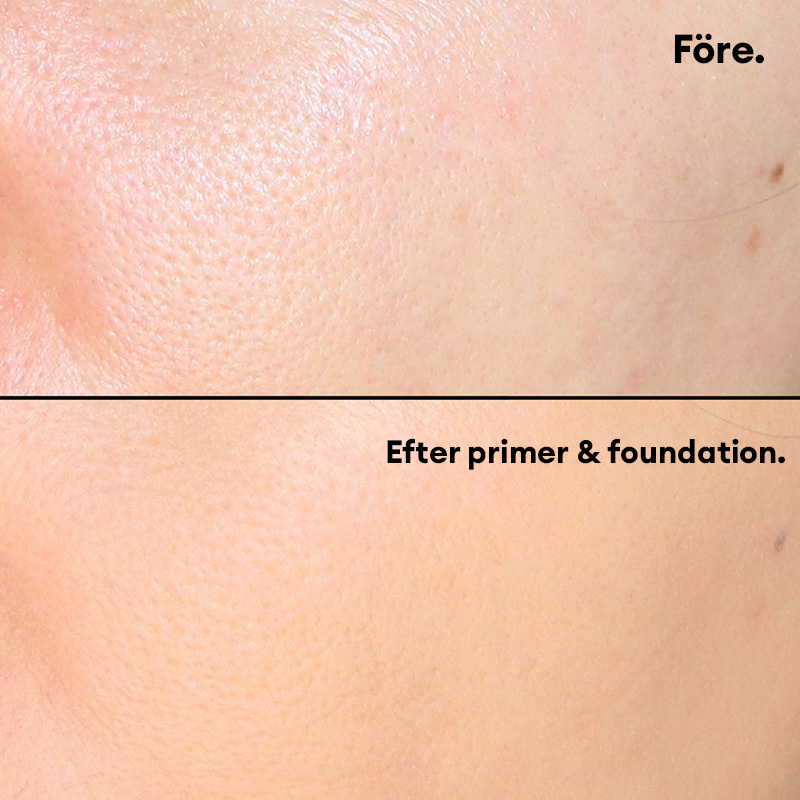
Here you see the result of mineral foundation on one half of the face.

A really good mineral foundation is suitable for all skin types, if you are dry in the skin, it is only extra important that you moisturize the skin properly before. Priming with a face primer before becomes the finishing touch as well.

Why is mineral foundation so good?

  • It is quick to apply
  • You choose the coverage rate yourself. Thin all over the face, full coverage all over the face, or full coverage only in certain areas by dabbing on extra just there.
  • It is possible to skip both concealer and powder because the foundation can be obtained completely, and gives a matte finish that does not need to be fixed with powder = 1 step instead of 3.
  • If it is not very sunny outside, you can also skip sunscreen, as mineral foundation naturally has SPF in it (unless you apply too thin).

Here's how I do it:

mineral foundation application

Dab / buff the mineral foundation on the skin with a soft but fairly compact brush. If it is too fluffy, you will not get as much pigment. I apply thinly all over my face, then I dab a little extra around my nose where I am a little red-flamed.

The mineral foundation is glo Skin Beauty Pressed Base Foundation (adlink) and I have the shade Golden Medium. It is a pressed powder which makes the whole thing even smoother compared to mineral foundation in loose powder form.

mineral foundation concealer

2. I dab with a small brush (does not matter which) on pimples. Then I avoid concealer.

Bonus tips! If you have a blemish or similar that is difficult to cover, dab on a little brown eye shadow or eyebrow pencil and make it a birthmark / beauty spot instead. A little discreet enough, not necessarily mouche á la Marilyn Monroe. It goes faster and also makes the base look more "unmade" :)

Read my post Make-up freckles step by step where I use the same principle / technology.

Back to top ⤴

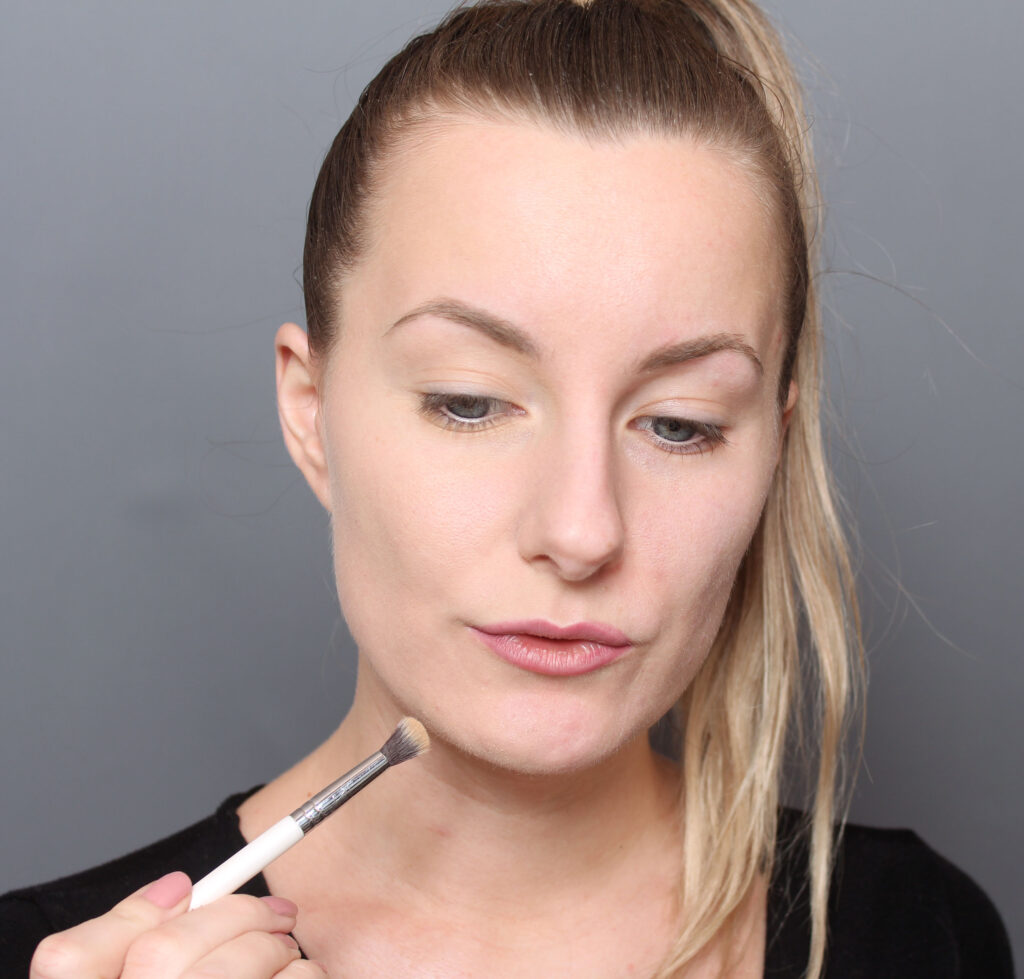
2. Rouge in a neutral tone:

red as contouring

Here I have put blush on one half, but not the other. Makes a big difference but is both easy and fast done.

I usually love to do contouring with 1-2 dark shadows, a matte light, a shimmery light and then blush on it. In other words, a whole bunch of products, neither easy nor time efficient. No make-up tip for beginners if you say so;)

Instead, you can choose a blush in a more neutral tone, which you can put mostly on the cheeks but also a little in the rest of the face as well. It results in more color and shape on the face (you can otherwise look a little flat with only opaque products) but thanks to the blush being a neutral tone, you do not look reddish either.

What is a neutral tone? It depends a bit on what skin tone you have .. For me, a mild blush works that goes with hot apricot / peach. So not bronzer-brown but not strong pink either. Choose a color that is a little darker and a little more colored than your own skin tone, without being greasy.

Here's how I do it:

apply red brush

Sweep with a soft brush from the apple cheek and up to the top of the ear. Not too high up on the cheek. Here you can add a little extra color!

A good blush I can really recommend is Indy Beauty Make Me Blush! (adlink) in the shade Jasmine. It is a good beginner blush because it is well pigmented (so you do not need much) and becomes very even on the skin = you do not have to work so much with the brush but can just swipe on. The shade Jasmine is a very nice mild color that is not at all bright.

blush for beginners

2. Wrap a thinner / more discreet layer up against the temple, preferably a little on the sides of the chin as well.

In other words, prime the skin the way your skin type / condition needs (skin care and face primer). Then just swipe on mineral foundation and blush, and the whole base is ready!

Back to top ⤴

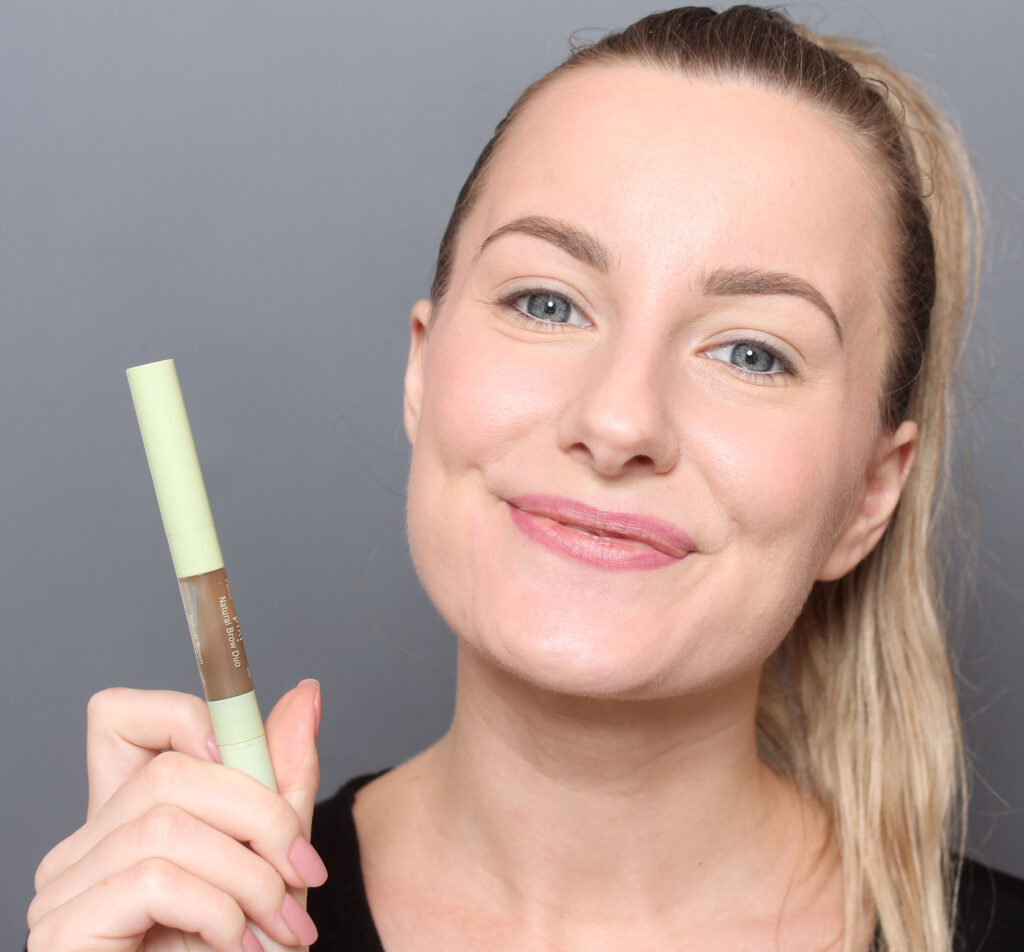
3. Simple eyebrow pencil:

brow pencil simple beginner

There are eyebrow pencils that make it difficult to fill in the eyebrows and then there are pencils that make it very easy!

Highlighting the eyebrows raises the gaze and frames the face, which makes a big difference even if you make a very natural eyebrow.

A brow pencil with a triangular tip makes it easy to fill in the brows naturally, because you work with a wide edge instead of a pointed tip.

The fountain pen I use, Pixi Natural Brow Duo (adlink) also has a brow at the other end which highlights the brows extra! Partly thanks to the fact that the strands lie down well-combed and nice, but also because it gives a glossy effect, which emphasizes your hair strands.

In short, these are the reasons why this pen is a good make-up tip for beginners:

  • Easy to work with
  • Gives a natural result
  • Highlights your brow hairs too = more effect with a simple step

Here's how I do it:

light brow pencil

1. Fill in the brow with the pen. I usually first fill in the lower part of the brow and then work with small light strokes in the same direction as the straws grow.

In the post Pixi Natural Brow Duo Video + Instructions I show and explain everything about this in a video!

make up eyebrows naturally

2. Apply bristle with the small brush at the other end of the pen.

When it came in as news at the salon, both customers and our makeup artists began to refer to it as the "miracle pen" because it is so easy to use. Can be the product we sell most of at the salon!

Back to top ⤴

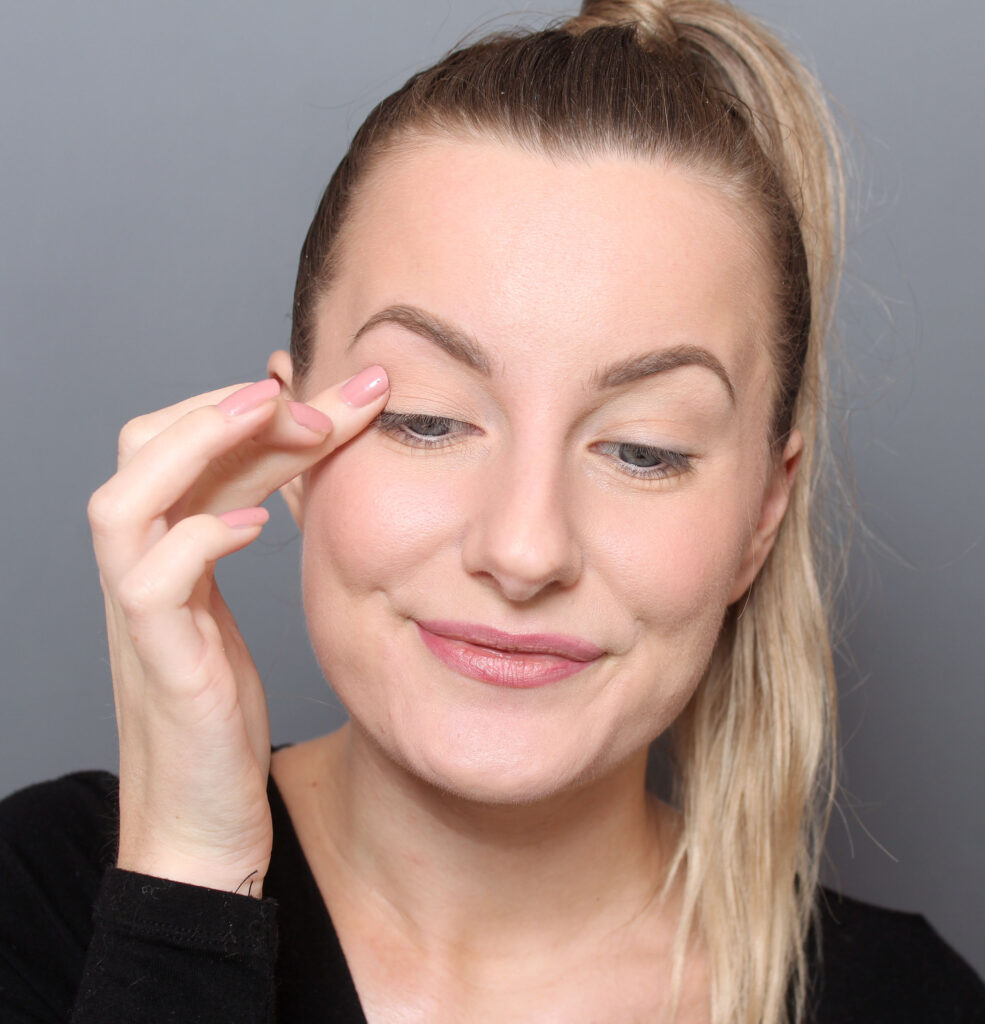
4. Do not skip eye primer!

why eye primer

Many people think that eye primer is an unnecessary or advanced step. How much difference does an eye primer make? Huge difference!

Why do you need an eyeshadow primer even as a beginner?

  • Easier and faster application
  • The eye shadow becomes more pigment-rich
  • Make eye makeup more durable (both eye shadow, eyeliner and mascara)

Without primer, many people have problems with the eye shadow falling under the eyes, settling unevenly on the eyelid and if you use two colors, they just dust together with each other instead of being a nice transition.

And if you get a nice make-up without primer, it often ends up with the eye shadow lying like two lines on the eyelid when you blink for a few hours. And it's not fun!

In addition, the mascara can last better if you use eye primer. Many people have quite oily eyelids, this is due to the fact that the skin produces sebum / sebum. The oil dissolves mascara and eyeliner (also waterproof mascaras, because waterproof is not oilproof), which causes the mascara to discolor under the eyebrows during the day. But with primer, you keep the oil in check!

Here's how I do it:

eye shadow primer why

Apply the primer on the entire eyelid. Not too stingy, but not thick all the way up to the brow either. Just right :) And then dab the cream evenly over the eyelid and up towards the brow bone.

Here I have used Pixi Eye Bright Primer, but it has now been discontinued. Another favorite is NYX Eye Shadow Base High Definition (adlink) that I have used for many years!

Back to top ⤴

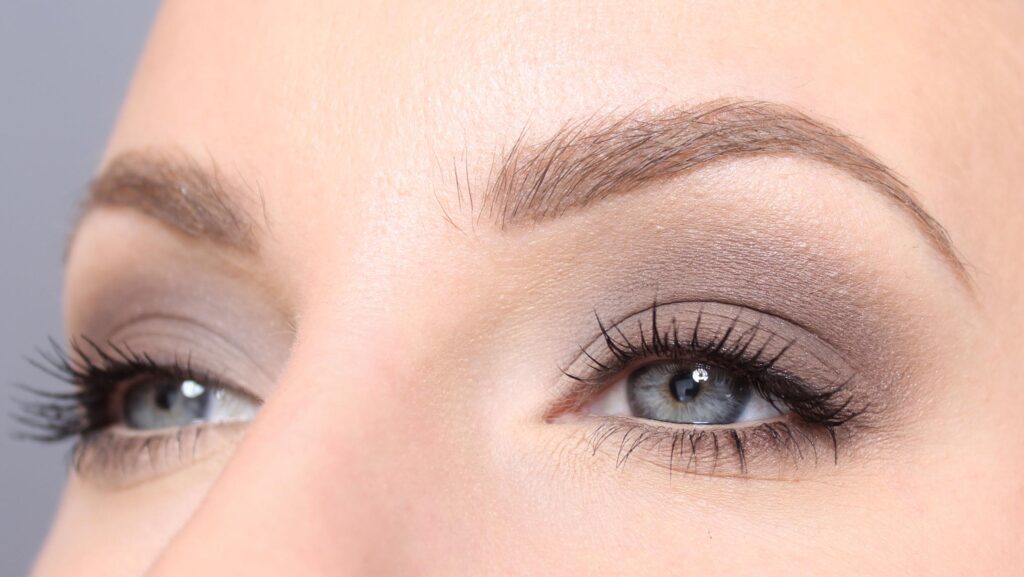
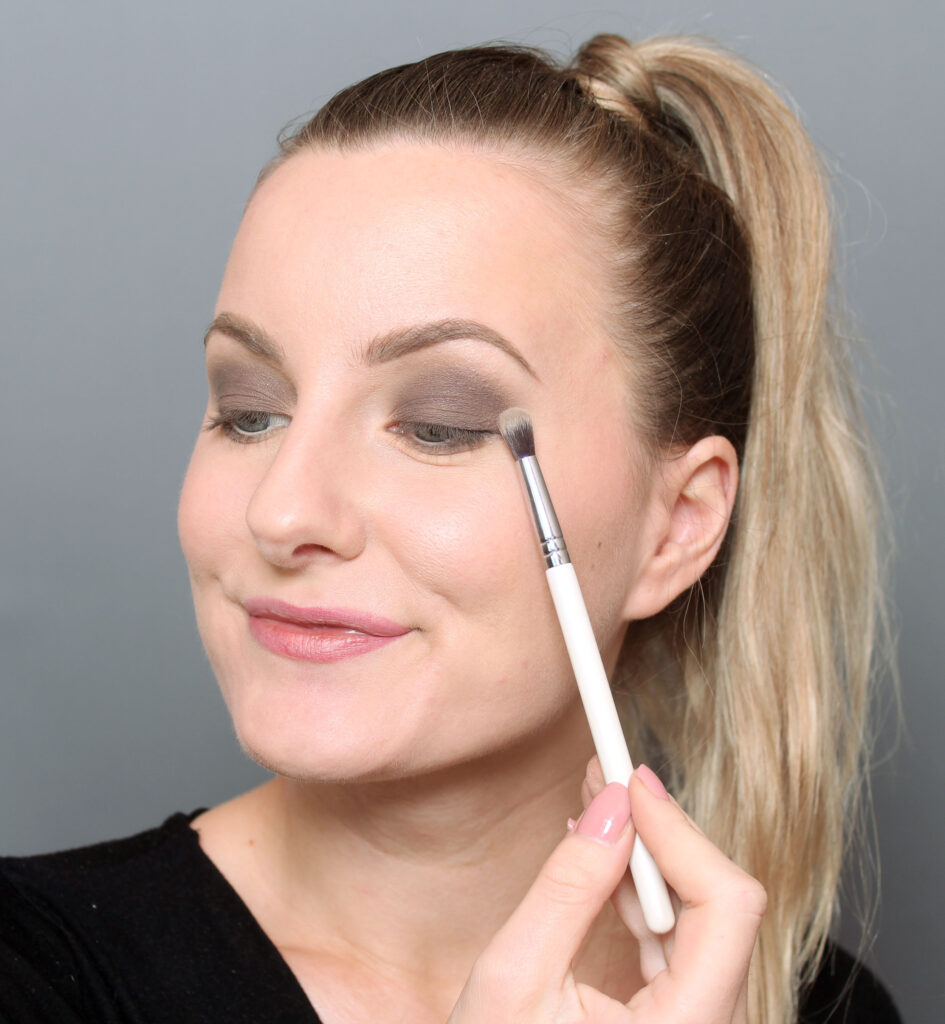
5. The same eye shadow around the whole eye:

simple make-up for beginners

Click here to see this make-up step by step.

Most make-up that you see step by step is done with eye shadows in 3 colors. Light, medium and then dark at the outer edge. It is really pretty! But it can be made even easier.

If you want a quick and easy make-up, it actually works just as well just to choose just one color and put it around the whole eye. Whether it is discreet, dark, colorful or glittery.

A brand that has really good single eye shadows that are great all alone around the eye, it's IsaDora! IsaDora Holiday Single Power Eyeshadow (adlink) are available in many useful shades that are easy to feel comfortable in while giving "the little extra" :)

Here's how I do it:

eyeshadow for beginners

Use a soft brush (preferably rounded) and dab on the entire eyelid.

A rounded and compact brush is simpler than a flat one, because with a flat you get a sharp line that you need to tone out a lot. With a rounded edge, the edge becomes a little softer and is easier and faster to fade.

simple eye makeup

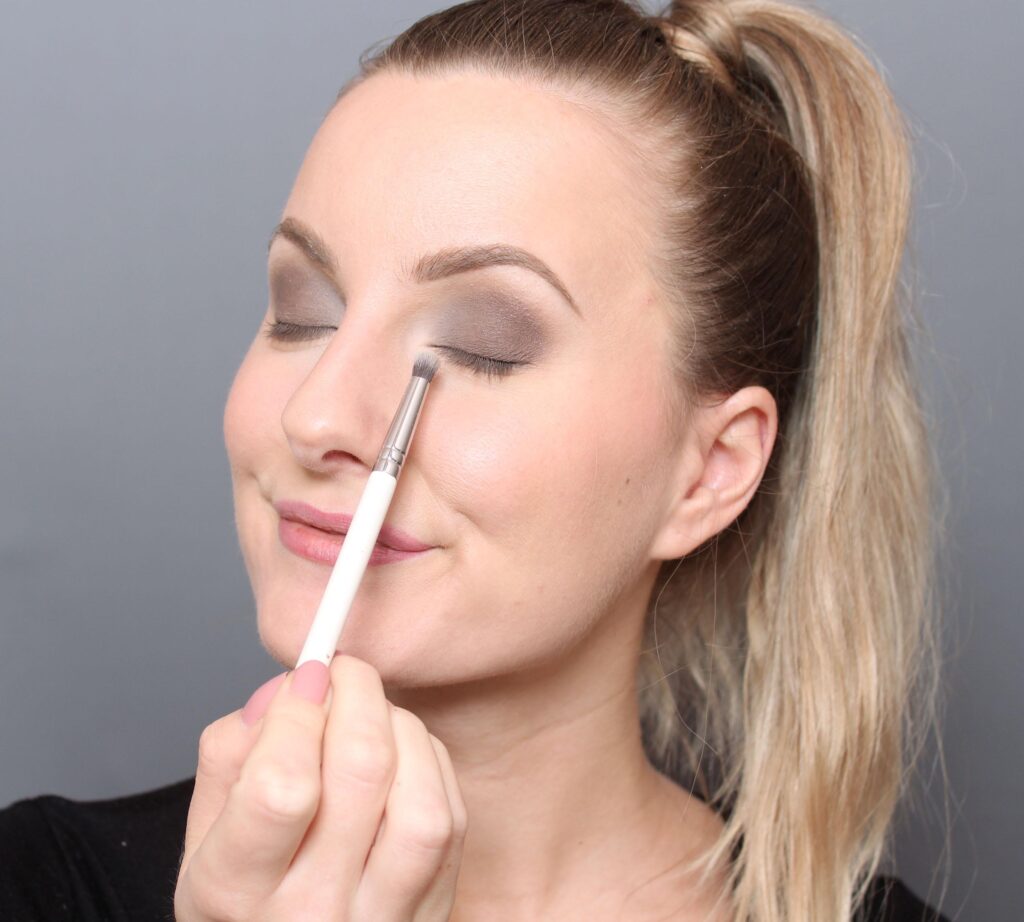
Use a smaller brush under the eye, a slightly rounded one is easiest. Dab under the eye and "tie together / meet" the eye shadow on the top in the outer corner of the eye. Swipe a little with the brush back and forth if needed to fade out extra.

quick eye makeup

Use a slightly larger and softer one (but not for fluffy) brush and fade out over the globe line. Swipe with the brush back and forth on the edge you want to fade out (sideways).

Back to top ⤴

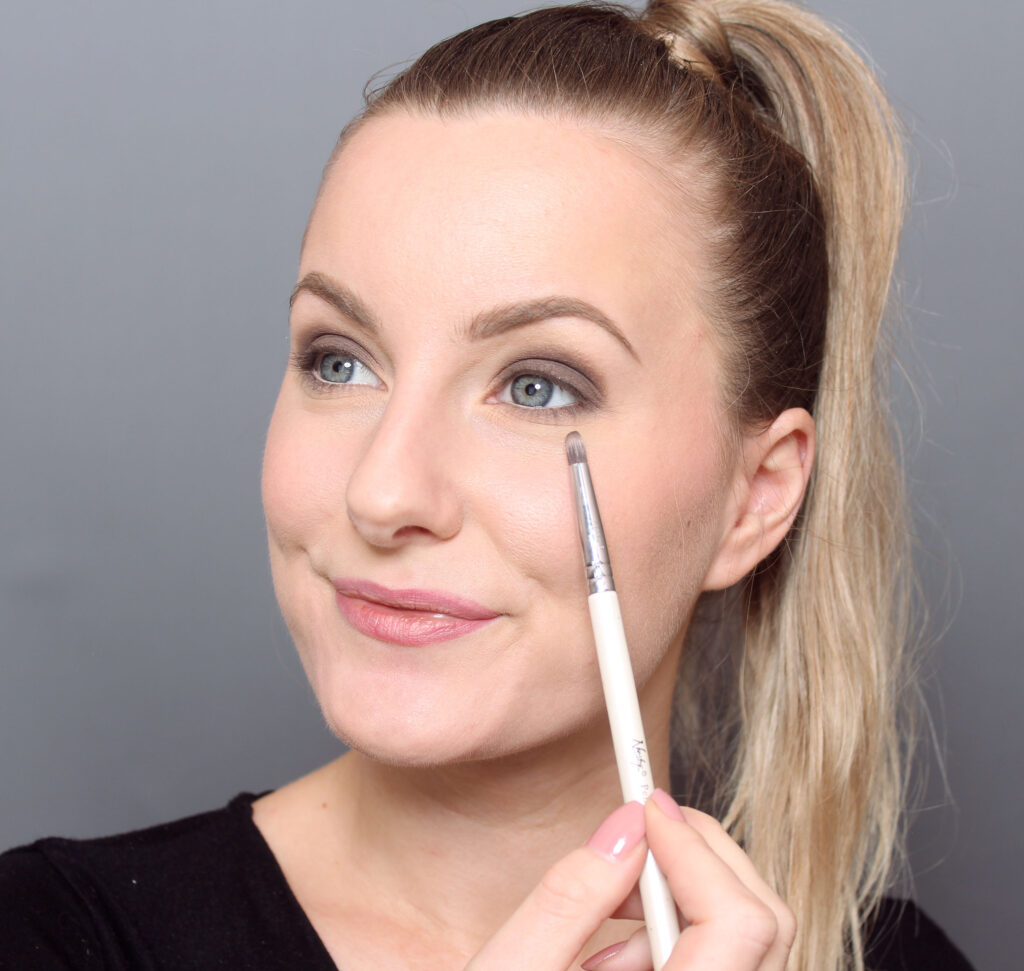
6. Brighten around the eyes:

By light I mean a few steps lighter than your own skin tone. Then whether it means a light off-white color or a lighter brown it depends on what skin tone you have :)

more alert eyes

Dab light eye shadow in the corner of the eye and up a little on the eyelid.
As well as under the eyebrow. For example NYX Nude Matte Shadow (adlink) in the shade Have a headache

livelier look

And the same eye shadow under the eye to lighten the shadow that most of us get there (more or less).

Back to top ⤴

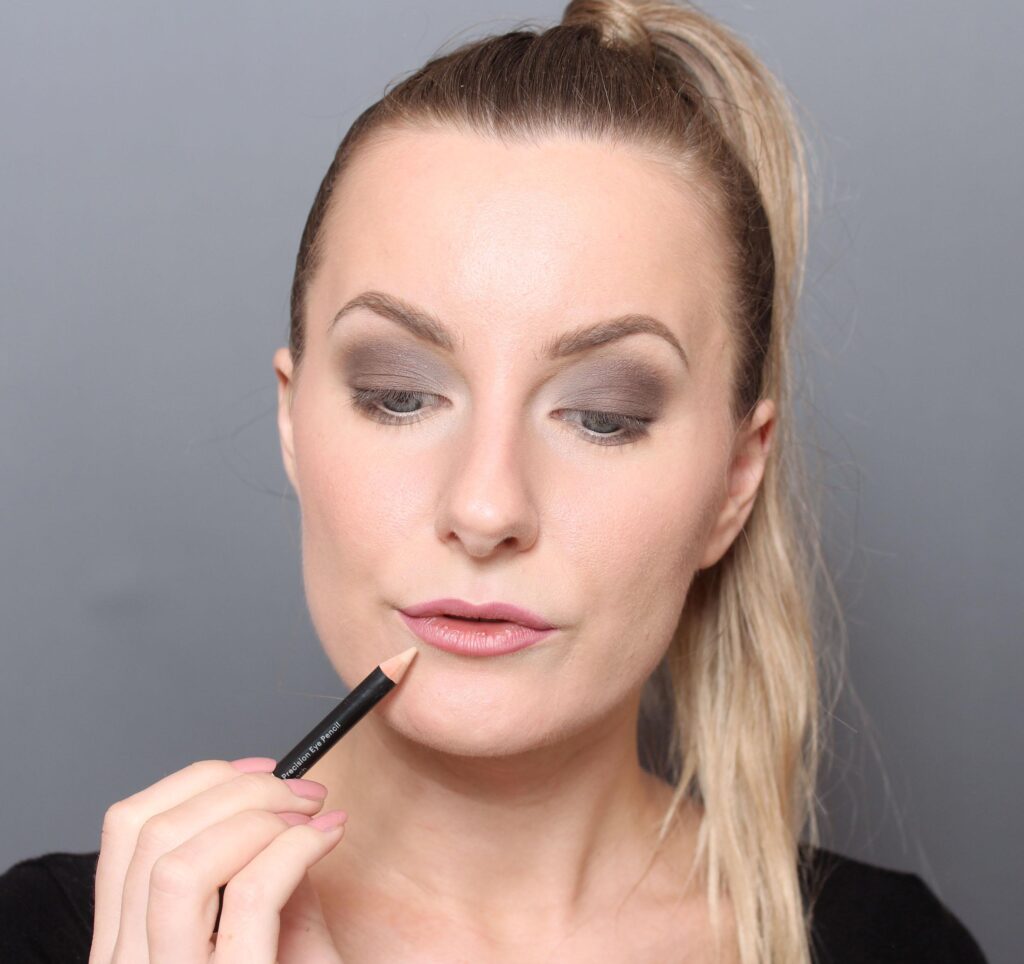
7. Light eyeliner along the waterline:

make up eyes bigger

A bright eyeliner along the waterline makes a huge difference! Mine is tattooed, luxury! It makes the eye and make-up a little "cleaner" when you get rid of redness and more alert when it opens up the gaze.

But here I use glo Skin beauty Precision Eye Pencil (adlink) in the shade Peach which is a light eyeliner in a perfect off-white / beige tone. If you have one that is too cold or too white, it can look a little unnatural to a neutral make-up.

Back to top ⤴

8. Lighten up around the lips:

emphasize the lip shape

You can also apply a matte light eye shadow on the cupid's arch on the upper lip, to emphasize the lips extra. I do this with the same eye shadow as around the eyes.

lip makeup for beginners

And / or as I do every make-up - put the bright eyeliner around my lips too! It highlights the lip shape nicely without the need to apply makeup with a sharp edge with lip makeup.

Brightening up under the eyes and around the lips like this can not be imagined as a "make-up tip for beginners", but technically it is not difficult at all. Above all, it is easier than e.g. apply concealer under the eyes or make a sharp lip contour with a lip pencil :)

Back to top ⤴

9. Black eye shadow instead of eyeliner:

eyeliner for beginners

Do you want to frame your gaze extra? A sharp carbon black eyeliner is considered by many to be difficult and time consuming, especially when it goes wrong. precision!

The eyeshadow Make Up Store Microshadow (adlink) in the shade Super Black is an eye shadow that works brilliantly for this!

kajal simple

I also recommend painting lashliner / fringe marking. That is, between the eyelashes. Read more about how to make lashliner in this post.

It is also tattooed on me, I am so spoiled;)

Back to top ⤴

10. A good mascara that does not crumble or smudge:

good mascara that holds waterproof

Then apply mascara! No strangeness in this step. Two favorite mascaras that last well without crumbling or smudging are Sensai Mascara 38 ° (adlink) and Xlash Mascara (adlink).

Feel free to read my blog post Mascara Best in Test ⇔ (Review)

Back to top ⤴

11. Colored lip balm:

lipstick beginners

A colored lip balm disappears in a discreet way because it is not comprehensive. This means that you do not have to think so much about the lips during the day because it never looks strange if you need to refill.

In addition, it does not require precision when applying, which means that this step in the make-up routine goes quickly. In addition, no mirror is needed if you improve on the go during the day!

Good complement when highlighting the lip contour with a light eyeliner before;) The lip balm I use is Pixi Shea Butter Lip Balm (adlink) and it's absolutely amazing! I use it no matter how much and always have one in my purse. This is the shade Natural Rose but it is available in more colors as well.

Clear!

Back to top ⤴

12. The importance of good products:

I would also like to emphasize that the reason why this make-up is simple is partly due to the fact that it is made with simple techniques, but also with good products!

If you e.g. should apply eye shadow with a worn and perhaps too large makeup brush, and skip eyeshadow primer, well then it will be a struggle to get it nice.

Or if you are going to make a black eyeliner with an eyeshadow with a fluffy pigment that just turns greyish. Then it is difficult.

Or have a foundation that does not settle nicely at all or a brow pencil in the completely wrong color, then you will not be satisfied either.

But if you have found (or received help to find) the perfect make-up routine with good products and tools - then it will be both quick and easy and you will be just as happy every time! :)

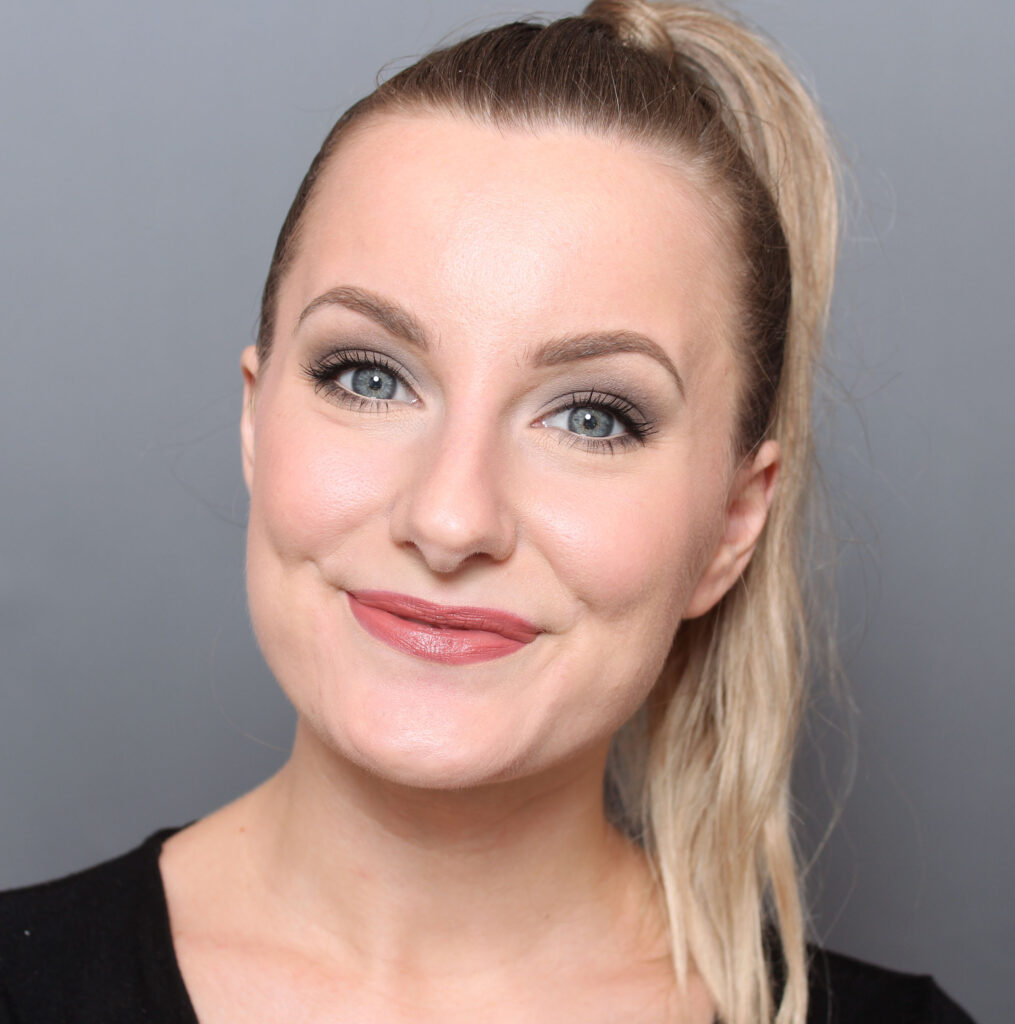
And here is the end result of my 12 simple makeup tips for beginners:

simple make-up tips for beginners step by step

Can you do anything more to get better at putting on make-up yourself? Yes! :) I have one makeup yourself course at the Helena Amiley Academy of Makeup. The level is beginner / intermediate and is aimed at all private individuals regardless of age, skin type and colors (eye colors, hair colors, undertones, skin tones, etc.).

You do not need any previous knowledge at all to take the make-up course as it mainly focuses on products, steps and make-up tips for beginners, but if you learn all the tips and steps, your make-up is far from beginner level.

Hope the post on makeup tips for beginners was inspiring and helpful!

Also read:

Hugs are ♥

Eyebrows - Pick different eyebrow shapes (Guide)

How to pick eyebrows? Getting a nice eyebrow shape on oneself is not entirely easy because it is a matter of picking different eyebrow shapes in different ways. Picking eyebrows does not have to be that difficult.

Have you looked at how others show in blogs / youtube / instagram, but then when you have to do the same to yourself, you sit as a question mark?

I have been asked to write a post about how to pluck the eyebrows on oneself in the best way. But it's a bit tricky post to do, because even though I can tell you about the guidelines for picking different eyebrow shapes here and there, it mostly depends on how even own straws look like.

All eyebrows are so heavenly different! You can not look at how someone else does and then do exactly the same, if you do not have the same kind of eyebrows at all.

But here is finally some tips, warning for a long post! :)

Pick different eyebrows and eyebrow shapes

Table of contents of picking different eyebrow shapes:

  1. Different types of brow hair
  2. Different types of brow shapes
  3. Pick eyebrows
  4. Color the eyebrows
  5. Fill in the eyebrows
  6. Brow lift & brow serum

Pick different eyebrow shapes eyebrows
Back to top ⤴

Different types of eyebrow hairs

The most difficult thing about following tips for different eyebrow shapes is not only that everyone has different shapes naturally, but also that the straws grow differently.

There are, of course, a billion different varieties, but you can simply divide it into three different ones: Brows that grow upwards, downwards or to the side.

Type 1 - Straws grow upwards

Pick eyebrows

The easiest thing, both when picking and filling in the eyebrow, is to have this variety.

The straight straws in the inner edge automatically form a nice start on the eyebrow, only need to be cut a little. The rest of the eyebrow also grows a lot upwards / a little to the side.

Common mistake: Not to cut with scissors in the front edge. Many people pick with only tweezers, but because the straws are long, it easily results in it being sparse, uneven and in some cases the whole eyebrow becomes too short.

Type 2: Straws growing downwards (in the middle of the eyebrow)

shape eyebrows

These straws grow straight down and cannot be combed either upwards or to the side.

Common mistake: Not to bother with the eyebrow scissors, but even here it is a life saver for people who want a high and uplifted shape. The straws are often quite long but hang down, so when you want to get rid of a straw further down, it is still stuck in the mold. If you pick that straw with tweezers, the whole shape becomes sparse and indistinct. Better to cut the straws with scissors!

Some eyebrow hairs can be brushed both up and down or to the side - then you can simply choose how you want them. Upwards and a little to the side is, as I said, easiest if you can choose (as in the first picture). Then you do not have to cut at the bottom edge.

Type 3: Straws growing to the side (at the front edge)

eyebrows before and after

(Just look at the model, because the model is with a brow lift. The straws cannot be brushed upwards without a brow lift)

The straws rarely grow straight down the front edge, but it is very common for them to grow to the side instead of straight up.

Common mistake: It's harder to get a nice leading edge on the eyebrow because you can not just cut a little. Many people happen to pick the eyebrow too short or create cavities, because if you remove a long straw that lies towards the eyebrow, it can create a wide hole where the straw has been. Here it is important to pick sparingly, take one straw at a time and be careful. Pick mostly at the bottom and top edge instead of at the front edge.

Back to top ⤴

2. Different types of eyebrow shapes

When I talk about eyebrow shapes in this paragraph, I mean the natural eyebrow shape before one has picked and shaped. So not what shape you want on the end result but what you have naturally.

Type 1 - Clear eyebrow shape

Shape eyebrows eyebrow shapes

Even though the eyebrow is completely unpicked, you can still distinguish a natural shape quite easily. It has like the "arch" finished already, then it is really just to pick from the underside and clean around the rest.

Common mistake: That you do not follow your own form but stare blindly at e.g. a nice picture you found. Looking at other people's eyebrows is great for knowledge and inspiration, but starting from your own straws is the best!

Type 2 - Blurred eyebrow shape

Wide eyebrows before and after

This eyebrow shape is wide and indistinct, like an unformed lump.

Common mistake: It easily happens that you happen to make a crazy shape because there is no "natural line" to follow. Note by crazy, I do not mean an "ugly style" or similar because it is a matter of taste, but simply that you pick at random and then not at all satisfied because it e.g. is very uneven.

Type 3 - Straight brow shape

Straight eyebrows

A straight shape is also great! This customer wanted a clearer arch and then you need to lower the shape in front and raise the shape in the middle.

Common mistake: Many with straight eyebrow shapes want to do as I picked on this customer, thus raising the shape (which is not a must). But many do not pick below the highest point in the middle of the eyebrow, but instead closer to the start of the eyebrow. It does not raise the eyebrow shape at all but gives the opposite effect, you look more sad instead.

It is difficult to describe in text so I show with a picture instead:

incorrectly picked eyebrows

This "floorball club shape" is a very common eyebrow shape that many people want help with. They have then had a straight shape naturally and instead of raising in the middle, they have raised far forward on the eyebrow.

The best thing is to let the straws grow back in the lower edge and then shape as I drew a little quickly in the right picture. So lower the front edge so that you get a lifting shape out towards the middle, instead of the shape leaning down.

If you want more about guidelines for eyebrows, I can recommend this post where I show clearly!

Back to top ⤴

3. Pick the eyebrows

In addition to the tips I wrote above, I also thought to write a little "step by step" how I usually do and think when I pluck my eyebrows.

If you have already plucked your eyebrows before and want to change shape, I recommend letting them grow out as much as possible before. Otherwise, it can be difficult to distinguish any other shape than the one you picked earlier and then you just stare blindly at the old shape.

Pick different eyebrow shapes eyebrow plucking tweezers

Do you need good tweezers? I use the tweezers from Brow Game (adlink) which is in my webshop!

tweezers for plucking eyebrows

1. Study the eyebrow - Look in the mirror and study the eyebrow, the best thing is to adapt the shape as much as possible to your own starting position. If possible, keep the shape where it is as dense with straw as possible.

2. Remove excess straw - Start by removing all the straws that you know will not make a difference to the final shape. Pick around the entire eyebrow first, then it is easier to distinguish a shape than if you e.g. start with the inner edge and then try to shape the rest after that.

3. Pick on the top or not? - Many people say that it is a big no no to pick on the top of the eyebrows .. I say: pick 95% from the bottom, but if it is uneven on the top then pick on the top! You should be careful on the top, however, because it is (on many) sparser there and there is a risk that you "push down" the eyebrow shape if you pick too much.

4. Brush your eyebrows - Once you have removed all the unnecessary straws and can distinguish a shape, then brush the eyebrows but a brush. Is there still a lot to go? The straws you want to remove, are they stuck in that area, or are they just so long that they extend there? If they are long (stuck in the shape you want to keep), it is better to cut than to remove them completely.

5. Cut the eyebrows - Take a little at a time if you are above, especially if you have sparse eyebrows, so you do not risk cutting too much. Cut in front if your straws grow upwards. Cut at the bottom if your straws grow down and cannot be combed to the side. Do you have obsessive-compulsive eyebrows that protrude in other places? Cut them too!

6. Finputsa - When you are done with your shape, you can polish it. Remove the last small strands to get a clean shape. Brush the straws to the right, look straight into the mirror, are they relatively similar on both sides or should more straw be removed from one side? Remove small bumps around the eyebrows with an eyebrow knife.

eyebrow knife folding eyebrows

A folding brow knife is worth its weight in gold! Otherwise it gets worn out and dull so quickly. Many whetstone knives come with lids, but how many have it left after five uses? ;) I like Brow Game Eyebrow Shaping Knife Foldable (adlink) which is really good!

Back to top ⤴

4. Color the eyebrows

Picking eyebrows makes a big difference, but coloring can have an even greater effect!

Pick different eyebrow shapes

Here I stand and color the eyebrows of a satisfied eyebrow customer ♥

Color selection - I absolutely recommend eyebrow color from Refectocil (adlink) which I worked a lot with when I ran a beauty salon. Many customers who have tried other brands (in other salons or home paints) say that nothing is as durable as these.

What shade?
Dark eyebrows: Natural brown
Medium light eyebrows: Mix natural brown and light brown
Light cold eyebrows: Mix light brown and granite. Or light brown and just a tiny bit of natural brown.
Light warm eyebrows: Light brown

Note that you must mix the paint with the hydrogen peroxide from the same brand!

Color before or after picking? - Exactly when to color the eyebrows is a little different depending on how your eyebrows look. I always pick some before coloring, but on people with light and / or sparse eyebrows, I color quite directly. On some with clearer eyebrows, I color as the last step.

Color eyebrows - Apply the eyebrow color as a nice shape on the eyebrows, pull with a top along the edges and make an even shape. Even though only the straws are dyed, the color easily sticks to the skin immediately afterwards, so it is much nicer if you apply the color carefully instead of a thick lump :)

Are you above? Let the color ache for just a very short while and check what it looks like, then you can apply again if you want more color. The longer the color aches, the better the durability, but some people prefer a more natural result immediately after and prefer to dye more often instead.

Sample images:

color bright eyebrows

Eyebrow color on blonde eyebrows. They looked sparse before the coloring but suddenly she had even with straws all over the eyebrow :)

Many blondes have a lot of blemishes around the eyebrows that are perfect to color into the eyebrow. The result is fuller and on some people it is also possible to get a wider shape thanks to the fjunen.

color sparse eyebrows

Same here, where do all the straws come from? Sometimes you get shocked yourself when you wipe off the tan and see the result :)

Back to top ⤴

5. Fill in the eyebrows

Why everyone not only picks and colors, but also fills in the eyebrows with makeup, it can be due to several things:

  • You have gaps or other irregularities in the eyebrow where no straw grows
  • To get them fuller and with a clearer shape
  • Emphasizes thin hairs, e.g. with an eyebrow

fill in the brows

Here is a shape where we made up the eyebrows just to get the shape a little fuller and clearer. Nice before, nice after!

Pick different eyebrow shapes

Here is a sparse eyebrow where we filled in to hide gaps in the outer edge. If you want a narrow shape but have sparse straws, the shape is often not completely even.

Pick different eyebrow shapes

Here is a shape with very thin straws, where the eyebrow (and a little pencil too) emphasizes the straws more.

Back to top ⤴

6. Brow lift & eyebrow serum

In conclusion, I also want to show the result that I myself have received with eyebrow serum in combination with the brow lift treatment!

My straws are ones that grow straight down, so I cut them a lot when I want a high shape. But with a brow lift treatment (which allows you to brush the straws upwards instead) I can use the serum and get long straws without cutting them. The result is full and nice eyebrows!

Also read my great post where I go through all about Brow Lift!

See the difference:

brow lift uppsala brynserum

This is the result of Beauty Lash, but can really recommend RapidLash Eyebrow Enhancing Serum (adlink) which I tested recently and think is even better!

I want to end this great post about eyebrows by emphasizing that exactly what a nice eyebrow shape looks like is incredibly tasty, and this is just a helpful post, no rules you have to follow :)

And hope that you who managed to read everything and liked my post about picking different eyebrow shapes, shout out if you have any questions ♥

Hug!

Back to top ⤴

Also read:

Spinach Soup Recipe - Simple, useful & good (2 varieties)

Miska often makes spinach soup with eggs (from our own hens) here at home and they can vary a lot from time to time. I who am bad at cooking want to learn just spinach soup because of simple, good and useful - but he always does different, haha. I now asked him about the exact recipe, so here are two of his spinach soup recipes! A little more traditional (and maybe even a little easier) and a more all-in!

But both are useful and good, the one with all-in may be a little healthier and a little tastier! :)

He gave me two different recipes because some may just be looking for the classic recipe for spinach soup, but it can vary as much as you like! We usually do with frozen spinach as it has a longer shelf life, so we always have it at home, but it can just as well be done with fresh spinach. If you want to make spinach soup with fresh spinach, you only need to double the amount :) 

Miska makes really good food and all his different varieties of recipes for spinach soup are so delicious! It is especially good that it is different every time, we quite often eat spinach soup with eggs but I never get tired because we vary. Plus you can take some of what you have at home! 

Because spinach soup can be so varied, it's easy to make a vegan spinach soup too! However, we have in a little cream and eggs :)

Here are Miska's both recipes for spinach soup with eggs:

Simple, wholesome and tasty spinach soup recipe

Spinach Soup Recipe - Simple, useful & good

Recipe for classic spinach soup:

The recipe is for two people, but it is easy to increase the ingredients if you cook for more people.

Ingredients:
  • 2 eggs
  • 1 dl cream
  • 4 dl water
  • 1 tablespoon wheat flour
  • 1 tablespoon butter
  • ½ yellow onion
  • 1 clove of garlic
  • . Vegetable bouillon cube or a splash of liquid
  • 200 g frozen chopped spinach (If you use fresh spinach, double the amount)
  • Salt & Pepper

Here's how to make a classic spinach soup with egg halves:

  1. Boil the eggs to the desired consistency.
  2. Chop the onion and fry it soft in butter in a saucepan.
  3. Pour in wheat flour and stir.
  4. Add the vegetable broth, water and cream and bring to the boil.
  5. Add the spinach and cook for a while and season with salt & pepper.
  6. Pour into a deep bowl and place on the egg halves.

To make a vegan spinach soup, replace the cream with a vegan alternative and remove the egg halves or replace them with tofu or another vegan alternative.

The absolute simplest spinach soup recipe is frozen spinach, water, cream and spices. Maybe not the best spinach soup but it can be used as a basic recipe and add what you like! :)

Delicious spinach soup with eggs

Spinach Soup Recipe - Simple, useful & good

Recipe for luxurious spinach soup:

This recipe is the "all-in" variant and is varied to infinity. The recipe is for approx. 2 people but if you do for more, it is easy to increase the amount.

This spinach soup is not as "juicy" but it is easy to increase with the liquid if you want and sort it out with cornstarch or potato flour afterwards :)

Ingredients:
  • 1 dl water
  • 1 dl cream (spinach soup lchf? Add more cream!)
  • 1 splash liquid vegetable broth
  • ½ yellow onion
  • 1 tablespoon butter
  • 200 g frozen chopped spinach (If you use fresh spinach, double the amount)
  • 100 g frozen kale
  • 1 clove of garlic
  • 1 green onion
  • salt & pepper
Today we topped with:
  • 2 eggs
  • 2 tablespoons yogurt
  • chopped walnuts
  • Sunflower seeds & sesame seeds

Here's how to make the best spinach soup:

  1. Boil the eggs to the desired consistency.
  2. Chop all the onion and fry it soft in butter in a saucepan. (Save some green onions for garnish)
  3. Pour the frozen spinach and kale into the saucepan and add the water, stirring and bring to the boil.
  4. Add the cream, vegetable broth and season with salt and pepper.
  5. Somewhere during the preparation of the tastiest spinach soup, you have had time to chop some walnuts. :)
  6. Pour the spinach soup into bowls, divide the eggs with an egg cutter or into two egg halves and put on the spinach soup.
  7. Add a dollop of natural yogurt and sprinkle over the seeds, nuts and sunflower shoots. Top with a little coarsely grated black pepper and top with green onions.

If you want to make a vegan spinach soup instead, just exclude cream, egg halves and yogurt. Either you replace them with a vegan alternative or exclude them altogether, you have a vegan spinach soup! :)

This spinach soup recipe is more creative and varied with what is available at home. Sometimes it also contains carrots and parsnips, sometimes broccoli and sometimes with shrimp. You see the point, you do not have to be so strict when cooking! :) My personal favorite is to have in parsnip. I love parsnips !! I get safe from that taste, I do not know why haha.

A luxurious spinach soup that is really good! Hope you liked Miska's recipe for spinach soup with eggs and that you will dare to try the all-in variant. 

Try adding something new that you have at home too! It can be a piece of vegetable that has remained but must be used or some nuts that are in the pantry, it is guaranteed to be the best spinach soup! :)

Which spinach soup recipe is your favorite and do you make with fresh spinach or frozen?

tastiest Spinach Soup Recipe

Egg halves or egg slices?

We usually use the egg cutter to get egg slices instead of egg halves, it becomes much easier to eat and the eggs are portioned. If you have egg halves instead, it can be a little more clumsy to portion the eggs for each bite, because they slip around in the bowl when you use the spoon to divide a piece of egg :)

I think many people forget that you can actually use the egg cutter to divide the eggs just because you have always eaten spinach soup with egg halves. But if you have not tested with the egg cutter, do it next time!

For those of you who are interested in the nutritional value of eggs or spinach, I found it on livsmedelsinfo.nu (link).

Also read: Scrambled eggs as in hotel (Recipe)

Back to top ⤴

Large toiletry bag for make-up & products (new!)

It is difficult to find a large toiletry bag for make-up & products that is at the same time practical, nice and affordable, I think. I have about a billion toiletries at home, but they are all too small!

But now we have four large toiletry bags in my web shop Creativemakeup.se which is very fun! Each toiletry bag also includes a small toiletry bag with a zipper + a plastic pocket with a button.

These are not only very cute but also extremely practical, I was actually shocked myself at how extremely flexible they are and how much they actually hold.

I got a little Mary Poppins feeling haha.

I will show everything in this post so you will get to see really properly! :)

Large toiletry bag

Why a large toiletry bag?

I do not use toiletries just for makeup but mostly for skin and hair care products and they are quite large. You know if you are going to the gym or the swimming pool, sleeping away just one night or as simple as storage at home in the bathroom. It is not only when you travel abroad that you need a large toiletry bag.

And do you know what it usually looks like when I pack for longer trips? 4-5 small toiletries with make-up and tools and then the skin and hair care is in a plastic bag. Very impractical and very unlucky too.

But from now on I only need one or two depending on what I do! If I were to go away for a week or more, I would probably have had a toiletry bag for skin and hair care and one for make-up;)

spacious toiletry bag

Practical in many ways!

These toiletries are so heavenly practical:

  • Holds a lot
  • Both rubber bands and mesh compartments on the sides for easy sorting inside the bag
  • High toiletry bag for standing products = clear overview
  • Quick drawstring closure
  • Can both stand stably or be hung on a hook, perfect!
  • Includes a smaller toiletry bag with zipper, for e.g. tops, tweezers, nail clippers, hairpins and other small items. Can be attached with a button inside the bag if you wish!
  • Includes an elongated plastic pocket with button, good for gadgets you need to protect extra e.g. a damp toothbrush or use makeup brushes
  • Made of material that stays clean for a long time and is easy to wipe off.
  • Gets flat and takes up minimal space when not in use.

Is there anything else you are missing as well? :)

Practical toiletry bag

Here you see the rubber bands and small compartments on the sides where you can attach products. And that the little toiletry bag can be fastened with a button on the side.

Pack toothbrush

The plastic pocket is perfectly large for a toothbrush. Fresh! Especially if you pack shortly after using it and it is so moist.

Pack makeup brushes

The plastic pocket is also good for keeping the make-up brushes fresh, or vice versa, keeping the toiletries protected by dirty make-up brushes! Good if you have used creamy products or type black or glittery eye shadows.

It felt a bit awkward that I did not have any clean make-up brushes to take pictures (yes I need to wash make-up brushes asap) but since it still fulfilled a purpose for this particular point, I felt it was ok;)

I use synthetic brushes from Nanshy which are really good and come in many different varieties. In the post All about makeup brushes from Nanshy I go through all the brushes.

Standing toiletry bag

Also love that they can both stand or be hung up! Many of my old toiletries are those narrow ones that have to lie down or lean against something.

I longed for such a large toiletry bag mainly for travel but actually use it now all the time, have one hanging in the bathroom all the time now because I have such a small bathroom cabinet :)

Spacious toiletry bag

By big, I do not mean primarily "oh how big" but rather "oh how much it holds!".

Of course you have different sizes of your products, but my full size shampoo and conditioner bottles can stand up without problems and it is still possible to close the toilet easily.

To illustrate more clearly about how much it holds, I have actually filled it with products to show what fits!

Here are with skin and hair care products:

toiletry bag for large products

In the bag:

  • Shampoo, conditioner, dry shampoo
  • Facial cleanser, facial oil
  • Deodorant, two toothpastes, toothbrush
  • Nail polish, lash serum

In the small toilet:

  • Tops, cotton, tampons
  • Eyebrow scissors, tweezers, nail scissors, eyebrow knife, tassels

This is what it looked like from above:

High toiletry bag

Now the little toilet is a bit in the way, but no products stand on top of each other but I have an overview of all as long as I lift out the small toilet!

It would be possible to kneel even more, but wanted to show what fits on a level that is still smooth and orderly :)

The hair care I use is from the brand Hårologi. We no longer sell the products for various reasons, but really recommend them! They are silicone-free and based on science about the hair. If you want to read more about silicones in hair care, you can read my previous post Are silicones bad for your hair?

Enough about that :) This is how the toilet looked closed:

toiletry bag with drawstring

So easy to close completely even though it contains a lot!

To show even more clearly, I have taken the same photo but used it as a make-up bag:

Make-up bag

Excuse my dirty make-up stuff;)

In the bag:

  • Primer, foundation, concealer, pillows, redness relief pillows
  • Fixing mist & glow mist
  • Contouring palette, blush, two eyebrow pencils, brow
  • Both large and small makeup brushes
  • Eyeshadow palette, a black eyeshadow, several eyeliner pencils, mascara
  • Three lipsticks, several lip pencils

In the small toilet:

  • Tops, tofs
  • Brow scissors, tweezers, whetstone

This is what it looked like from above:

Large make-up bag

So it just kind of got half full. Had room for much more :)

Note the mesh compartments that hold all the pencils, brow makeup, mascara and lip makeup. LOVE the order !!

Different patterns

The toiletry bags are available in four different patterns. Everyone is so nice! :) I actually can not decide which one I like the most but it stands between the navy blue with feathers and the blue with pink flamingos…

Since they do not take up any space when not in use (it is easy to unfold the bottom of the toiletry bag so it becomes completely flat) I am extremely happy that I myself have all four and do not have to choose;) ♥

Sweet toiletries

A white with pink beige flamingos - You can find it in my web shop by clicking here :)

Floral toiletry bag

A black with flower bouquets - You can find it in my web shop by clicking here :)

Flamingo makeup bag

A blue with pink flamingos - You can find it in my web shop by clicking here :)

Bohemian toiletry make-up bag

And a navy blue with feathers - You can find it in my web shop by clicking here :)

Perfect in our camper van then too! Oh my God what the urge I was to get it done now. Imagine being able to start taking stuff in for the first time "here's my big toiletry bag hanging" iiiiiiiih!

As I said, you will find all necessities in my webshop Creativemakeup.se here!

Shout out if you have any questions ♥

Hug!

en_USEnglish