Durable eye makeup

0

I constantly nag you about eye shadow primer, it feels like, but it's the most important product I have in my make-up bag and I never do make-up without it, so it's worth mentioning again!

eye shadow spiers

An eyeshadow primer has several positive properties:
* Makes the eye shadows adhere better, so you avoid eye shadow crumbs under the eyes when you put on make-up.
* Makes it easier to use several eye shadows and fade the colors into each other.
* Makes eye shadows more pigmented and colorful.
* Do the eye makeup very more durable, you can even train and the eye shadows will still sit completely flawlessly on the eyelids.

Even expensive and extremely pigment-rich eye shadows need eye shadow primer in my opinion, because no matter how good the make-up is, it is boring if it does not last long. Most eyelids are as oily / oily as the T-zone, and when you blink all the time + is oily, the make-up will eventually only lie in the creases of the eyelid as two lines.

And if you have a good eye shadow primer, you can also indulge in lots of cheap eye shadows if you want, and they will still be nice and durable!

cheap-primer-eyes

My favorite primer is Bra Cosmetics Eye Primer like right now available to buy at Byher.se for just 59 kronor!

I have a sale on it because I do not like my seller and will therefore stop selling this brand to avoid hassle when I buy home stuff. So now I rent out these primers and when they are finished in the shop, they will not come in again. Unfortunately. I hope I find an equally good primer soon, I have several on g that I will test!

The primer is a waterproof eye primer that makes the eye shadows withstand much more moisture than with other primers. And the difference from not using primer at all is huge, but primer disappears the shadows almost immediately upon contact with water.

The texture is thin, liquid, smooth and easy to apply - not at all sticky or sticky!

primer-water-resistant

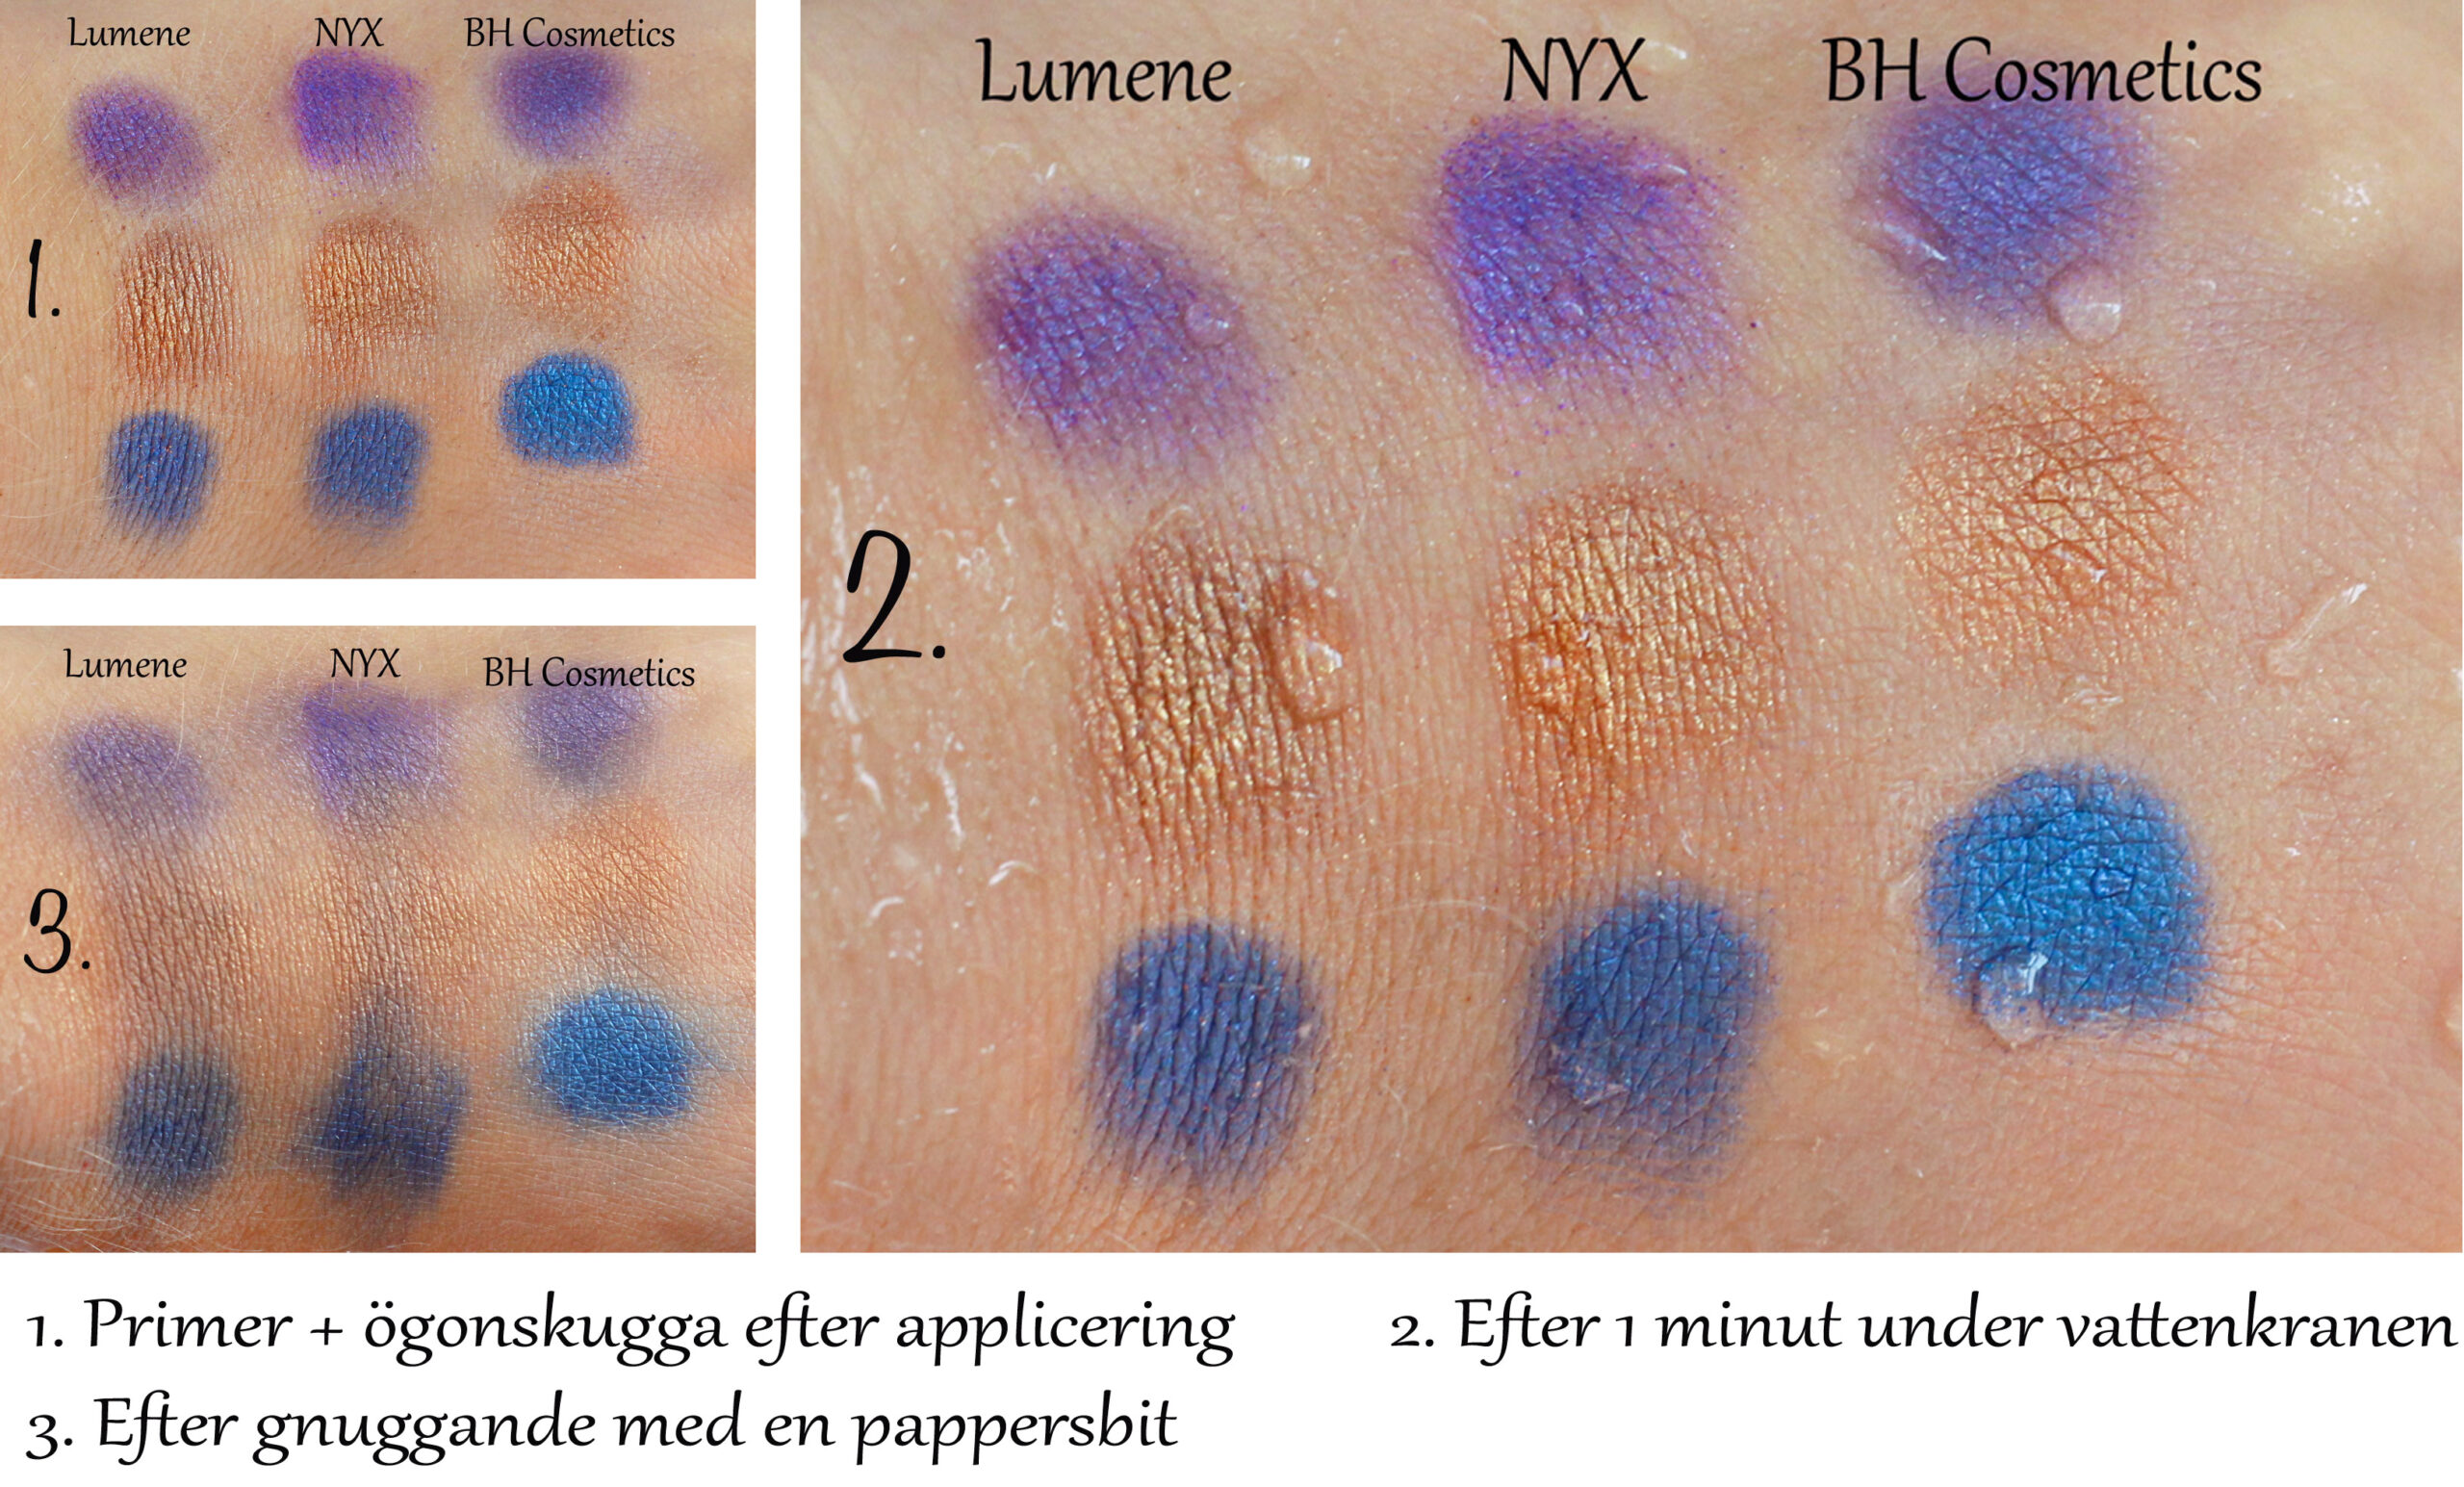
I did an extreme durability test on my hand, you can see the result above! If you rub even more on BH Cosmetics, it will also be erased, but it requires much more than the other brands and you will in principle never expose your eyes to so much stress.

I have received three nice reviews on Byher.se as well:

review bra cosmetics eye primer

So take the opportunity to shop now before they are completely finished! You will find all sale products on Byher.se here!

Hug,
Helena

Shading, highlighter & red

0

Shading, highlighter and blush are make-up details that in my opinion are important if you apply a comprehensive base. It's not important to use all three, but doing at least one of them makes an extremely big difference! You immediately get more shape and life in the face.

I feel a little shitty now when I tell you what inspired me to write this post, but it is still relevant for you to understand the importance of this :) It was namely "knotmasso" yesterday where I live, a tradition that involves that everyone dresses up and walks like a carnival along a long street. Then I saw a person who I thought was wearing a mask, not because the person was ugly at all in any way but just because the face had such an even and flat skin tone, until the mouth started to move and I realized that the person was just dressed with their clothes.

This is the effect you get a little, a comprehensive base over the whole face and nothing more becomes a bit like a mask! You become completely flat and lifeless as well. Now I was a bit fooled by the event itself as well, I would not have thought that the person would have a mask if we were seen on a normal day in the grocery store haha.

Anyway :)

Therefore, I now thought to show you before and after pictures with shading highlighter and blush, and also show how I usually do!

shading-highlighter

Difference huh? :)

Shading is a shadow that is a shade darker than your skin tone, and is applied in the deep parts of the face.
Highlighter is a shade that is a shade lighter than your skin tone, and is applied to the high / protruding parts of the face.
Rouge is a colored shadow that gives more life to the face.

But instead of writing a long text that you may not be able to read, I thought I would show as clearly as I can with pictures:

IMG_9122_111

I apply highlighter with a small and soft, fluffy brush, because I use it on quite small areas.

I prefer a matte highlighter to a shimmery one, because then you can apply as much as you want without it looking kinky. If you want shimmer / glow in the skin, it is possible to supplement with it at the end.

I have a light concealer as a highlighter in the picture, but another good tip for people with light skin it is Paeses two light cashmere shadows that work super well as highlighters!

IMG_9126_11

I apply the shading with a larger fluffy brush, and I actually use the same for the blush. Both the brushes I have shown now come from this brush set!

I usually use sun powder as shading, but prefer a cooler tone than one that is too warm, because all natural shades are cold. A shade that is too warm can look unnatural.

shading-highlighter-tutorial

Here you see how I usually apply all products!

I like to get as sharp and clear a chin as possible, a tip then is not to apply the shading on the jawbones, because it can make them look more round. Instead, I apply just below them on the neck and on the underside of the chin.

And this is how everyone gets together:

shading-highlighter-red

IMG_9138_111

And as I said, you absolutely do not need to use all three ways, but just blush or just shading goes super well too :) But it obviously gives more effect with both shading, highlighter and blush at the same time.

Hope you understood everything and that the post was helpful!

Hugs are!
(There will be a post with my whole base step by step on Helenaronnblad.se in a few days)

Tips for long nails

0

All my life I have thought that I simply do not have the genes to get long and nice nails. They have always been soft and so thin that they are basically transparent, and have sliced and gone all the time.

But about a year ago, I became more and more careful with my nail care, and I notice such a huge difference! My nails get so long that I have to cut them with nail scissors (has never happened before), they are much stronger and also they are not transparent at all anymore.

The changes I have made are not really that big so I thought I would share my tips with you today!

This is what my nails look like completely without nail polish right now:

get-long-nails

And here are my top tips:

1. Lubricate the cuticles !!
This is probably what has made the biggest difference. I have heard that you should lubricate the cuticles three times a day, I have not been really that good but at least once a day at least. I have not used only one product all the time but tested a little different, both creams and oils. The most important thing is to use a thin product with such small molecules that it goes into the thin skin around the nails. I like oils the most, e.g. pure argan oil!

2. Do not peel under the nails
I do not really know what the skin under the nails is called on "real", nail plate? Anyway, it will be like a support for the nail so it is good if it can be as long as possible. Therefore, do not peel with sharp objects under the nails! It is best if the nail is stuck in the skin only at the fingertips. You see what I mean by the markings in the picture above.

Use acetone-free nail polish remover
I always used remover with acetone when I removed the nail polish before. It both stinks and dries out, not good at all! Now I use Paese Nail Polish Remover which is acetone-free and both nourishes the nails (with vitamins E, F and glycerin) and smells good of tropical fruits!

There are of course lots of other nail tips as well, but it is these three points that are the only ones I have personally done differently :)

Hug,
Helena

Cat eye makeup

Here is the sequel to the makeup that I started showing in yesterday's post.

It felt as if it had become too much text to post everything at once. Yesterday wrote in such detail about how I make a nice cat eye shape, and today you will see the end result + product list as well!

Hope you like the look :)

cat-eye-step-by-step

1. Black eye shadow at the end of the eyelid, mark how far out you want the cat eye shape and at what angle, Paese Kashmir Matte Black Eyeshadow.
2. Fill in about half the eyelid with the black shadow.
3. Fade the edges.
4. Light eye shadow in the innermost part of the eyelid, in the corner of the eye and in the innermost part of the lower lash line, Paese Diamond Eyeshadow (shade 9)
5. Lighter eye shadow In the corner of the eye, Annika's Favorite Shadow.
Black eyeliner along the waterline and both the upper and lower lash line, Paese Linea Automatic Eyeliner (Black Glam)
Black mascara on all lashes.

IMG_9792_111 IMG_9796_111

Hope you were inspired :) ♥

Cat eye eyeshadow tutorial

Today's make-up you can not see the whole thing at once, but I thought I would start with the first part of the step-by-step description because I so often get questions about just that detail.

It's about doing a cat eye make-up, which many people think is a bit awkward, especially how to tone out the eye shadow when doing it. A more protracted form is much harder to do because you do not have as many guidelines to follow as when you just follow your own globe line.

You can also vary a cat eye very much, but here are my best tips on how I usually do with the eye shadow right at the outer edge of the eyes!

cat-eye-tutorial

Use a narrow eyeshadow brush and mark how far out you want the cat eye shape to go and at what angle. A tip is to follow the lower lash line and continue in the same slope outwards, as far out as you end up at the same level as the highest point on the globe line.

2. Fill in the eyelid with as much eye shadow as you want, either the entire eyelid or just the outside as I have done to make room for a new color.

Place a skin-colored eyeshadow / highlighter or powder above the mold. This is done so that the primer is not as damp, then it is easier to fade the edges.

4. Use a small fluffy brush and fade the edges so that they are not as sharp.

5. Use a larger fluffy brush and fade out to make the edges even softer!

cat-eye-eye shadow

Here you see the guidelines I suggest in point 1, this is absolutely no rule on what it should look like but just a tip!

Other tips to keep in mind:

The most important thing to keep in mind is to work carefully with the brush and not to blur too much, otherwise it can easily happen that you pull out the eye shadows too far or that it looks dirty. Have patience, be light on your hand and blur a little at a time!

You can do this with any color, but I chose a matte, black eyeshadow because it is best seen now when I want to show you, but is also the hardest shade to get nice. But if you feel that it becomes too difficult, but still want black, then you can apply a little brown eye shadow in the edges as well, because brown is easier to fade out and get nice is black.

And when you have come this far, you can choose how you want to continue, but black eyeliner along the waterline + a sharp eyeliner with a wing, I think is super nice, then you really get that intense cat look :)

Hope the tips were helpful, write if you have any questions or if I was unclear on any point. You will see the end result of this makeup tomorrow!

Hug ♥

en_USEnglish