Mint glitter in the corner of the eye

I received this email after we published Mood Wood Natural Glitter in the webshop:

“So nice glitter you have got home on Creative Makeup, saw them on your instagram and immediately went to your blog and checked your nice make-up! I have a question, you have written that you use the shade Mint in the corner of your eye as everyday make-up quite often, when you are not putting on make-up to show us in the blog. Can't you show picture of it too? Thanks!"

Of course I can show it! It is not so much step to show with a glitter dot in the corner of the eye so I did not take photos step by step, but if you missed my post on how to attach glitter, you will find it in this post :)

Dabling a little glitter in the corner of the eye enlivens the make-up enormously and is so easy! In this post, I supplemented with red lips too!

And to be so simple, I get an unusual amount of compliments for this make-up every time I wear it, great fun! One of my clients said “Vwhat a nice make-up you have, it's like much nicer than regular glitter!” :)

Colored face primer - glo Tinted Primer spf 30 (Medium)
Concealer - Pixi Pat Away Concealing Base (1 Cream)
Powder that neutralizes redness - glo Redness relief powder
Contouring - Contouring Palette (2)
Rouge - Blush (35)
Fixing Mist - Pixi Makeup Fixing Mist
Powder - Paese Bamboo Silk Powder

Eyebrows - glo Micro Brow Liner (Ash)

Lip pencil on the entire lips - Benecos Natural Lip Liner (Red)

The glitter is really hard to get in the picture, it gets more gravelly than bling-bling hehe.

Glitter: Mood Wood Natural Glitter (Mint) attached with Kryolan Cake Liner Sealer.
Mascara: Magnetic lash mascara on the lashes

Around the eyes I have nothing more in the way of make-up, but my black lashliner (eyeliner in the lash root) and my light inliner (along the lower waterline) are tattooed.

Me like!

Shiny skin in the summer? Powder tips!

Conversation between me and Miska when he came home from work:
Miska - Hey! Are you sitting here with a face mask?
I - No what face mask? (I had a full face glitter makeup)
Miska - Wow, are you so oily? It looks like you're wearing a face mask!
I - Yeah sure, I put a face mask ON my makeup it's very reasonable haha.

I worked from home and therefore had not powdered on the base during the day and this heat wave we have now really starts my sebaceous glands haha!

People often talk about it being so nice with glow products in the summer and I totally agree! But still, I prefer a lot of matte products now because you naturally become quite shiny in the summer as it is, so many do not feel that you need to add extra.

Or you "have to" use degrading base make-up for to be able to indulge in that shimmery gold highlighter without looking like a disco ball after a few hours :)

If you have as oily skin as I have, there is no chance (with the products available on the market today anyway) to keep the skin matte from morning to evening without dulling the skin during the day. Especially not if you are like me in the summer - just want to make a quick and easy base without a whole bunch of products in different layers.

Therefore, I now thought to give my best powder tips for the skin to stay matte a little longer in any case!

What is the fastest and most absorbent product? Powder! It is important to get as much powder in the face as possible without the skin looking powdery and dry.

The best way to do this is not to use a large fluffy powder brush that sweeps on a thin layer on the surface. Instead, I take a compact brush (I use Nanshy Buffed Base but a compact kabuki brush also works) and dab / buffer a thick layer firmly into the foundation (or whatever you now use underneath) and work the powder into the skin.

This means that the powder does not lie as a dry layer on the surface = nice result. At the same time as you get a very large amount of powder = the skin stays dull longer.

Buffer, buffer, buffer! Of course you do not have to powder the whole face first and then start buffering it into the skin (as I did in these pictures) but I photographed it so just so you will understand that a large amount of powder means a Big amount of powder!

I usually do this step before contouring, blush, eyebrows and such details. You can do this both if you do a full-coverage foundation make-up or if you only have a semi-opaque bb-cream or colored day cream.

The amount of powder you apply on the face really makes a big difference!

I have to finish by hitting an extra blow for the powder Paese Bamboo Silk Powder which I sell in the webshop - mine ran out at home so I had to use loose powder from other brands for a few days and was immediately reminded of the difference between powder and powder.

Hugs are! :)

Mint makeup tutorial (Mint green makeup with glitter)

My favorite glitter right now - the shade Mint from Mood Wood Natural Glitter which we sell in the webshop!

Even though I only have base and mascara one day, I dab a bit of this glitter in the corner of my eye, it is color at the same time as it is bright and not at all bright :)

Today I also put a green eye shadow underneath to get an extra green effect and it turned out so nice!

Colored face primer - glo Tinted Primer spf 30 (Medium)
Concealer - Pixi Pat Away Concealing Base (1 Cream)
Powder that neutralizes redness - glo Redness relief powder
Contouring - Contouring Palette (2)
Rouge - Blush (35)
Fixing Mist - Pixi Makeup Fixing Mist
Powder - Paese Bamboo Silk Powder

Eyebrows - glo Micro Brow Liner (Dark brown)

Lip pencil on the entire lips - glo Lip Pencil (Soulmate)

Surely this mint green is nice? :) It is not as green at all without the eye shadow underneath, but the shadow underneath means that you do not need much glitter at all, to dab on a little spread out is great enough!

  1. Eyeshadow primer, Pixi eye bright primer
    Light green eye shadow on the entire eyelid and up along the globe line, Paese Opal Eyeshadow Trio (Atacama) applied with Nanshy Tapered Crease Brush
  2. The same shadow along the lower lash line + in the corner of the eye, with the same brush as well
  3. Dip the brush into the liquid Kryolan Cake Liner Sealer and then dip in the glitter bottle - dab on the entire eyelid, a little in the corner of the eye and a little in the middle of the lower lash line. The glitter is Mood Wood Natural Glitter (Mint)
  4. Black eyeliner with wing, Kryolan Cake Liner (Black) mixed with Kryolan Cake Liner Sealer to make it waterproof (you can otherwise use ordinary water as well).
    I fiddled lightly with the eyeliner along the lower lash line as well
  5. Black mascara on all lashes, Magnetic lash mascara

Clear!

Hope you like the makeup ♥

Hug!

My business week v. 30

The last Sunday in July is today! Isn't it completely crazy as time goes on?

Free Helena loves summer and enjoys every bright moment! Entrepreneur-Helena, however, is starting to look forward to autumn, which always feels like New Year to me, then you avoid all I-am-on-holiday-auto-replies to emails and all routines are back to normal.

At the time of writing, I have just worked a 6-day week at the salon and now the rain is pouring down while I drink my morning coffee in the kitchen. I just took a shower and looked at the flashes outside the bathroom window, so cozy! :)

Presentation to producers
I have promised that I will keep you updated throughout our "make-your-own-makeup brand journey" :) This week I have started to put together a presentation that we can email to producers and then also to investors! I will start doing it in Swedish and we will do another in English later.

We have a concept that does not go under the "standard template" and what is possible to do in manufacturing, we have no idea. So it becomes a vicious circle: we must have the whole plan as ready as possible for the producer to want to cooperate with us - while we can not finish the whole plan until we have talked to the producer about what is possible haha.

But I do research as a little detective and try to think as smart as possible!

I am also doing a "swot analysis" where you list all our strengths, weaknesses, opportunities and threats. It is not finished yet but it is mostly points below strengths actually, and that is good;)

Then there are a lot of details that can put sticks in the wheel as well as I list under weaknesses and threats - as long as you are aware of them, they are not necessarily deal breakers but they are even more important to think about!

A sneak peek at what our brand should be called, you see here;) Although it is mostly a "working name" or whatever you say, we have bought the domain name in case that but it is not carved in stone that it will be just that name.

So much fun to finally get started with this for real!

The heat wave continues
As I wrote in the last business week post, we have sauna heating in the salon, then I jump into a hot car without AC and then it is super hot at home in the house as well. Pjuh, you get really tired of not getting a break from the heat!

So one day when I had a lot of work to catch up on when I got home, I half filled the bathtub with cool water, put the computer on a chair next to the bathtub edge and worked in the cool bath haha.

I got so sore in the ass in the end and had to sit on a towel in the water haha.

We also fixed blinds in the kitchen as heat protection when the sun shines in (best!) And on the floor it blew nicely when you opened the window, so it was my second working place in the house.

Not quite comfortable there either, after a while I had to stock up with some pillows. Poor little asshole :)

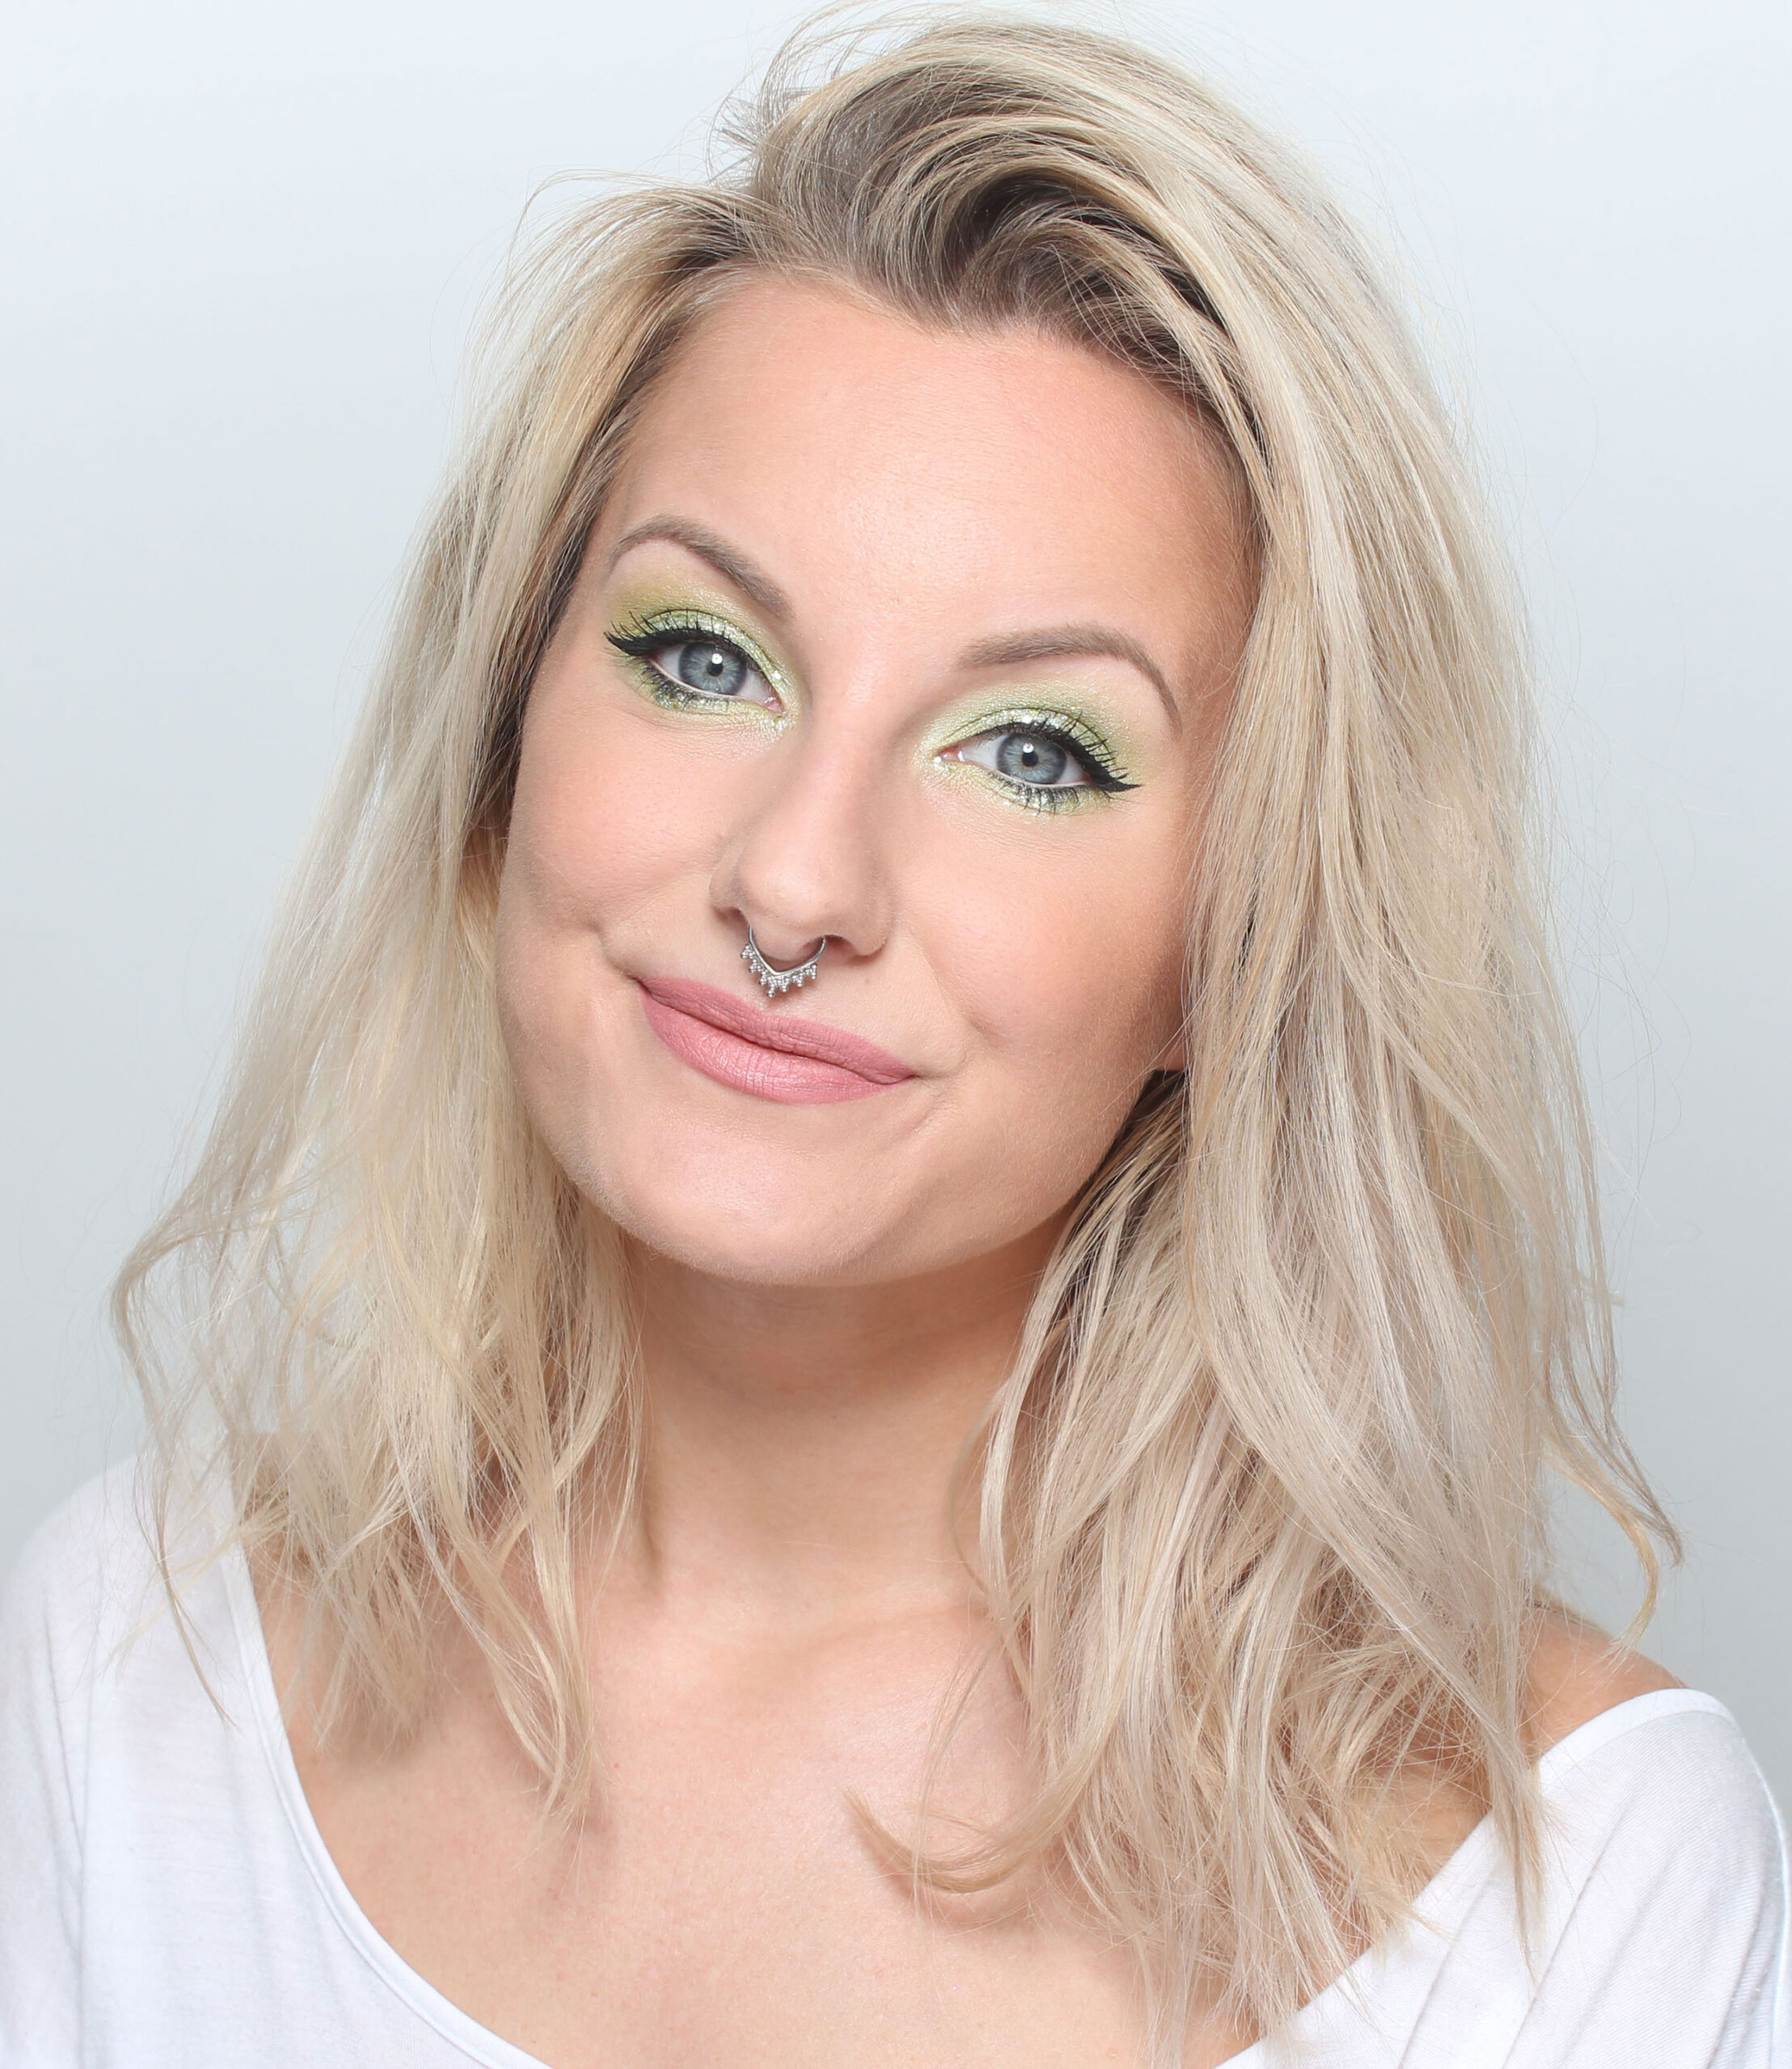
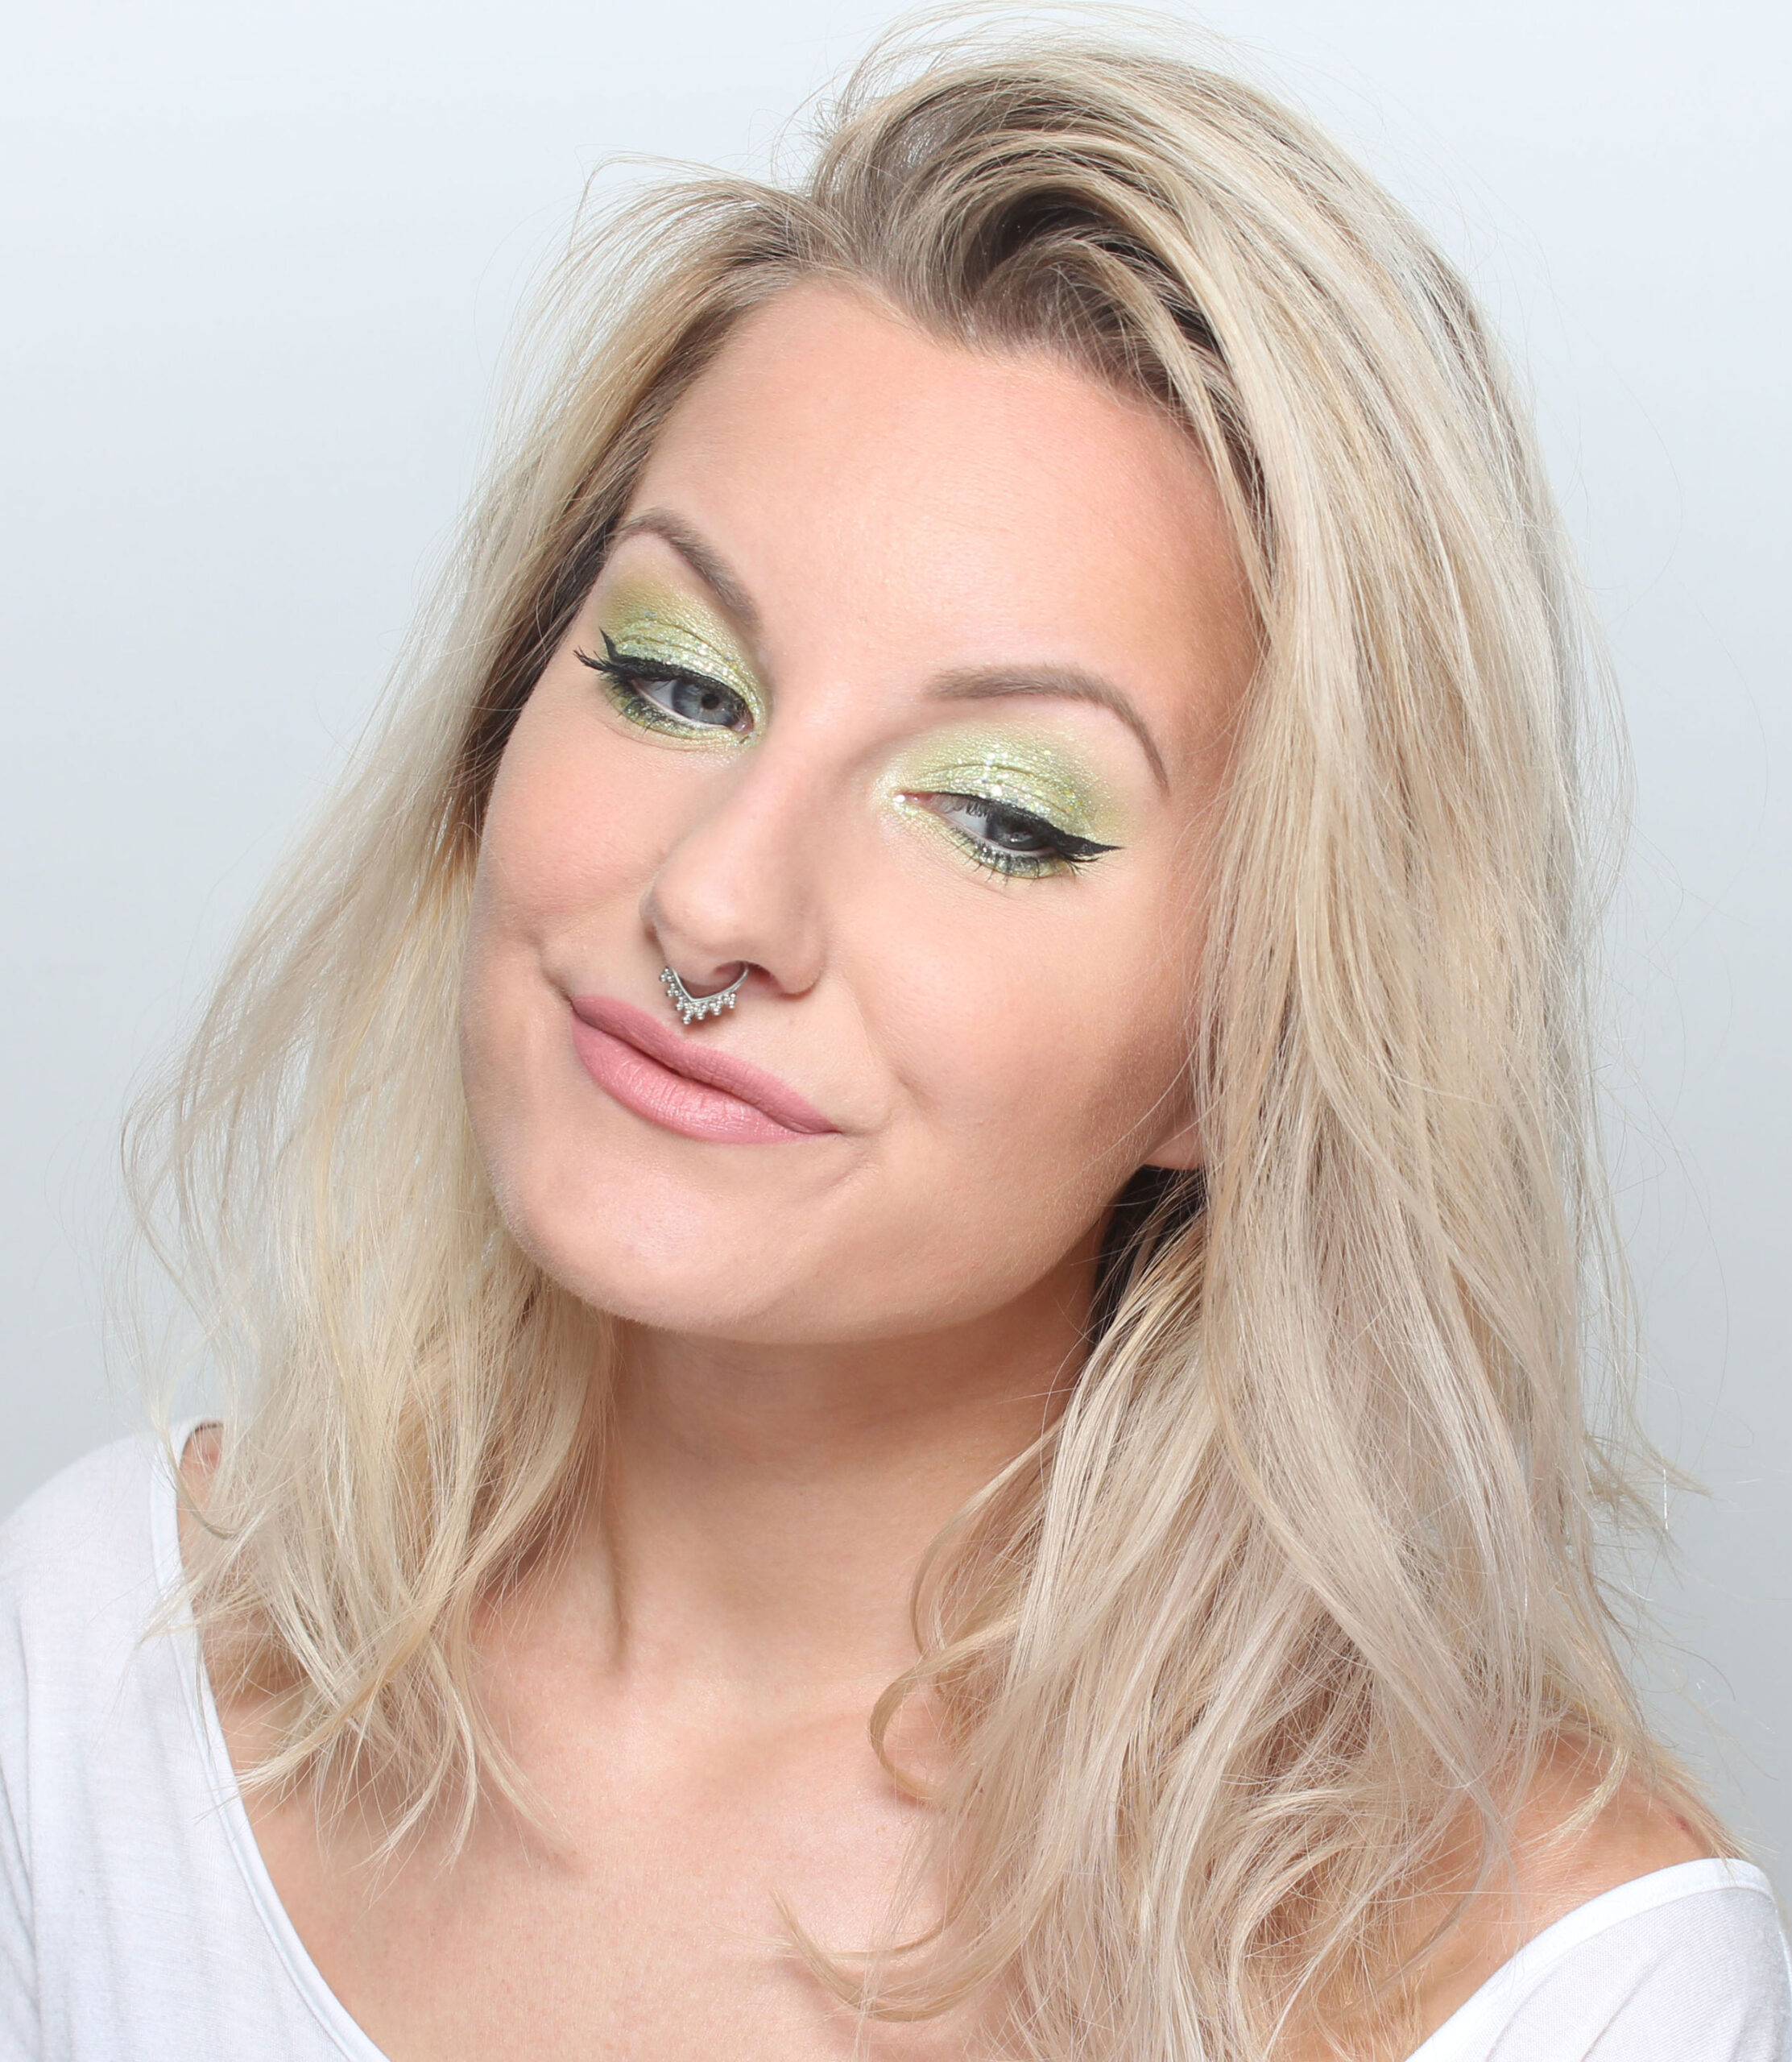
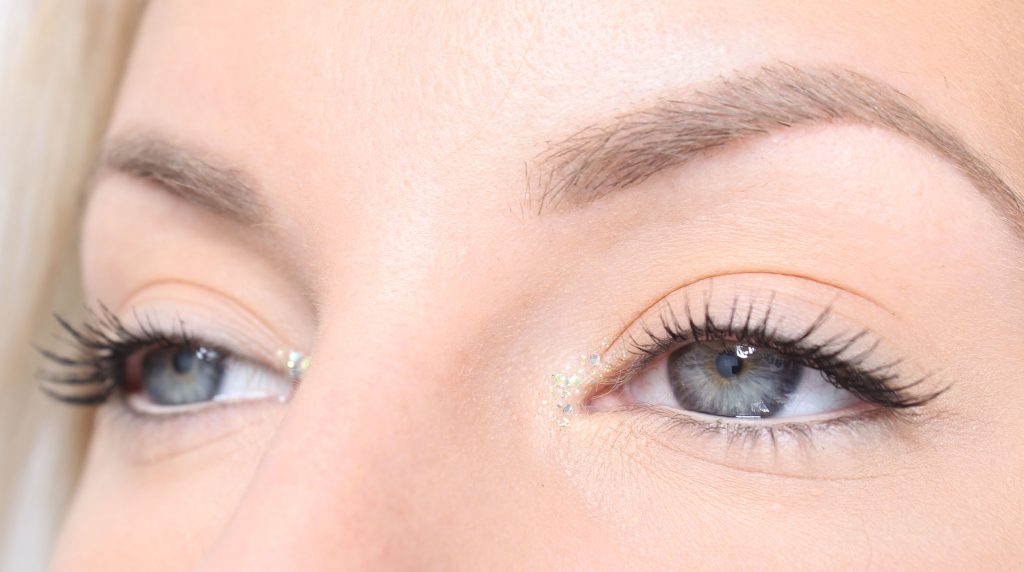
Glitter, glitter, glitter!
You who read my blog regularly may not have missed our news Mood Wood Natural Glitter as I have been bombarding you with lately!

This week I have published it in the webshop, photographed all the shades, photographed the tutorial, made beauty guides on the website, posted on social media and photographed and filmed for insta story.

You know how it feels after doing glitter? You have glitter just about everywhere! I was injured at work in the end so even the days I just fixed with the pictures and did not even touch the glitter, I had the feeling of "glitter fingers" haha.

Why do I feel good?
This week, one person said to me, “You can't really know anything about what stress is if you do not have children ”. I did not say anything about it then but I have thought a bit about that .. My first thought was of course "try starting a company with employees you too so you should look at stress" haha.

I'm fully aware that I do not know what it's like to have children so I say nothing about it :) That was not what I was going to talk about. But what happened was that it made me start thinking why I feel good. Is it because I do not have children or do not live a stressful life? No, the reason I feel good is not because I was lucky or because my life has slipped on a prawn sandwich. I feel good because I do jobs to feel good!

I nurture my relationships that mean something and put no energy on those who do not deserve it, negativity and drama create such inner stress for me! I can forget my cell phone out in the car for 2 hours when I get home without even noticing it. If we were to compare my personal finances with everyone I know, I would be the one who had it the worst in the last 6 years - but thanks to the fact that I am good at saving and living on some money, I have still escaped the enormous internal stress that financial problems can give. And above all, I get to grips with things right away if I'm not happy with the situation. Postponing things is really a source of inner stress!

In the last 2 years, my company has grown to 7 employees and a staff cost of over 2 million per year. My mother passed away in a terrible way for us and in return I lost contact with two family members. At the same time as we just made our biggest staff investment, the number of bookings really dipped (not even Annika had had such a low autumn since she started with permanent makeup) and we really calculated how many months it could continue at that level before everything goes to the forest completely. In the midst of all this, I sat in conversation with estate records and struggled with my last strength to be able to keep our childhood home.

It is not because of luck that I stayed above the water surface, so to speak.

I'm not saying that it's easy to feel good, but regardless from where your stress comes, I think you have to work on feeling good and what that "job" consists of is different for different people. So in such cases it becomes the first thing to analyze: what would you need more / less of to feel better? Everything from small things that spice up life to bigger things like changing your life situation to get more free time, finances, security, well-being, etc. And get to grips with all those things!

I do not know about something I just wrote make sense hehe or if it was even a bit inspiring? :) I sit with my cat Viktoria in my arms, the first cup of coffee has just kicked in and the rain is pounding on the windows = a Helena in a writing mood! It clatters as much on the keyboard as on the windows;)

Mys Sunday ♥ The painting is painted by Miska! He also sells paintings if any of you are hungry - check out his instagram @miskaisoniemi if you want to peek :)

Surprise bride & hair styling!
During the summer, I work more Saturdays than usual (because the other makeup artists have a holiday) and yesterday I had an unusual bridal make-up at the salon. Surprise weddings have been witnessed (eg that the guests think they are going to a baptism) but that the wedding was only a surprise for the bride (!) I have never been to before haha!

Imagine getting the courtship in the morning and getting married the same day, what a fun idea! Note they had been together for 34 years so he was pretty sure she would say yes;)

I did her bridal make-up and usually I do not take any hair styling but made an exception for this because something simple and "sloppily fixed" was to be done so I could give in to it.

Here you see the hair:

The before and after pictures of the make-up will be in a separate post shortly :)

What has happened more this week?

I have had 9 customers, of which a "regular" that I have from Skåne who usually stays in Uppsala when she travels around the country, so fun :) Last Thursday I made her up for a trip to Tallinn! You will also see pictures of it.

I am already preparing blog material for our trip to Spain so that the blog does not have to be empty then. I do a plan and material cost calculation for our new microneedling treatment that will come this autumn and have completed Mia's autumn schedule (she who just trained for microneedling). It's a little calmer at the salon because more people are on holiday now so I have been able to go home several days before as well, which is really nice - so you can e.g. work naked in a cool bathtub instead;)

So it's been a good week! All weeks are not as interesting to tell about, but I keep the tradition with the business week posts on Sundays when I often hear that they are appreciated. Cool!

Now I will enjoy a day off :) Hugs to you ♥

Guide - Attach glitter to your makeup

If you buy a loose glitter and think that it will be possible to use with regular eye shadow primer, you will be disappointed. An eyeshadow primer is a cream where small, small pigments adhere very well, but larger glitter grains will fall off as much as it gets stuck and in the end you have glitter all over your face.

I use Kryolan Cake Liner Sealer to attach glitter, here is a step by step description of how I do!

Different products to attach glitter with:
First of all, I thought I would go through different types of products to attach glitter with, so that you can more easily understand why I think Kryolan Cake Liner Sealer is so flexible!

Glitterprimer - An extra sticky primer that makes glitter adhere properly. Works great (depending on the brand) but I do not think it is completely optimal if you want eye shadow under your glitter (and it is usually the type of makeup I do) then you first apply regular primer, then eye shadow, then glitter primer and then the glitter - and you have to be very careful to get an even result because you put a sticky cream on top of your eye makeup.

Fixing mist - I have also tried to use a regular fixing mist and it actually attaches very well with one but the durability is not so good. The glitter releases easily if you happen to access it during the day.

Lifehacks - There are also some tips that pop up in the flow of social media from time to time that I recommend that not make use of. For example. attach glitter with hair spray, of course it works but the skin really does not feel good about it! You can also attach with a little hair wax but it is also not tested to use so close to the eyes, it is such a sensitive place and not at all fun to get reactions! So be careful with all these tips :)

My tip: "Multi use liquids" - There are also different liquids with several uses that can be used to attach glitter, mix with cake eyeliner, mix with eye shadow, etc. and that type of product I prefer the most when it comes to glitter! You just moisten the brush, dip in the glitter and then you can dab on just a little or completely opaque, the glitter sits like a charm from morning to evening and it is easy to apply over other eye shadows without the risk of sabotaging the makeup underneath. So whether you just want a few glitter grains over your eye shadow, a full-coverage glitter bomb on your eyelids or a glitter eyeliner - this way works great.

However, some of these liquids contain a lot of alcohol and then my eyes tear a lot because they "sniff" in the eyes. But Kryolan Cake Liner Sealer is gentle on the eyes and does not irritate anything at all. And I like that the packaging is a bottle with a spout as well. So good! Best I tested!

How to use:

1. The packaging is a small bottle with a spout which makes it easy to dispense out = does not waste the product and reduces unnecessary smudges. I usually take 1-2 drops on the back of the hand.

2. Dip the brush into the liquid. I usually want it moisturized, not completely wet but it must not be too dry because then the glitter does not stick to the brush later.

Choice of brush
Which brush is best depends entirely on what you want for results, I usually use a little different:

Comprehensive - A flat and compact brush that can dab on a large amount of glitter at once, then you can build up a comprehensive glitter layer. For example. Nanshy Flat Definer.

Tunt - Most often I use eye shadows under the glitter that shines through and then you do not need a full layer of glitter but a little is enough, it is a nice effect if the eye shadow under shines through. Then I use a softer brush but it still needs to be a bit compact. For example. Nanshy Tapered Crease.

Small areas - Nanshy Pencil Brush is absolutely perfect for applying glitter on small areas e.g. in the corner of the eye or under the eye! It is compact with a rounded, narrow top.

Eyeliner - An ordinary eyeliner brush works brilliantly to make a comprehensive glitter eyeliner! Nanshy has both a regular straight, Nanshy Eyeliner, and a little bent, Nanshy Bent Eyeliner, which some find easier to get precision with.

3. Dip the brush into the glitter, I usually dip straight into the bottle, but you can also pour a little on a kleenex napkin or toilet paper if you prefer.

Tip! Do not dip the brush more than necessary, it is better to just have a little glitter on top and dip more times than to have too much on the brush. If it falls under the eyes when you apply, it means that you have too much glitter on the brush. I never put loose powder or hold a napkin under the eye as protection, because nothing falls down when I apply anyway.

4. Then just apply! Use dot movements with the brush. The glitter attaches immediately, the liquid dries in a few seconds and then it stays superb all day.

Here above you see a thin layer where I applied with a soft brush (Nanshy Tapered Crease) which means that the glitter is not completely opaque. Should this be on an eye makeup, the eye shadow will still be visible underneath. This is the technology I myself use the most.

Tip! You do not have to dab a lot of glitter at all on your make-up, it is easy to pull on a full-covering layer which is very nice but can also result in the make-up feeling for glittery and in addition it is not as quick to get even and nice if it is a whole cake with glitter. Add a little at a time and see what you think, just a few glitter grains on your eye shadow are great and give a lot of effect immediately!

Tip 2! If you are going to do a full-coverage glitter make-up with faded edges, you can use a flat and compact brush on the eyelid and then in the fading you use this technique where the grains end up more sparse from each other. Because you can not erase the edges of the fade as with a regular eye shadow, so then this technique becomes instead of a fade :)

Here you also see that you can make a solid line like an eyeliner! I find it easier to make a glitter eyeliner than a regular black one.

If you have a good product to attach glitter with, it really is the fastest and easiest way to liven up your make-up - both for everyday and for parties! It is also great to "save up" a make-up if you are not completely satisfied, everything will be nice with glitter on;)

Hope you were inspired and that the post was helpful!

en_USEnglish